Web applications accessed using the web browser connects to the server and downloads all the HTML components including images,cascading style sheets – css, frames and iframes as well via HTTP requests. All these content is downloaded from Server via internet via HTTP requests. This results in time for loading the webpages.
IS there any possibility in preventing loading of web application contents??
The answer is Yes, it is possible using Selenium WebDriver tool which helps in preventing loading of HTML components.
They are three ways of loading the Page
- EAGER
- NORMAL
- NONE

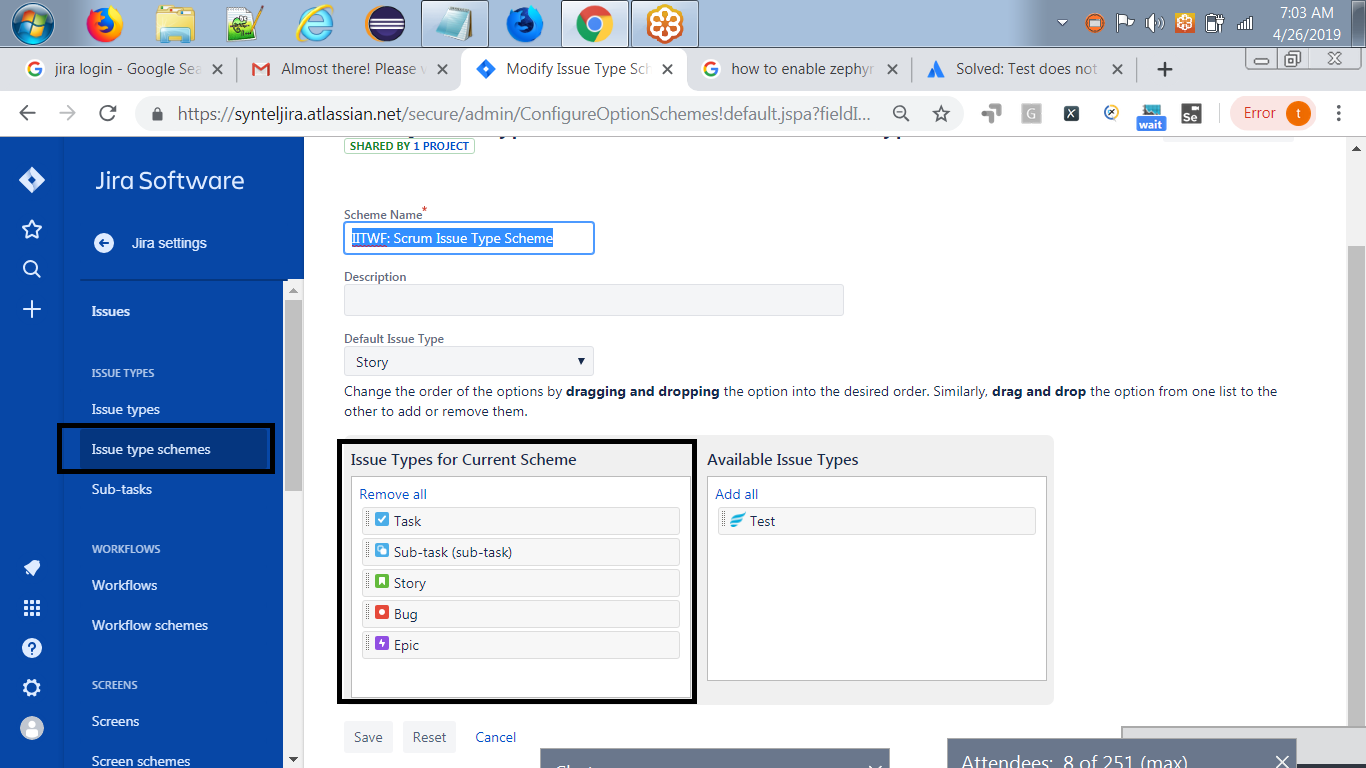
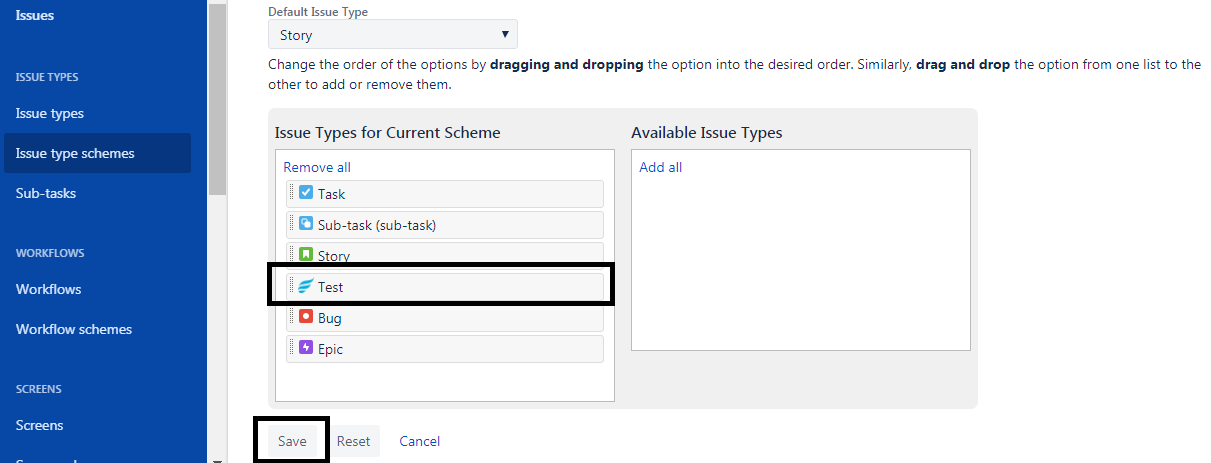
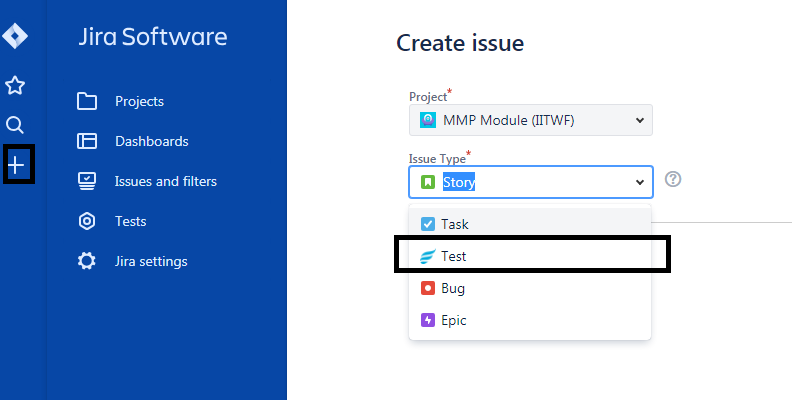
Preventing Page Loading
Page Loading Strategy: eager
Setting the Page Loading Strategy as eager, prevents loading of CSS,images and Subframes.
|
1 2 3 4 5 6 7 8 9 10 11 12 13 14 15 16 17 18 19 |
package totalqa; import org.openqa.selenium.PageLoadStrategy; import org.openqa.selenium.WebDriver; import org.openqa.selenium.chrome.ChromeOptions; import org.testng.annotations.Test; import org.openqa.selenium.chrome.ChromeDriver; public class EagerLoadStrategy { @Test public void pageloadStrategy() { ChromeOptions chromeOptions = new ChromeOptions(); chromeOptions.setPageLoadStrategy(PageLoadStrategy.NONE); WebDriver driver = new ChromeDriver(chromeOptions); driver.get("http://total-qa.com/"); driver.quit(); } } |
Refer to Time in milliseconds:

PageLoadingStrategy in Selenium WebDriver
Page Loading Strategy: normal
Setting the Page Loading Strategy as normal loads the CSS,images and Subframes as well. It loads all the components in the webpage.
|
1 2 3 4 5 6 7 8 9 10 11 12 13 14 15 16 17 18 19 |
package totalqa; import org.openqa.selenium.PageLoadStrategy; import org.openqa.selenium.WebDriver; import org.openqa.selenium.chrome.ChromeOptions; import org.testng.annotations.Test; import org.openqa.selenium.chrome.ChromeDriver; public class NormalLoadStrategy { @Test public void pageloadStrategy() { ChromeOptions chromeOptions = new ChromeOptions(); chromeOptions.setPageLoadStrategy(PageLoadStrategy.NORMAL); WebDriver driver = new ChromeDriver(chromeOptions); driver.get("http://total-qa.com/"); driver.quit(); } } |
Refer to Time in milliseconds:

PageLoadingStrategy in Selenium WebDriver
Page Loading Strategy: none
Setting the Page Loading Strategy as none waits until the initial page is loaded.
|
1 2 3 4 5 6 7 8 9 10 11 12 13 14 15 16 17 18 19 |
package totalqa; import org.openqa.selenium.PageLoadStrategy; import org.openqa.selenium.WebDriver; import org.openqa.selenium.chrome.ChromeOptions; import org.testng.annotations.Test; import org.openqa.selenium.chrome.ChromeDriver; public class NoneLoadStrategy { @Test public void pageloadStrategy() { ChromeOptions chromeOptions = new ChromeOptions(); chromeOptions.setPageLoadStrategy(PageLoadStrategy.NONE); WebDriver driver = new ChromeDriver(chromeOptions); driver.get("http://total-qa.com/"); driver.quit(); } } |
Refer to Time in milliseconds:

PageLoadingStrategy in Selenium WebDriver
Conclusion:
Preventing the web page from loading the html components is achieved using the Selenium WebDriver API.