Selenium IDE Recording and Playback – Get this Extension for Chrome


Selenium IDE is one of the important Component of Selenium. IDE stands for Integrated Development Environment useful for Record and Playback and helps for getting acquainted with Selenium Web-Driver.
The new version Selenium IDE is designed to record and playback interactions with different browsers such as ‘Mozilla Firefox’ and ‘Chrome‘.

Steps for downloading IDE on Firefox Browser(Pre-requisite – Firefox)

1. Download the Mozilla Firefox by accessing the link ->https://www.mozilla.org/en-US/firefox/new/

2. Access Firefox and open the URL http://seleniumhq.org.

3. Navigate to Download tab look for Selenium IDE.

4. Download latest released version of Selenium IDE for Firefox by clicking on the Link Firefox which redirects to the url ->
https://addons.mozilla.org/en-US/firefox/addon/selenium-ide/

Steps for downloading IDE on Chrome Browser(Pre-requisite – Chrome)

1. Download the Chrome Browser by accessing the link ->https://www.google.com/chrome/

2. Access Firefox and open the URL http://seleniumhq.org.

3. Navigate to Download tab look for Selenium IDE section.

4. Download latest released version of Selenium IDE for Firefox by clicking on the Link Firefox which redirects to the url ->
https://chrome.google.com/webstore/detail/selenium-ide/mooikfkahbdckldjjndioackbalphokd

Record and Playback the Scripts on Chrome Browser:

1. Open Selenium IDE.

Selenium IDE - Chrome Browser

Selenium IDE – Chrome Browser


2. Click on the link Record a new test in a new project.
Selenium IDE - Record a new test in a new project

Selenium IDE – Record a new test in a new project

3. Provide the project name and click on OK button.

Selenium IDE Project Name

Selenium IDE Project Name

4. Provide the Base URL and click on START RECORDING button.

Base URL -> http://www.seleniumhq.org

Base URL -> http://www.seleniumhq.org

5. A new Chrome browser opens with the Base URL. Perform the steps and check the recorded steps in the background.
Click on Stop Recording button in Selenium IDE to complete Recording.

Selenium IDE - Recording and playback on  Chrome Browser

Selenium IDE – Recording and playback on Chrome Browser

Conclusion:

Selenium IDE add-on helps us to record the steps on Chrome Browser as well.
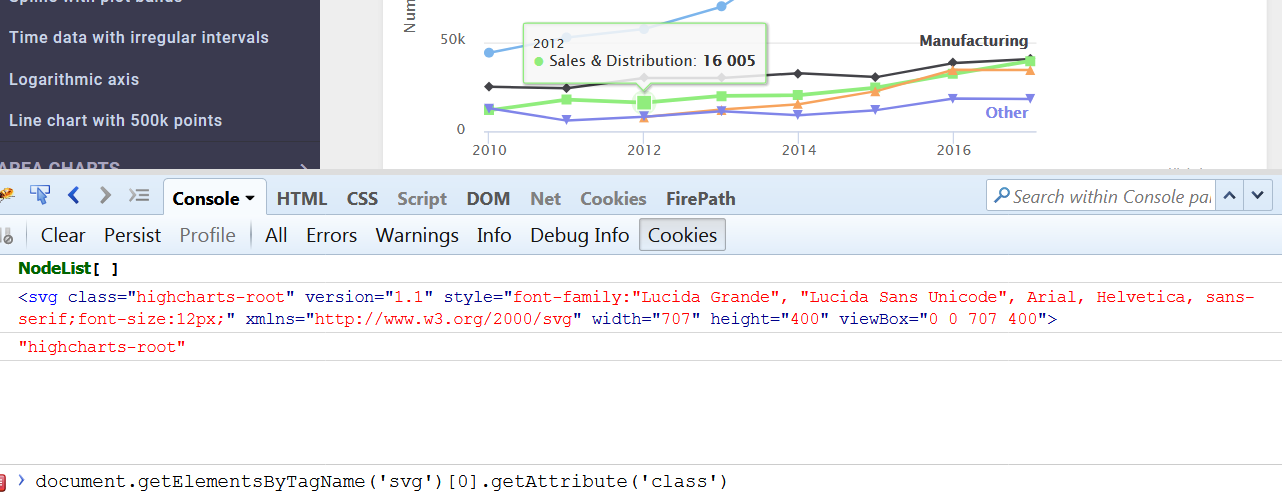
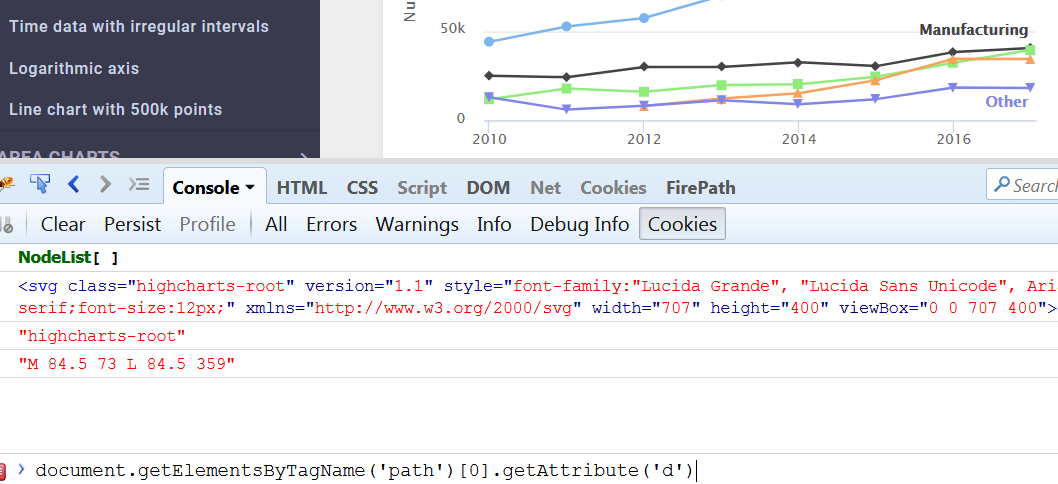
It also helps us to identify the properties of the Web-Elements available in the Web Application.

How to use Selenium Grid easily in 3 Steps?

      No Comments on How to use Selenium Grid easily in 3 Steps?


Selenium-Grid allows you run your tests on remote desktop against different Operating Systems like Windows,Linux,MAC and against different browsers like Opera,Safari,IE,Firefox and Chrome in parallel. Selenium-Grid allows running your tests in a distributed test execution environment.


Grid Architecture:

In Selenium-Grid, the Component Hub acts as a server receives the requests from Selenium WebDriver program and redirects requests to the Nodes which are configured to Hub. Refer to the details in the diagram mentioned below:

Grid Architecture

Grid Architecture


Installation:

Ensure the Selenium Standalone Server Jar is downloaded in Hub and Node Systems as well.
Download the Selenium Standalone Server Jar from this link -> http://selenium-release.storage.googleapis.com/index.html


Starting Hub:

The Hub is the central point that will receive all the test request and distribute them the the right nodes.
Open the new command line and execute the below command:
java -jar selenium-server-standalone-xxx.jar -role hub -port 4545


Starting Node 1:

Use the same http://selenium-release.storage.googleapis.com/index.html jar file to start the nodes and connect to the Hub.
Capabilities for Node 1:

  • Platform : WINDOWS
  • Browser Name: firefox
  • Browser Version:123

Open the new command line and execute the below command:


java -Dwebdriver.gecko.driver=”C:\\XXXX\\geckodriver-v0.23.0-win64\\geckodriver.exe”
-jar selenium-server-standalone-3.141.59.jar
-role webdriver
-browser “browserName=firefox,version=123,maxInstances=1,platform=WINDOWS”
-hubHost localhost
-hubPort 4444
-port 4546


Starting Node 2:

Use the same http://selenium-release.storage.googleapis.com/index.html jar file to start the nodes and connect to the Hub.
Capabilities for Node 2:

  • Platform : WINDOWS
  • Browser Name: chrome
  • Browser Version:40

Open the new command line and execute the below command:


java -Dwebdriver.chrome.driver=”C:\\XXXX\\chromedriver_win32\\chromedriver.exe”
-jar selenium-server-standalone-3.141.59.jar
-role webdriver
-browser “browserName=chrome,version=40,maxInstances=1,platform=WINDOWS”
-hubHost localhost
-port 4547


Selenium WebDriver Testng Program:


Results:


To check the ports which are reserved

To verify that the port number 4444 is in use. Execute the below command in the command line:
netstat -a -n | findStr 4444

Conclusion:

Selenium Grid is useful to run test cases remotely with specific capabilities.

[CSS Tips]white-space-hyphen-minus selenium

      No Comments on [CSS Tips]white-space-hyphen-minus selenium


In this tutorial we will discuss about the identifying the Selenium Locator for the Css (Cascading Style Sheets) in the following scenario’s

  • white spaces in an Web Element attribute value
  • hyphen-minus (-) in an Web Element attribute value
  • Attribute Selector
  • Type Selector


HTML Source Code for a Text-box having spaces for attribute id value:

Represents an element with the attribute whose value is a white space-separated list of words, one of which is exactly “val”.
id="pass word".

Syntax:

[att~=val]

Examples:

[id~=pass]
[id~=word]

Selenium Locators-Css white space

Selenium Locators-Css white space


HTML Source Code for a Text-box having hyphen-minus for attribute id value:

id="pass-word".

Syntax:

Represents an element with the attribute, its value either being exactly “val” or beginning with “val” immediately followed by “-”
[att|=val]

Examples:

[id|=pass]

Css attribute value having hyphen-minus special character

Css attribute value having hyphen-minus special character


Attribute Selector:

Match when the element sets the “att” attribute, whatever the value of the attribute.

Example:

[id] – Selects all the Elements having ‘id’ attribute.
[type]- Selects all the Elements having ‘type’ attribute.

Css Locator - identify all the elements having <id> as attribute

Css Locator – identify all the elements having type as attribute

Type Selector:

Matches every instance of element Type.

Example:

h1 – Selects all the elements having h1 as tag-name.
input- Selects all the elements having input as tag-name.

Type Selector in CSS

Type Selector in CSS

Conclusion:

In this topic we have discussed about Handling CSS attribute values from Selenium Web-driver perspective which are having white spaces and special characters hyphen-minus (-).

[Solved]SessionNotCreatedError: Unexpected error launching Internet Explorer


In this tutorial we will discuss about Fixing the issues that arises during execution of Selenium WebDriver tests against the browser Type Internet Explorer. Before Running Tests, make sure the following settings are updated for the Internet Explorer.

Browser Zoom Level

Access File Menu->View->zoom should be set to 100%.

Protected Mode Settings

Access File Menu->Tools-> Internet Options->Security.
Make sure the Protected Mode is enabled or disabled for all the Security Zones as listed below:

  • Internet Zone
  • Local intranet
  • Trusted Sites
  • Restricted Sites
Enabled or Disable Protected Mode

Enabled or Disable Protected Mode

Executable File

Add the IEDriverServer.exe to the eclipse project by downloading from the link https://www.seleniumhq.org/download/

Untrusted SSL Certificate

To Handle the SSL Certificates on IE Browsers use the following code snippet to Handle SSL Certificates. This logic clicks on the link Continue to this website(recommended)

driver.navigate().to(“javascript:document.getElementById(‘overridelink’).click()”);

Selenium WebDriver Program:

Conclusion

Therefore, setting the zoom to 100% and enabling or disabling the protected mode for all the security zones resolves the SessionNotCreatedError.

Software Testing Interview Questions

      1 Comment on Software Testing Interview Questions


Software Testing Interview Questions
In this article, we see best interview questions of Software Testing. Let’s get started.

What is Test Harness?
A test harness is the collection of software and test data configured to test a program unit by running it under varying conditions which involves monitoring the output with expected output.

What is Integration Testing?
Integration Testing is the process of testing the interface between the two software units. Integration testing is done by three ways. Big Bang Approach, Top Down Approach, Bottom-Up Approach

What is Adhoc Testing?
Ad-hoc testing is quite opposite to the formal testing. It is an informal testing type. In Adhoc testing, testers randomly test the application without following any documents and test design techniques. This testing is primarily performed if the knowledge of testers in the application under test is very high. Testers randomly test the application without any test cases or any business requirement document.
What are the principles of Software Testing?
1. Testing shows presence of defects
2. Exhaustive testing is impossible
3. Early testing
4. Defect clustering
5. Pesticide Paradox
6. Testing is context depending
7. Absence of error fallacy

What is Defect clustering?
Defect clustering in software testing means that a small module or functionality contains most of the bugs or it has the most operational failures.

What is Pesticide Paradox?
Pesticide Paradox in software testing is the process of repeating the same test cases, again and again, eventually, the same test cases will no longer find new bugs. So to overcome this Pesticide Paradox, it is necessary to review the test cases regularly and add or update them to find more defects.

What is Bug Leakage?
A bug which is actually missed by the testing team while testing and the build was released to the Production. If now that bug (which was missed by the testing team) was found by the end user or customer then we call it as Bug Leakage.

What is Showstopper Defect?
A showstopper defect is a defect which won’t allow a user to move further in the application. It’s almost like a crash.
Assume that login button is not working. Even though you have a valid username and valid password, you could not move further because the login button is not functioning.

What is State Transition?
Using state transition testing, we pick test cases from an application where we need to test different system transitions. We can apply this when an application gives a different output for the same input, depending on what has happened in the earlier state.

What is Defect Age?
Defect age can be defined as the time interval between date of defect detection and date of defect closure.
Defect Age = Date of defect closure – Date of defect detection
Assume, a tester found a bug and reported it on 1 Jan 2016 and it was successfully fixed on 5 Jan 2016. So the defect age is 5 days.

If you have any queries, please comment below.

Author bio: Rajkumar SM is a founder of SoftwareTestingMaterial.com. He is a certified Software Test Engineer. He has an extensive experience in the field of Software Testing.

[solved]java.lang.IllegalStateException – Driver not executable on MAC


In this tutorial we will discuss how to solve the java.lang.IllegalStateException on MAC during the execution of tests on Chrome Browser.
Before getting into point, we will discuss about File Permissions on Unix platform. Each and every file in Unix has following attributes:

  • Owner: Owner of the file
  • Group: User belongs to a particular Group
  • Other: Other users

To view permissions of any file on unix use the following command:
total-qa$ ls -l chromedriver
-rw-r--r-- 1 25399 25399 chromedriver

Changing Permissions

We can modify the permissions of a file by providing following Access:

  • Read
  • Write
  • Execute

To provide all the read,write and execute permissions for all the attributes Group,Owner and Others for a file in Unix use the following command in the terminal as mentioned below:

total-qa$ chmod 777 chromedriver
Owner :4 (read) + 2 (write) + 1 (execute) = 7 rwx
Group :4 (read) + 2 (write) + 1 (execute) = 7 rwx
Others :4 (read) + 2 (write) + 1 (execute) = 7 rwx

We can even update the permissions of the File in Eclipse directly as well.

1. Right Click on the project and select the Properties.

chromedriver properties on MAC

chromedriver properties on MAC


2. Select all the Read,Write and Execute permissions for Owner,Group and Others.
chmod:777 - Read,Write,Execute permissions for Owner,Group and Other Attributes

chmod:777 – Read,Write,Execute permissions for Owner,Group and Other Attributes

Conclusion:

Modifying the permissions of the file executes the chromedriver and launches the Chrome Browser successfully.

java-semicolon after for loop,while loop,if statement


In this tutorial we will discuss about the problem by adding the semicolon after for-loop,while-loop and if-statement. This concept is very important to know from Selenium WebDriver perspective as well. We mainly use for-loop for iterating the List of WebElements.
Also, one important key-note here is adding semicolon does not throw any compilation error in Eclipse.
So, it would be difficult to understand the reason why the code is not working as expected.
Else we can depend on the static code checking tools such as following which helps in identifying those issues.

Semicolon

java-semicolon after for loop,while loop,if statement

Adding Semicolon for if-Statement:

int i = 1;
if(i==2);//condition is false
{
System.out.println("if-statement");//Empty Statement will be executed
}

Output:

if-statement

Conclusion:

if(i==2); Adding semi-colon for if-statement the line is ended.
The code in the curly braces executes irrespective of the condition is true or false.


Adding Semicolon for for-loop:


for(int i=0;i>10;i++);//condition is false
{
System.out.println("in for-loop");//Empty Statement will be executed
}

Output:

in for-loop

Conclusion:

for(int i=0;i>10;i++); Adding semi-colon for-loop the line is ended.
The code in the curly braces executes irrespective of the condition is true or false.


Adding Semicolon for while-loop:

int j = 1;
while(j>10);
{
System.out.println("in while-loop");//Empty statement will be executed.
}

Output:

in while-loop

Conclusion:

while(j>10); Adding semi-colon for while-loop ends the line.
The code in the curly braces executes irrespective of the condition is true or false.

Therefore adding the semicolon executes the empty statements without any errors.

Highlighting the Empty Statements with Errors in Eclipse

Enable Empty Statement

Enable Empty Statement


Enabling Empty Statements shows the following Errors during compilation in Eclipse:
Empty Statement Errors

Empty Statement Errors


Automating SVG and Interactive Charts in Selenium-JavascriptExecutor


In this tutorial we will discuss about automating the Interactive Charts and SVG [Scalable Vector Graphics] in Selenium.

To automate these Interactive Charts, Selenium Locators such as Xpath and Css-Selector are not helpful. We should depend on an Interface called JavascriptExecutor to identify the SVG and read the values available in these charts.

Javascript Commands:

Reading Attributes of SVG graph[Scalable Vector Graphics]
document.getElementsByTagName('svg')[0].getAttribute('class')

Scalable Vector Graphics - SVG

Scalable Vector Graphics – SVG


Reading Data from the Chart
document.getElementsByTagName('path')[0].getAttribute('d')
Interactive Chart-Line Chart

Interactive Chart-Line Chart

Executing the Javascript Commands in Selenium WebDriver

Output:

M 84.5 73 L 84.5 359
Basic line | Highcharts


References:

JavaScript HTML DOM Document
Interactive Charts

Conclusion:

Therefore, using Javascript Commands we can automate the SVG and Interactive Charts in Selenium.

DevOps Tutorial-3 Triggering CI Build with Github Push Notifications


In this tutorial we will learn about triggering the CI Build with Git Hub Push notifications or Pull notifications automatically by using Jenkins Web Hook URL.
The Jenkins Web Hook URL needs to be added in the GitHub Repository. These Web Hook helps to detect changes in the Git Hub and trigger the Jenkins JOB automatically. Please follow the steps to enable this in Git Hub and Jenkins.

Enable Communication between Jenkins and Git Hub

1. Access the Jenkins URL.
2. Navigate to Manage Jenkins->Configure System->Git Hub Section. Click on Add to provide the Credentials as mentioned below. For Generating the Secret Text Click on this link and generate the Token and update accordingly.
ID: Github1

New personal access token

New personal access token


Jenkins->Git Hub Server

Jenkins->Git Hub Server


3. Navigate to the Git Hub Repository URL click on Integration Services and Add Service as Jenkins(GitHub plugin).
Git Hub Integration Plugin

Git Hub Integration Plugin


4. Configure the Web Hook in the Git Hub Repository Settings as shown below:
Payload URL : Jenkins URL + /github-webhook/
Git HubWebhook Configuration

Git HubWebhook Configuration

5. Provide the Secret Key generated in the Step 2 nothing but the Token. In addition to that select the Events to trigger this Web Hook.

  • Enable Pushes
  • Enable Pull request reviews

Git Hub Events Push and Pull

Git Hub Events Push and Pull

6. Select the Active Checkbox and Add the Web Hook.

7. Navigate to Git Hub Repository URL update the Review Comments for the Pull Request.

8. Access the Web Hook under the Repository Settings and check the payload information.

Web Hook Payload

Web Hook Payload

9. Click on Redeliver Button to send the payload again and verify the response.

Issues

Stack Over Flow: Web Hook Connectivity Issues to Jenkins

Conclusion:

Using Web Hooks in Git Hub we can configure events such as Push and Pull which triggers the Jenkins Job automatically.

References

DevOps tutorial Series

DevOps Tutorial-2 Resolve merge conflicts in Git and GitHub


In this tutorial we will learn about resolving the merge conflicts in Git and Github. Git can often resolve differences between merged branches. Usually, the changes are on different lines, or even in different files, which makes the merge simple for computers to understand.

However, sometimes there are competing changes that Git needs your help with to decide which changes to incorporate in the final merge. Often, merge conflicts happen when people make different changes to the same line of the same file, or when one person edits a file and another person deletes the same file. You must resolve the conflict before you can merge the branches.

Lets discuss this scenario in detail:

1. Generally developers or testers create a new branch and modify the HelloWorld.java in there own branch Fix_Bug01.

Creating a new branch for safely experimenting the changes

Creating a new branch for safely experimenting the changes


Adding a new line

Adding a new line


2. During the same time if another team member modify the same file and same lines in the master branch in the Github Repository.
Updating the File in Github master branch

Updating the File in Github master branch


Committing the changes

Committing the changes


3. In Local Repository if the master branch is refreshed from Global Repository and try to merge these changes in the branch Fix_Bug01 which introduces the merge conflicts.
Refresh the Master

Refresh the Master


Conflicts due to changes in the same file and same line

Conflicts due to changes in the same file and same line


4. Fixing the merge Conflicts by ignoring the lines which are not required.
Merge Conflicts

Merge Conflicts

Deleted the unnecessary lines of code

Deleted the unnecessary lines of code


5. Execute the below commands in the Git bash to resolve the merge conflict.
git status

git add

git commit -m "Commit Message"

Fixing the merge conflicts

Fixing the merge conflicts

Conclusion:

In this example we have learnt how to resolve the merge conflicts in Github and Git.