Resolution for the Error ->Current Branch is not configured for Pull. No Value for key remote.origin.url found in configuration.
In Github , during the creation of branch we should make sure to select the option configure upstream for push and pull. What happens if this option is not selected?? This causes the “git pull” operation causing the error. In this post we are going to discuss on now fixing the error in Eclipse as follows:
configure upstream for push and pull
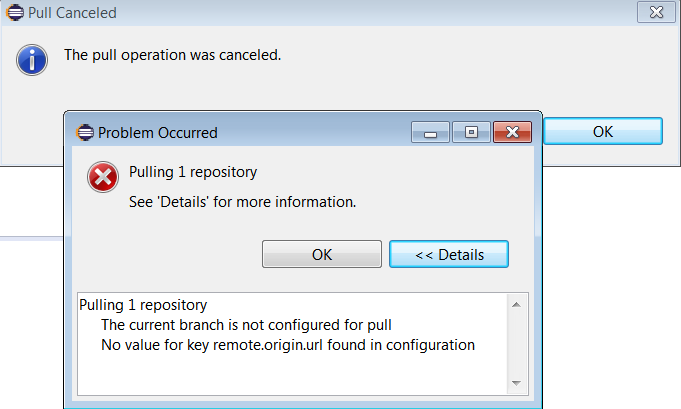
Right Click on the project in Eclipse->Team->Git Pull throws the following Error:
Pulling 1 repository The current branch is not configured for pull No value for key remote.origin.url found in configuration
How do we resolve this Error now???
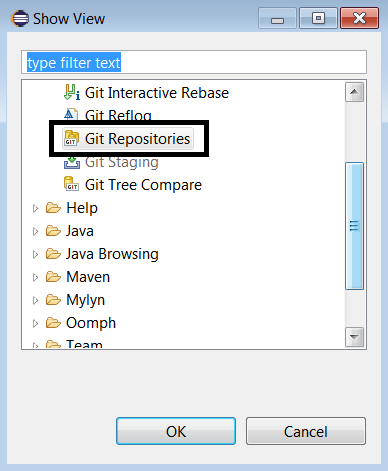
Navigate to the Eclipse Menu->Window->Show View->Other->Git Repositories.
GitRepositories
Update the Config File in the Repository as mentioned below:
What is the statement **refs/heads/PullRequestError** in the config file refer to ??
The ref in the URL must be formatted as heads/<branch name> for branches and tags/<tag name> for tags. If the ref doesn’t exist in the repository, but existing refs start with ref they will be returned as an array. If the ref doesn’t match an existing ref or any prefixes, a 404 is returned.
TestNG is a java framework useful to execute the Unit Tests in a java project. We can even TestNG to automate the Selenium Tests in the Project.In TestNG xml file, the execution of Tests is managed by setting the “parallel” attribute and “thread-count” attribute in the suite xml as follows:
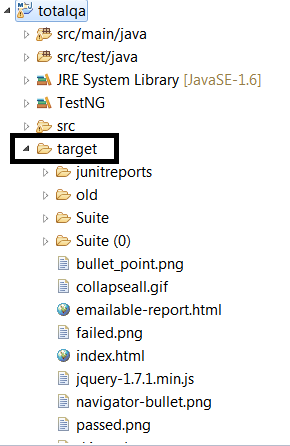
Execution of the ParallelSuites.java program, stores the Results in the output folder.Make sure the Project is refreshed to view the results as mentioned below:
TestNG allows you to group your tests and also allows to pass Test Parameters using parameter tag in the TestNG xml file.
You can then execute one or more specific groups such as Sanity,Regression or Functional Tests based on the requirement and passing the parameter values to the testng.xml using maven-surefire-plugin via pom.xml the following configuration is helpful.
1
2
3
4
5
6
7
8
9
10
11
12
13
14
15
16
<plugins>
<plugin>
<groupId>org.apache.maven.plugins</groupId>
<artifactId>maven-surefire-plugin</artifactId>
<version>3.0.0-M3</version>
<configuration>
<suitexmlFiles>
<suiteXmlFile>testng.xml</suiteXmlFile>
</suitexmlFiles>
<systemPropertyVariables>
<propertyName>urlValue</propertyName>
</systemPropertyVariables>
<groups>sanity,regression</groups>
</configuration>
</plugin>
</plugins>
Passing the specific group name from the Command Line is achieved by updating the configuration of maven-sure-fire plugin as follows:
PhantomJS is a headless web browser scriptable with JavaScript which is similar to HTMLUnitDriver. Click on this link to view the examples of the HTMLUnitDriver.
PhantomJS runs on Windows, macOS, Linux, and FreeBSD. Currently the PhantomJS development is stopped due to less support from the group.
Pros of Headless Browser:
Headless browser executes the scripts faster then the real browser.
Helps us in improves the performance execution of the scripts.
Headless browser saves time.
Cons of Headless Browser:
Headless browser does not mimic the real execution of the test-cases.
It not possible to view the steps visually during the execution of the test-cases.
1. Add the following dependency in the pom.xml to add the PhantomJS Library to the build path:
1
2
3
4
5
<dependency>
<groupId>com.github.detro.ghostdriver</groupId>
<artifactId>phantomjsdriver</artifactId>
<version>1.0.3</version>
</dependency>
2. Instead of the setting the path to the Phantom JS executable. Use the WebDriverManager class ensure the following depedency is added in the maven project object model (pom.xml) file.
1
2
3
4
5
<dependency>
<groupId>io.github.bonigarcia</groupId>
<artifactId>webdrivermanager</artifactId>
<version>3.2.0</version>
</dependency>
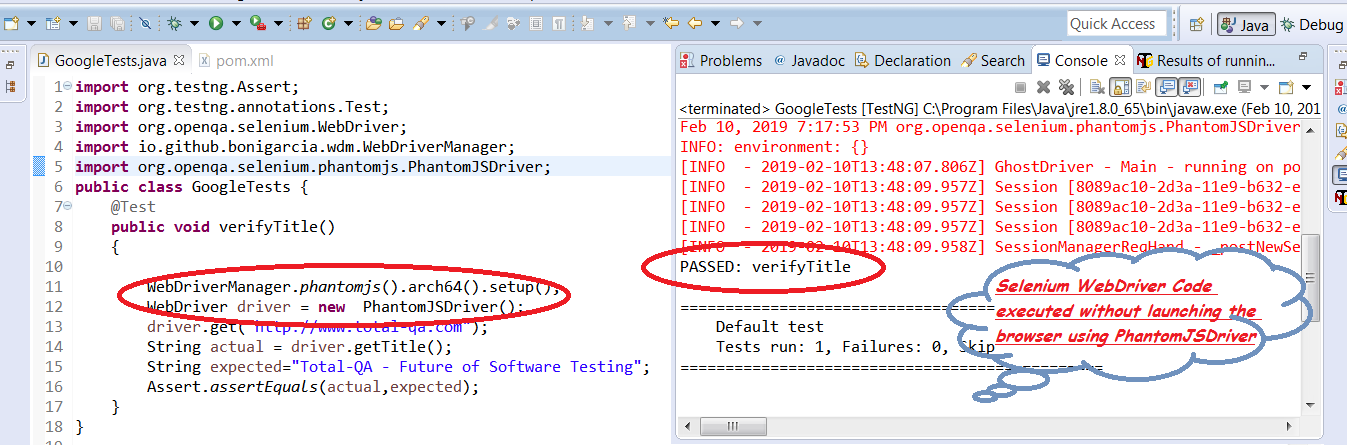
3. Execute the below code in eclipse and verify the results.
1
2
3
4
5
6
7
8
9
10
11
12
13
14
15
16
17
18
19
20
import org.openqa.selenium.WebDriver;
import org.openqa.selenium.chrome.ChromeDriver;
import org.testng.Assert;
import org.testng.annotations.Test;
import io.github.bonigarcia.wdm.WebDriverManager;
publicclassGoogleTests{
@Test
public void verifyTitle()
{
WebDriverManager.chromedriver().setup();
WebDriver driver=new ChromeDriver();
driver.get("http://www.total-qa.com");
String actual=driver.getTitle();
String expected="Total-QA - Future of Software Testing";
Assert.assertEquals(actual,expected);
}
}
Conclusion
Selenium Code executed successfully without launching the Browser.
Selenium WebDriver automation tool is mainly useful to run tests against multiple Browsers such as Chrome Browser,Firefox Browser,Internet Explorer Driver.Running the tests against multiple browsers is known as Cross Browser Testing.
To launch the Browser in Selenium WebDriver we need to set the path of the executable available in the laptop. Following that we have to instantiate the driver instance based on the Driver instance. In order to avoid these steps we can use the WebDriverManager class.
WebDriverManager
WebDriverManager allows to automate the management of the binary drivers (e.g. chromedriver, geckodriver, etc.) required by Selenium WebDriver.
Using WebDriverManager its not required to maintain the below lines of the code for launching the browser.
Selenium WebDriver automation tool is mainly useful to run tests against multiple Browsers such as Chrome Browser,Firefox Browser,Internet Explorer Driver.Running the tests against multiple browsers is known as Cross Browser Testing.
To launch the Browser in Selenium WebDriver we need to set the path of the executable available in the laptop. Following that we have to instantiate the driver instance based on the Driver instance. In order to avoid these steps we can use the WebDriverManager class.
WebDriverManager
WebDriverManager allows to automate the management of the binary drivers (e.g. chromedriver, geckodriver, etc.) required by Selenium WebDriver.
Using WebDriverManager its not required to maintain the below lines of the code for launching the browser. System.setProperty(“webdriver.chrome.driver”, “/path/to/binary/chromedriver”);
System.setProperty(“webdriver.gecko.driver”, “/path/to/binary/geckodriver”);
System.setProperty(“webdriver.opera.driver”, “/path/to/binary/operadriver”);
System.setProperty(“phantomjs.binary.path”, “/path/to/binary/phantomjs”);
System.setProperty(“webdriver.edge.driver”, “C:/path/to/binary/MicrosoftWebDriver.exe”);
System.setProperty(“webdriver.ie.driver”, “C:/path/to/binary/IEDriverServer.exe”);
WebDriverManager Maven Depdendency
To use the WebDriverManager class ensure the following depedency is added in the maven project object model (pom.xml) file.
The java.awt.Robot class is mainly useful to perform native actions where keyword and mouse actions to be performed. This actions are helpful for automation. If the current platform configuration does not allow input controls, an AWTException will be thrown when using the java.awt.Robot class. In this post we will java.util.Robot class for capturing the screenshots. The method createScreenCapture(Rectangle screenRect) is available in java.awt.Robot class which helps to create an image containing pixels read from the screen.The java.awt.Rectangle object to be passed as an parameter for capturing the screenshot. To create an Rectangle object the java.awt.Dimension[Height*Width] object to be passed as an parameter.
API Classes and Methods useful to capture the Screenshot as follows:
Robot Class Object
Rectangle Class Object
Dimension Class Object- Input Parameters Height * Width
Selenium WebDriver Code
1
2
3
4
5
6
7
8
9
10
11
12
13
14
15
16
17
18
19
20
21
22
23
24
25
26
27
28
29
30
31
32
33
34
35
36
37
38
39
import java.awt.AWTException;
import java.awt.Rectangle;
import java.awt.Robot;
import java.awt.Toolkit;
import java.awt.image.BufferedImage;
import java.io.File;
import java.io.IOException;
import javax.imageio.ImageIO;
import org.openqa.selenium.firefox.FirefoxDriver;
publicclassCaptureScreenshotRobot{
public void captureScreenshot(String testcase_testStep_ID)throws IOException,AWTException
To identify particular pattern of regular expressions in Strings is achieved in JAVA by using the API java.util.regex. This API consists of two main java classes such as Matcher and Pattern classes. Also we can even use String Functions to identify the particular pattern of regular expressions in the String class.
Pattern Class
A regular expression specified as a String is passed into an instance of this class.
The output is used to create a Matcher object that can match the character sequences against the regular
expression.
Static methods available in the Pattern Class as follows:
pattern()
split()
matcher()
compile()
matches()
Matcher Class
This java class helps to matches the character sequences by interpreting the pattern.
Static Matcher Methods in the API:
start()
end()
group()
Identify the List of Strings Starts with a particular letter
1
2
3
4
5
6
7
8
9
10
11
12
13
14
15
16
17
18
19
20
21
22
23
24
25
26
27
28
29
30
31
32
33
34
35
36
import java.util.ArrayList;
import java.util.List;
import java.util.regex.Matcher;
import java.util.regex.Pattern;
/**
*
* Print all the list of Strings starts with particular character
Result:: false
Result:: false
Result:: false
Result:: true
Start index: 0 End index: 1 Group value::t
String Functions to identify the Regular Expressions:
startsWith(String prefix)
endsWith(String suffix)
contains(CharSequence s)
Identify the List of Strings Starts with a particular letter using String Functions
1
2
3
4
5
6
7
8
9
10
11
12
13
14
15
16
17
18
19
20
21
22
23
24
25
26
27
28
29
30
31
32
33
34
35
36
37
38
39
40
41
42
43
44
import java.util.ArrayList;
import java.util.List;
publicclassStringFunctions{
public static void main(String[]args){
/*
print all the names start with a particular character
print all the names ends with a particular character
print all the names contains as part of the String
*/
List<String>list=new ArrayList<String>();
list.add("total-qa");
list.add("javatpoint");
list.add("guru99");
list.add("tutorialpoint");
for(inti=0;i<list.size();i++)
{
String str=list.get(i);
boolean result=str.startsWith("t");
if(result)
System.out.println("String starts with a particular character:::"+str);
}
for(inti=0;i<list.size();i++)
{
String str=list.get(i);
boolean result=str.endsWith("9");
if(result)
System.out.println("String ends with a particular character:::"+str);
}
for(inti=0;i<list.size();i++)
{
String str=list.get(i);
boolean result=str.contains("a");
if(result)
System.out.println("String contains with a particular character:::"+str);
}
}
}
Output of the Program:
String starts with a particular character:::total-qa
String starts with a particular character:::tutorialpoint
String ends with a particular character:::guru99
String contains with a particular character:::total-qa
String contains with a particular character:::javatpoint
String contains with a particular character:::tutorialpoint
Conclusion:
Using the String functions and java.util.regex API, identification of the pattern in the given Strings is possible using the above examples.
List is a type of Collection mainly useful to store the Objects which are duplicates as well. Its available in the package java.util.List. The behavior of the List is implemented by the java classes
ArrayList
LinkedList
Vector
Java Mock Interview Questions about java.util.List as follows:
1. Adding an new item to the List
2. Adding an new item first to the List.
3. Adding an item from in the middle of the List.
1
2
3
4
5
6
7
8
9
10
11
12
13
14
15
16
17
18
19
20
21
22
package totalqa;
import java.util.ArrayList;
import java.util.List;
publicclassListExamples{
public static void main(String args[])
{
List<String>list=new ArrayList<String>();
list.add("abc");
list.add("def");
//Adding an new item first to the List.
list.add(0,"ghi");
// Adding an item from in the middle of the List.
list.add(1,"jkl");
for(inti=0;i<list.size();i++)
{
System.out.println(list.get(i)+":::"+i);
}
}
}
4. Remove an item from the List.
5. Remove an item from the List at particular index.
6. Update an item from the List.
1
2
3
4
5
6
7
8
9
10
11
12
13
14
15
16
17
18
19
20
21
22
23
24
25
26
27
28
29
package totalqa;
import java.util.ArrayList;
import java.util.List;
publicclassListExamples{
public static void main(String args[])
{
List<String>list=new ArrayList<String>();
list.add("item1");
list.add("item2");
list.add("item3");
list.add("item4");
//Remove an item from the List.
list.remove("item2");
//Remove an item from the List at particular index.
list.remove(2);
//Update first item in the List
list.set(0,"item1update");
for(inti=0;i<list.size();i++)
{
System.out.println(list.get(i)+":::"+i);
}
}
}
Conclusion:
Addition,Deletion and Updating the items of List is achieved using the methods available in the java.util.List package.
In Testing it is important to provide input data to complete the execution of Test-cases. Irrespective of any type of testing such as Functional Testing,Integration Testing,System Testing and Performance Testing the input data plays a vital role.
In Automation tools such as Selenium WebDriver the input data can be maintained in three different ways:
1. Maintain parameters in the testng.xml. Read the parameter values using @Parameters annotation.
2. Maintain input data in the Excel File. Read the data and pass the values using @DataProvider annotation.
3. Input Data in the properties file.
In the above 3 cases, the input data stored is static. If we suppose, the dynamic data should be generated used in the execution flow of test cases. We have to Java API to generate the dynamic data.
So, we will go through now how to generate the random/dynamic input data.
Note:
Do not get confuse with the dynamic object properties. In this post we are discussing about only the input data.
Generating two digit Random Number
java.util.Random is a java class available for generating random integers.
1
2
3
4
5
6
7
8
9
10
11
12
13
package totalqa;
import java.util.Random;
publicclassDynamicInputData{
public static void main(String args[])
{
int uLimit=99;
int lLimit=10;
int val=lLimit+rand.nextInt(uLimit-lLimit);
System.out.println("2 digit Random Number:"+val);
}
}
Generating three digit Random Number
1
2
3
4
5
6
7
8
9
10
11
12
13
package totalqa;
import java.util.Random;
publicclassDynamicInputData{
public static void main(String args[])
{
int uLimit=999;
int lLimit=100;
int val=lLimit+rand.nextInt(uLimit-lLimit);
System.out.println("3 digit Random Number:"+val);
}
}
Generating Random ASCII Character
To generate the random characters we should glance through the ASCII table from this link. http://www.asciitable.com/
Lower Case Alphabets– Decimal Number Ranging from 97 to 122Upper Case Alphabets– Decimal Number Ranging from 65 to 90

![[branch "PullRequestError"] remote = origin merge = refs/heads/PullRequestError](https://total-qa.com/wp-content/uploads/2019/04/GitConfigFile.png)