Execute Selenium WebDriver Tests from Jenkins 2.0 Pipeline


Pipelines allows Jenkins to support continuous integration (CI) and Continous Delivery (CD). Pipeline are nothing but the Jenkins jobs the simple text scripts are based on Groovy Programming language. Pipeline terms such as “Step”, “Node” and “Stage” are subset of vocabulary using in Jenkins.

Step:
It defines the Single task which is part of the sequence tell Jenkins what to do.

Node:
A “node” means any computer that is part of your Jenkins installation.

Stage:
A “stage” is comprised of one or more build steps.

Pre-requisites:
Download Jenkins 2.0 from this link https://jenkins.io/download/ which is recommended.
Core Pipeline Plugin

Plugin Name – Pipeline:
In this tutorial we will learn about using Pipeline plugin and its usage.
It allows Jenkins to execute the Pipeline API and Basic Steps.
Download the Pipeline Plugin from this link https://wiki.jenkins.io/display/JENKINS/Pipeline+Plugin

SCM’s:
Git Plugin

Cloud Plugins{optional}:
Docker
ec2
Jenkins Environmental Variables:
echo “BUILD_NUMBER” :: $BUILD_NUMBER
echo “BUILD_ID” :: $BUILD_ID
echo “BUILD_DISPLAY_NAME” :: $BUILD_DISPLAY_NAME
echo “JOB_NAME” :: $JOB_NAME
echo “JOB_BASE_NAME” :: $JOB_BASE_NAME
echo “BUILD_TAG” :: $BUILD_TAG
echo “EXECUTOR_NUMBER” :: $EXECUTOR_NUMBER
echo “NODE_NAME” :: $NODE_NAME
echo “NODE_LABELS” :: $NODE_LABELS
echo “WORKSPACE” :: $WORKSPACE
echo “JENKINS_HOME” :: $JENKINS_HOME
echo “JENKINS_URL” :: $JENKINS_URL
echo “BUILD_URL” ::$BUILD_URL
echo “JOB_URL” :: $JOB_URL

Note:
Any of the Jenkins Environmental Variables are used in the Pipeline Script in the following way:
echo ${env.BUILD_NUMBER}

Creating a Simple Pipeline Script:

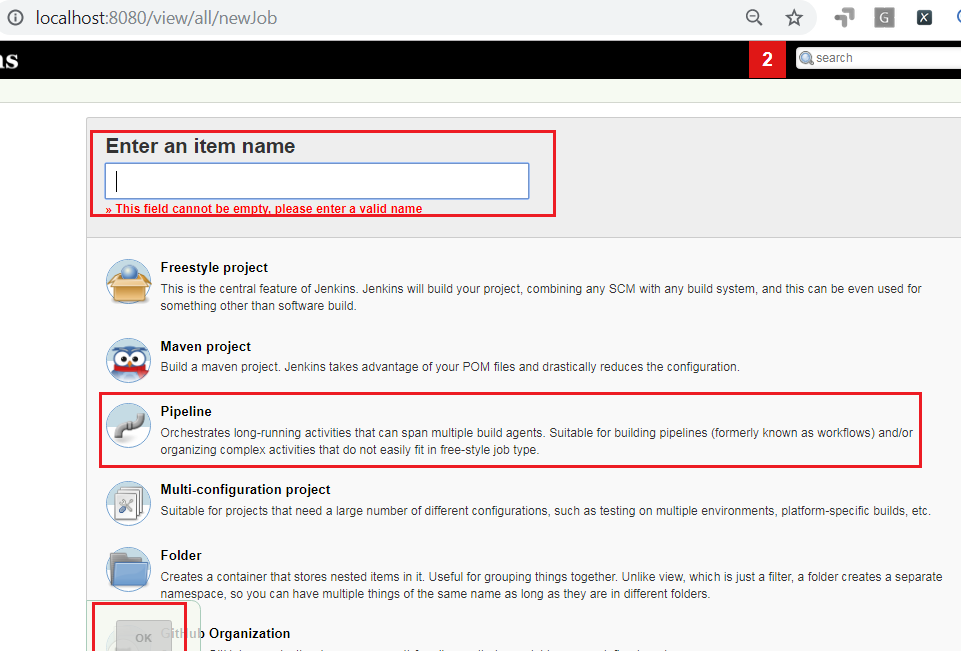
1. Open the Jenkins Home Page URL. Click on New Item in Jenkins home Page.

2. Provide the new item name. Select the Pipeline option. Click on OK button.

Jenkins Pipeline Script Example

Jenkins Pipeline Script Example

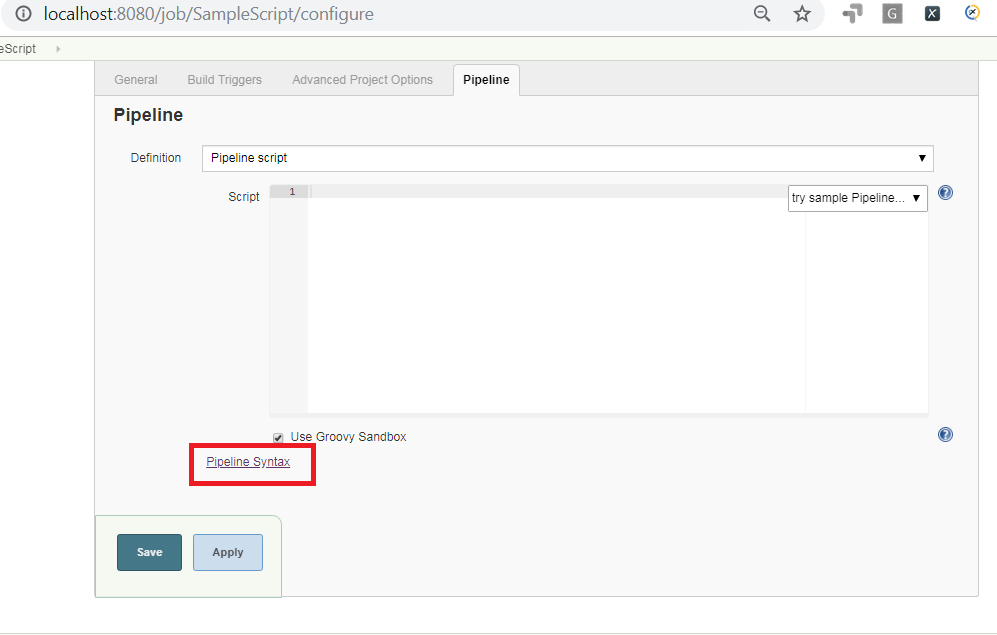
3. Open the Jenkins job created in Step2. Click on Configure->Pipeline Syntax link to generate the Script automatically.

Pipeline Syntax Example

Pipeline Syntax Example

3. Create a Jenkinsfile with the pipeline script mentioned below:

Github Repository-> Link

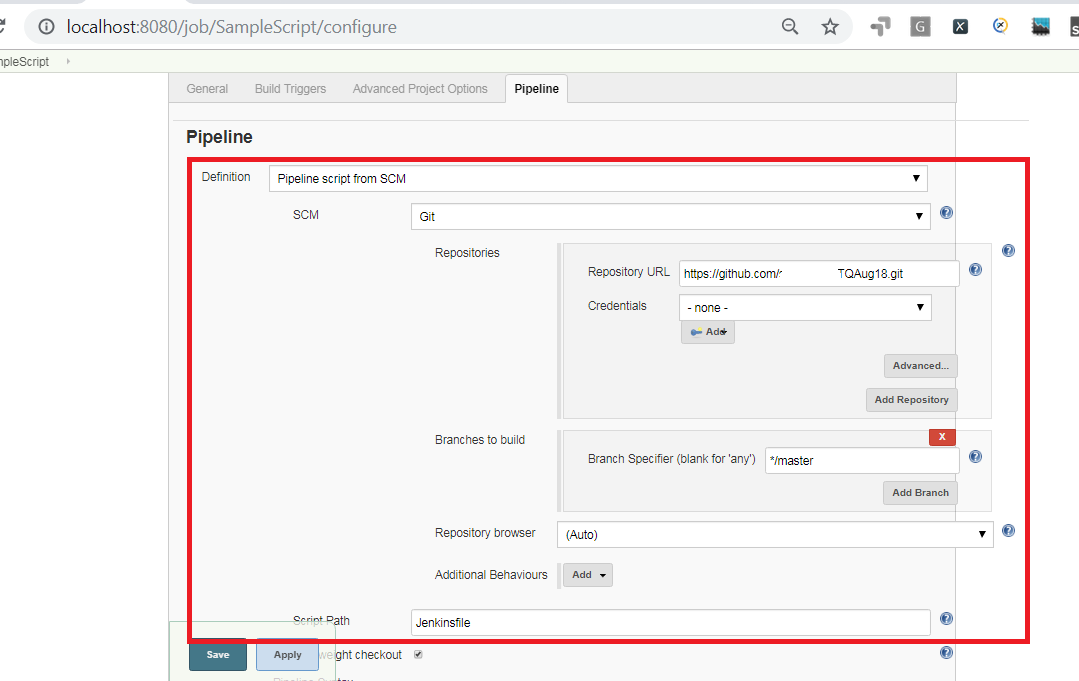
4. Configure the Jenkins job created in Step2. Refer to the Jenkinsfile from the Github Repository.

Jenkins Pipeline SCM Configuration

Jenkins Pipeline SCM Configuration

5. Click on Build Now to execute the Job Successfully.

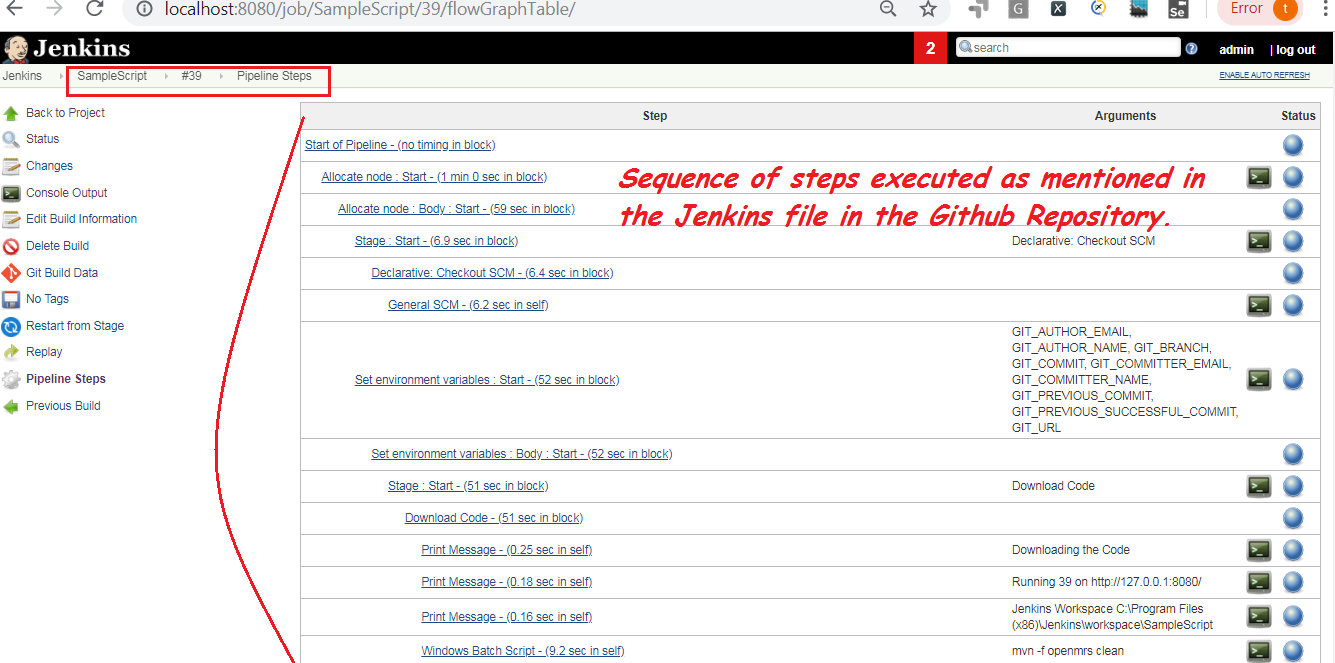
6. Open the JOB Console to view the Results.
JenkinsfileExecution

JenkinsfileExecution

Uploading the Sonarlint results to SonarQube[Cloud Server]


Before getting into this tutorial please read the information about the Sonarlint by clicking on this link.
Sonarlint helps the developer analyzes the code quality on the fly and displays the scan results. Now the Question is, would it be possible to push these results to SonarQube.

What is SonarQube??

SonarQube provides the capability of displaying the results in a Dashboard. And it also helps to configure the Quality Gate to improve the Code Quality. If we want to publish the results from Sonarlint to SonarQube the code does not require any compilation. Once the code scans are done we can push the results directly into SonarQube.

Bind the Sonarlint to SonarQube:

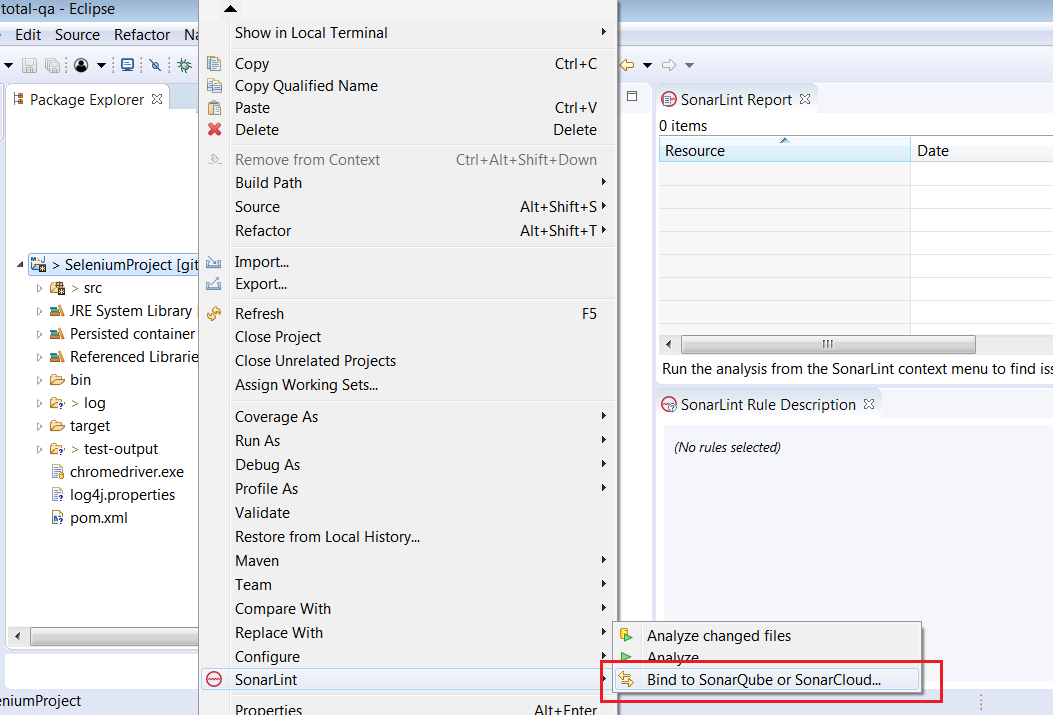
Right click on the project in Eclipse Select Sonarlint->Bind to SonarQube to SonarCloud option as mentioned below:

Binding Sonarlint to SonarQube or SonarCloud

Binding Sonarlint to SonarQube or SonarCloud

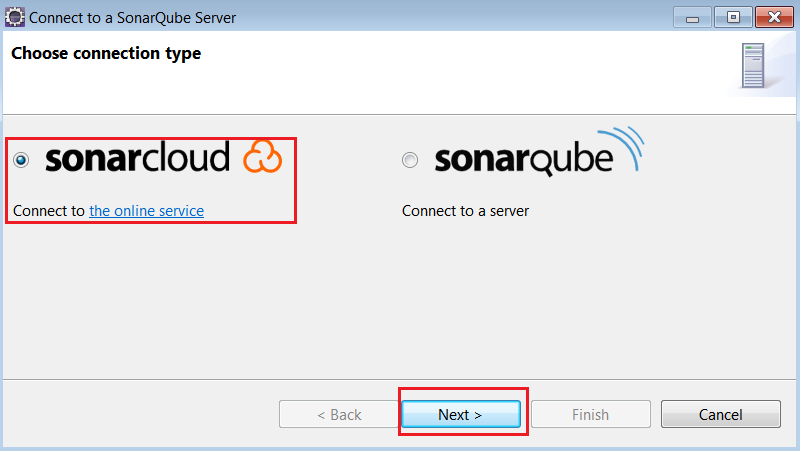
Select the connection type as SonarCloud and click on Next button.

SonarCloud Connection

SonarCloud Connection

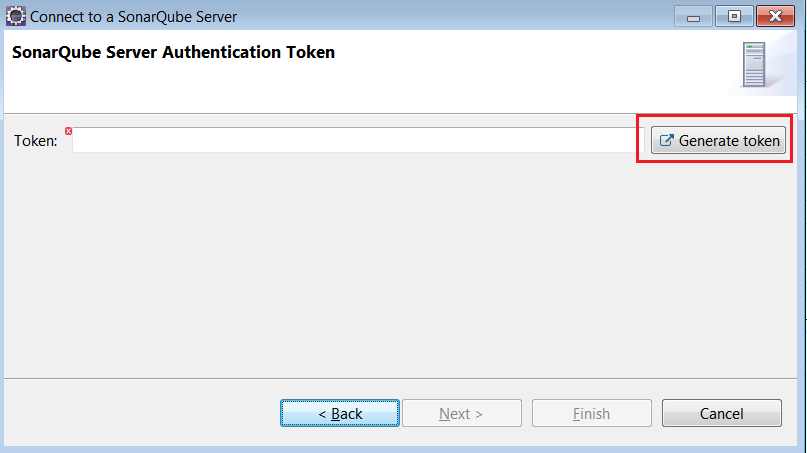
Provide the Token generated from SonarCloud Server in the mentioned dialog box.

GenerateToken

GenerateToken

Access the SonarCloud server URL https://sonarcloud.io/projects as mentioned below.
Click on Analyze new project button and

SonarCloudServer-Analyze New Projects

SonarCloudServer-Analyze New Projects

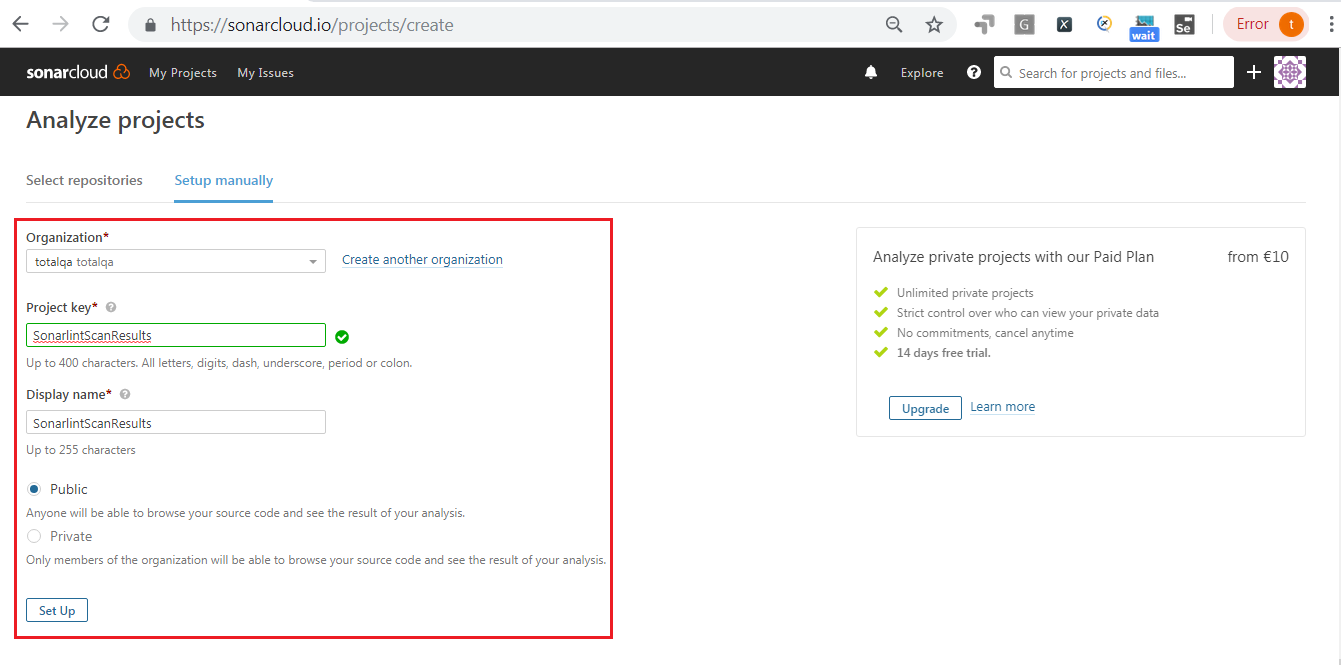
Provide all the required information and click onSet Up button.

AnalyzeProjects -SonarCloudServer

AnalyzeProjects -SonarCloudServer

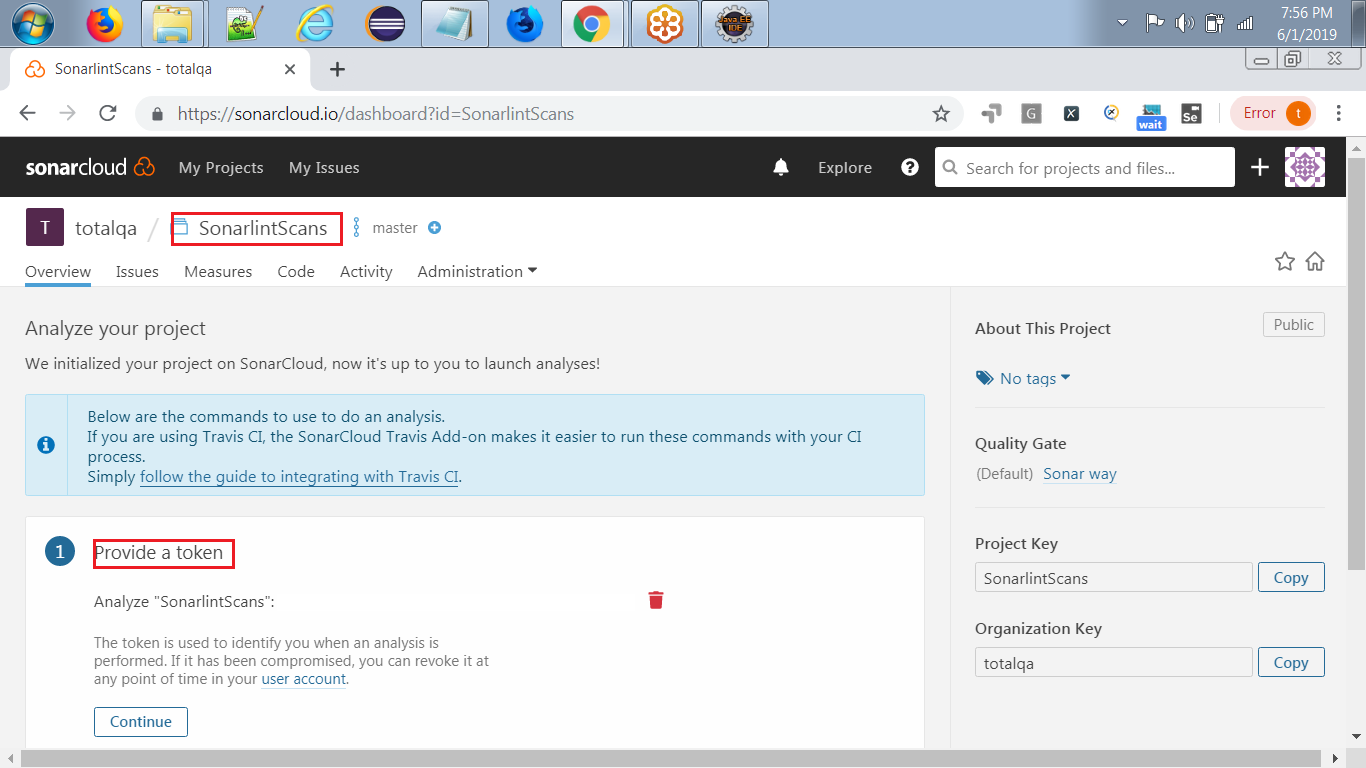
Click on the Generate button for generating new token.

GenerateToken

GenerateToken

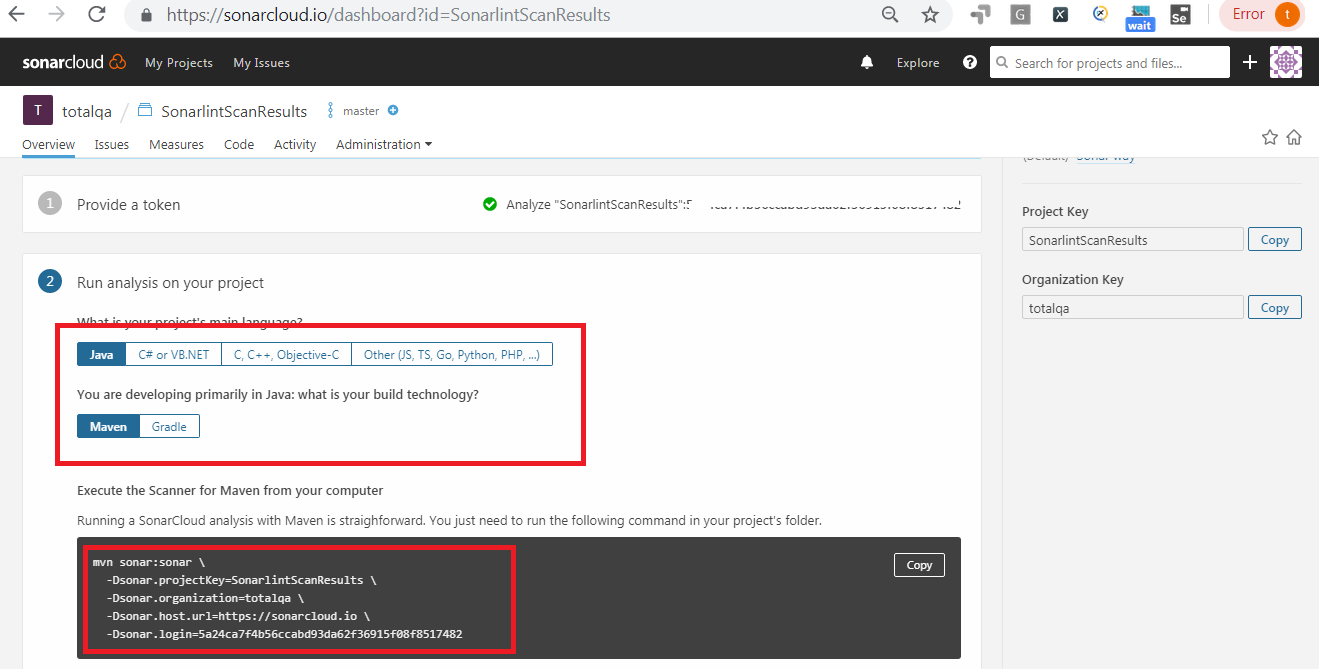
Run the analysis on your project.

Sonar Cloud - Run Analysis

Sonar Cloud – Run Analysis

Execute the Command from the Command line to push results of Sonarlint to the SonarQube Cloud.

mvn sonar:sonar \
-Dsonar.projectKey=SonarlintScanResults \
-Dsonar.organization=totalqa \
-Dsonar.host.url=https://sonarcloud.io \
-Dsonar.login=5a24ca7f4b56ccabd93da62f36915f08f8517482

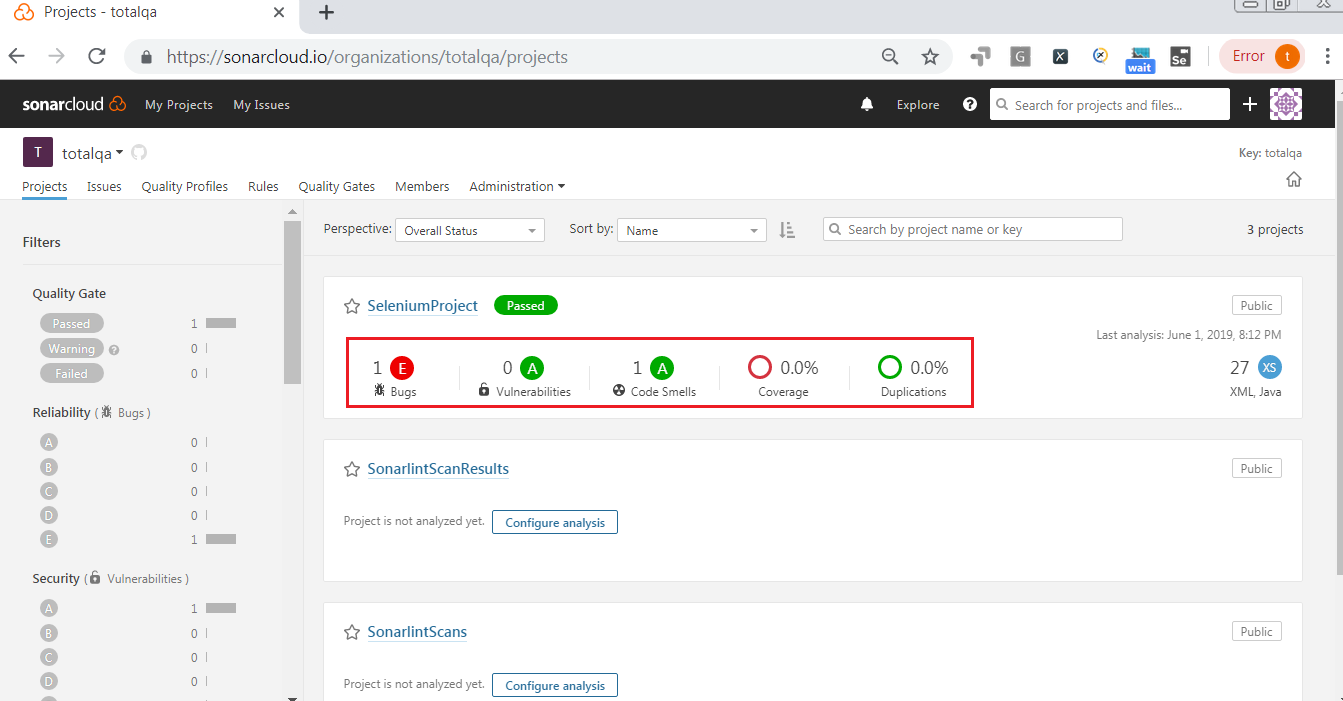
Sonarlint-Scan Results

Sonarlint-Scan Results

Conclusion

Results generated from Sonarlint are pushed into SonarQube Server Successfully.

Sonarlint-Instant Feedback Selenium,JAVA,Eclipse


Sonarlint helps the developers to identify the issues on the fly when you write the code immediately. It helps to detect the common mistakes and vulnerabilities based on the thousands of rules in various languages such as Java,Javascript,PHP and PHP . It also helps to scan the source code in different IDE’s such as Eclipse IDE,Intellij IDEA,Visual Studio and VS Code. Please find the list of Sonarlint rules from the link mentioned below:

https://rules.sonarsource.com


Vulnerability Examples:

Its a weakness in the code, which can be exploited by an actor to perform unauthorized actions within a computer system.
“public static” fields should be constant:
Noncompliant Code Example:

Compliant Code Example:


Bug Example:

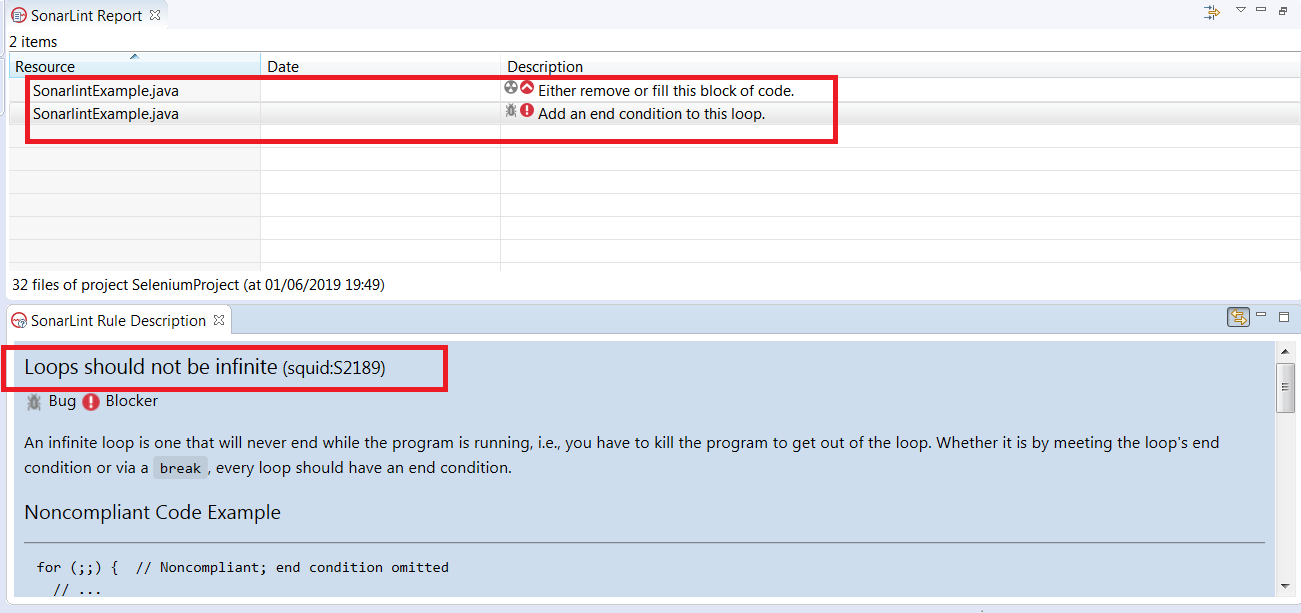
Loops should not be infinite:
Noncompliant Code Example:


Code Smells:

Nothing but the violation of the Fundamental Design Principals.
Tests Should include Assertions:
Noncompliant Code Example:

default Clauses should be last in the Switch Case


Using Sonarlint in Eclipse:


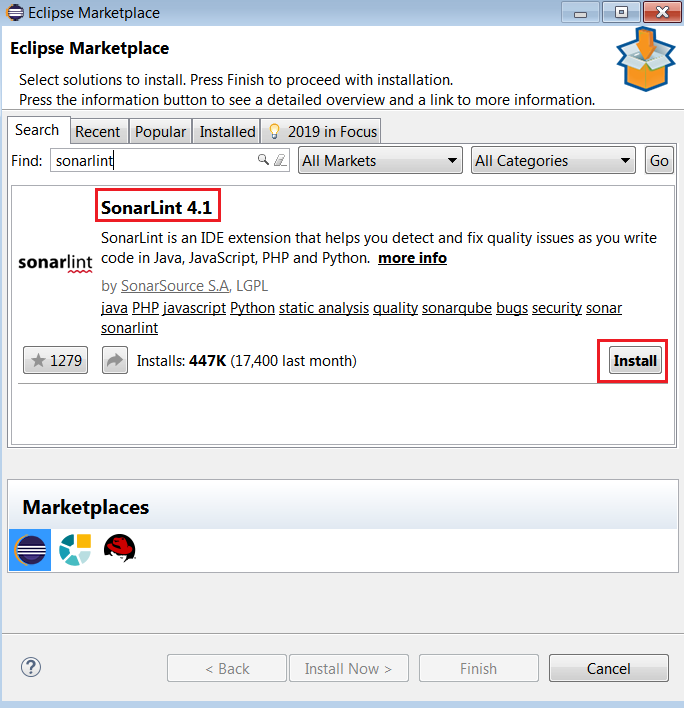
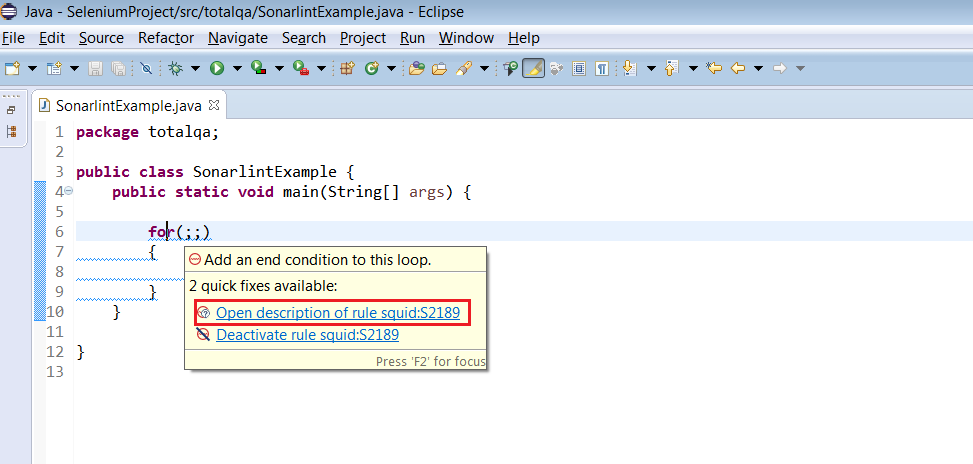
Download the Sonarlint Plugin from the Eclipse Market Place. During the Development of the Code, the Sonarlint highlights the issues in the editor. It also gives the rule description on the the fly.Once the plugin is installed successfully. Open the Eclipse and write a sample program to verify the rules.

Sonarlint-Eclipse Marketplace

Sonarlint-Eclipse Marketplace


Analyze the Java Source Code using Sonarlint:

Sonarlint-Instant Code Scan

Sonarlint-Instant Code Scan


Click on the rule to view the Rule Description
Sonarlint:RuleDescription

Sonarlint:RuleDescription


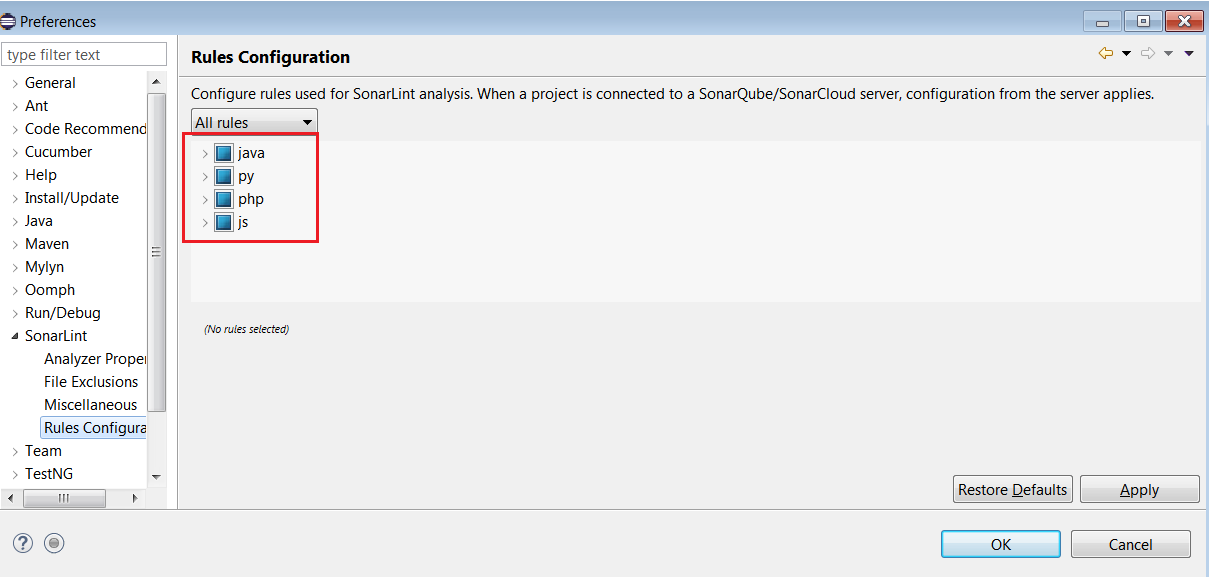
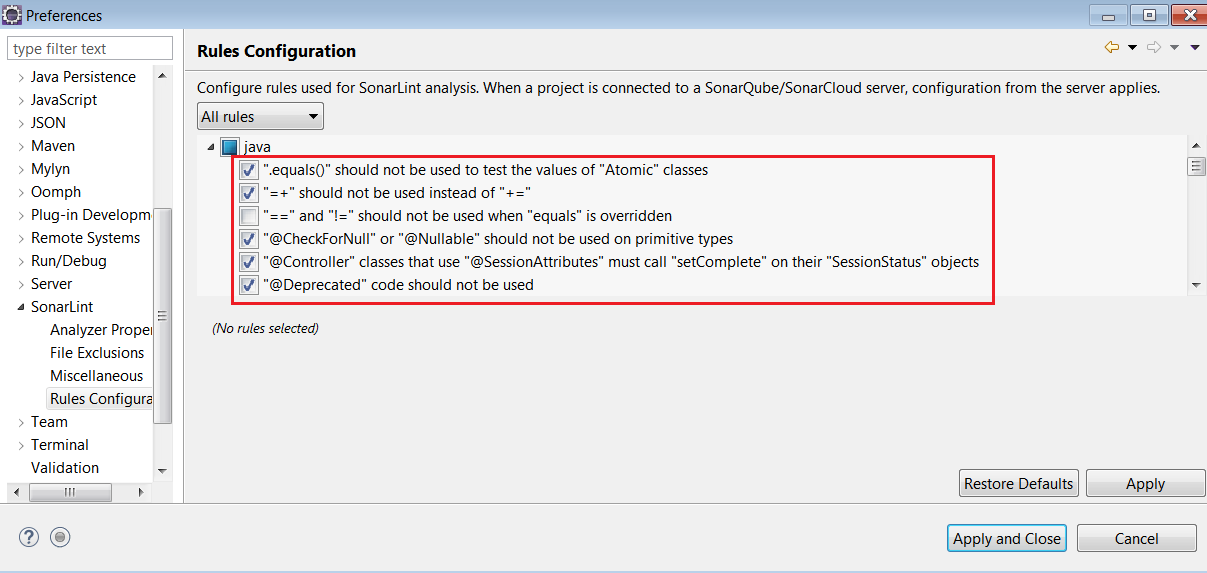
Enable the rules in Sonarlint:
Navigate to the Window->Preferences->Sonarlint->Rules Configuration to select the rule configuration for different languages.
Sonarlint-Rules

Sonarlint-Rules


SonarlintRules_Enable_Disable

SonarlintRules_Enable_Disable


Conclusion:


Sonarlint plugin in Eclipse enables the Developers to identify the issues early in the Coding phase to fix the issues during the time of development and fix them on the fly with Compliant Solution.

Soft Asserts and Hard Asserts in TestNG


TestNG is mainly used by the JAVA Developers to perform Unit Testing of the Code. This Framework is used mainly in Selenium as well to verify the outcome of the automation test Scenario. To verify the outcome the assert statements are available in the org.testng.Assert Class used such as

  • Assert.assertEquals
  • Assert.assertTrue
  • Assert.assertFalse
  • Assert.assertNotNull

.
They are different types of Assert types such as

  • Hard Assert
  • Soft Assert

Hard Assert:

In Hard Assert if the assertion is failing the execution stops.
Assert.assertTrue statement fails the test and stops the execution and makes the test case as failing.
Assert.assertFalse statement continues the test, if the element is not present in the Web Application.
Assert.assertFalse statement stops the execution of the test, if the element is present in the Web Application.

Soft Assert:

In Soft Assert if the assertion is failed the execution doesn’t stops. The execution continues to the next step. The org.testng.asserts.SoftAssert object collects all the errors. If you need to throw an exception then you need to use the method assertAll() as the last statement in the @Test. And the execution continues to the next @Test.
assertAll fails the test case if any of the assertions are failed.

Summary

It’s important to decide what kind of Assertion is required.
If you want your assert method to fail and stops the execution use the Hard Assert.
If you want your assert method to fail and continues with the execution of the second assert and collect all the results at the end of the test use Soft Assert.

Enabling Writing Tests with in JIRA using Zephyr Plugin


Follow this Atlassian Software-JIRA Registration Link to register for a free account for using JIRA. Click on the Link received in your email inbox to verify your email Address.This product is available in the Cloud, free for 7 days .
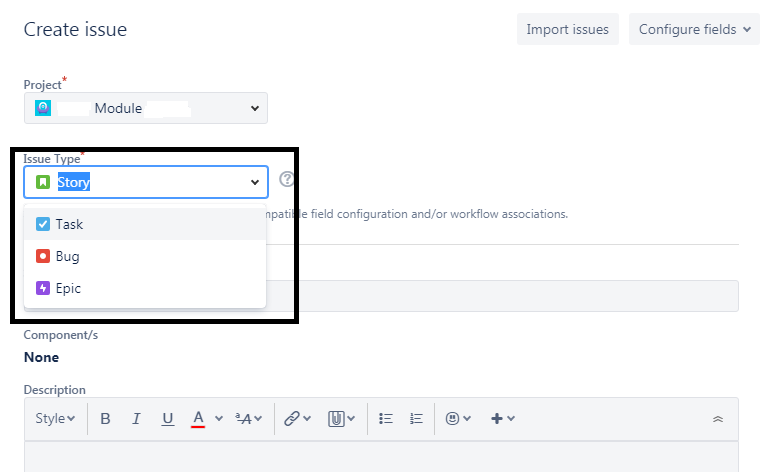
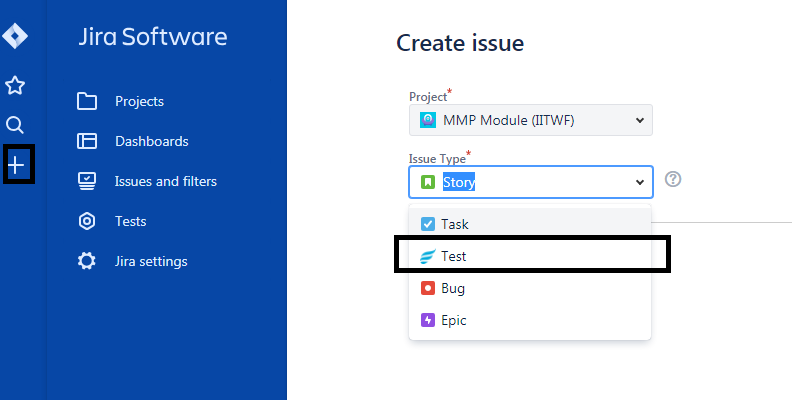
Login to JIRA by clicking on the Link received in the email.Click on Create Issue to view the Issue Types available. Currently issue types visible in JIRA by default are as follows: Story,EPIC,Task,Bug

JIRA Issue Types-Story,EPIC,Task,Bug

JIRA Issue Types-Story,Epic,Task,Bug


To view the Test as Issue type in JIRA a plugin named Zephyr has to be installed.
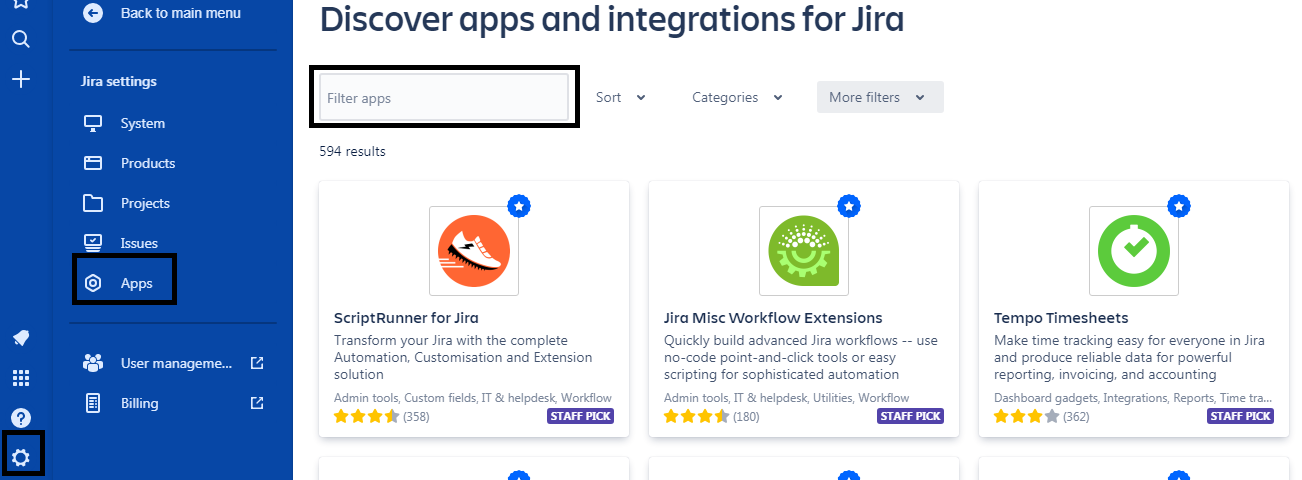
Follow the Steps to enable the Zephyr plugin in JIRA. JIRA Settings->Apps->Find new Apps
Filter Apps in JIRA

Filter Apps in JIRA


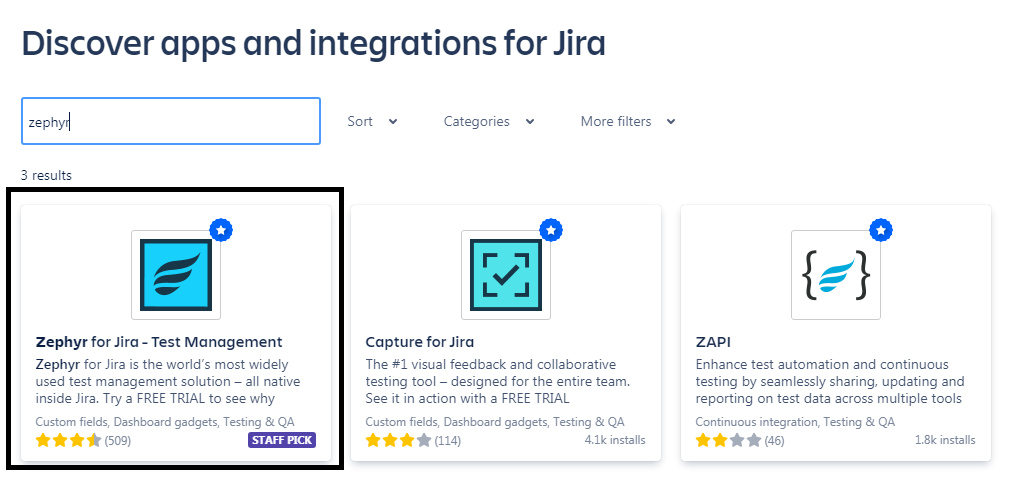
Provide the name to filter the apps named by Zephyr.
ZephyrPlugin

ZephyrPlugin


Once the Zephyr plugin is successfully installed the issue Type Test is not visible in the Issue List.
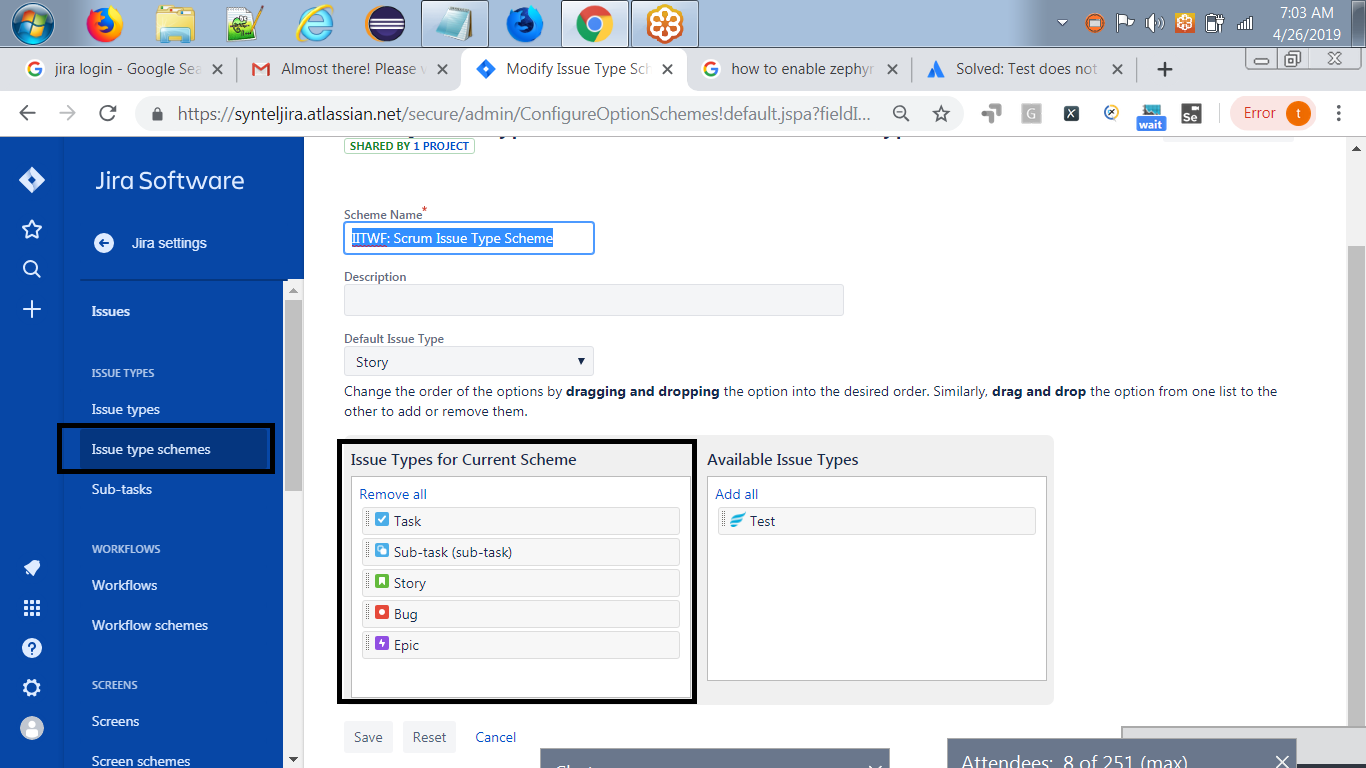
Enabling Test to write Tests with in JIRA using Zephyr Plugin JIRA Settings->Issues->Issue type Schemas->Edit.
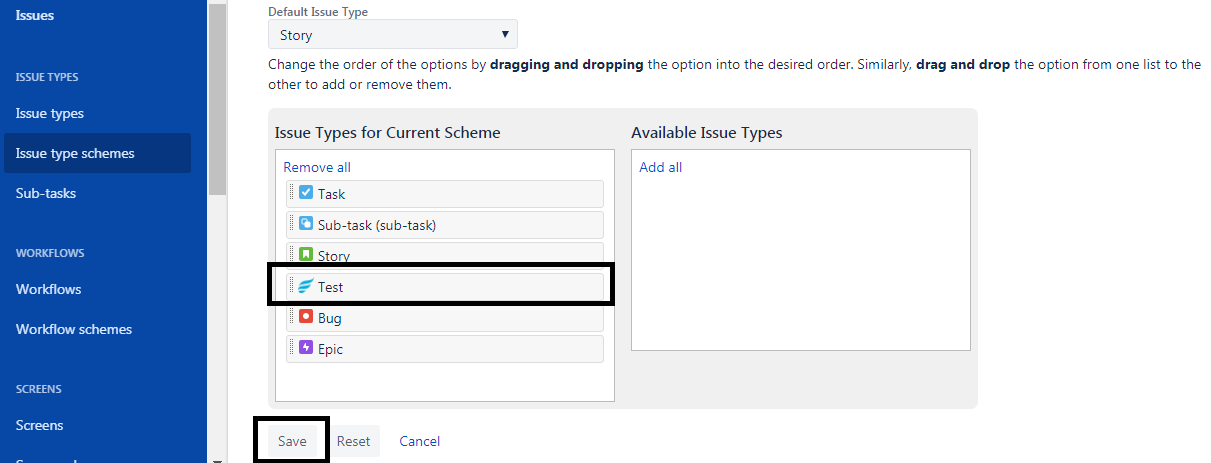
Drag and Drop the Issue Type Test from Available Issue Types to the section
Issue Types for Current Schema.
Test Issue Type in JIRA

Test Issue Type in JIRA


Click on Save button to save the Issue type Schema.
Zephyr Test Issue

Zephyr Test Issue


Verify the issue Test is visible in JIRA as mentioned below:
Issue Type Test

Issue Type Test

Resolving the Git Error current-branch-is-not-configured-for-pull


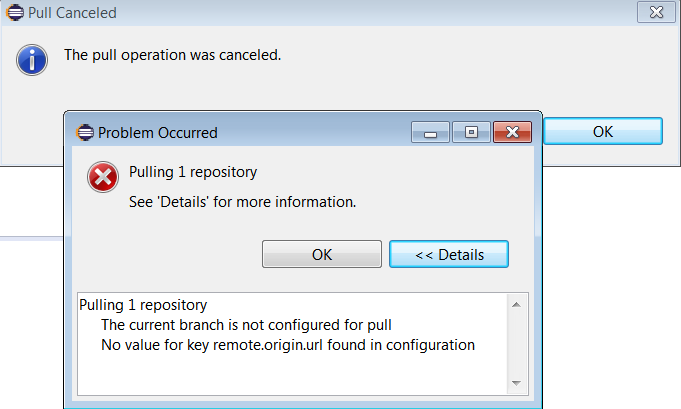
Resolution for the Error ->Current Branch is not configured for Pull. No Value for key remote.origin.url found in configuration.
In Github , during the creation of branch we should make sure to select the option configure upstream for push and pull. What happens if this option is not selected?? This causes the “git pull” operation causing the error. In this post we are going to discuss on now fixing the error in Eclipse as follows:

onfigure upstream for push and pull

configure upstream for push and pull


Right Click on the project in Eclipse->Team->Git Pull throws the following Error:

Pulling 1 repository The current branch is not configured for pull No value for key remote.origin.url found in configuration

Pulling 1 repository
The current branch is not configured for pull
No value for key remote.origin.url found in configuration


How do we resolve this Error now???
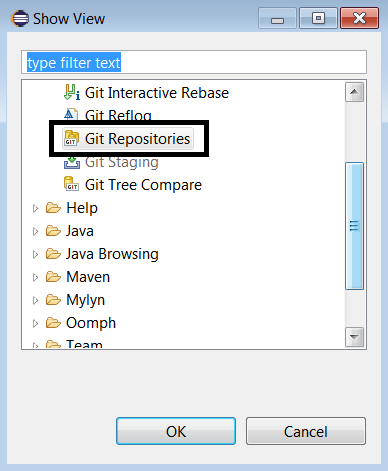
Navigate to the Eclipse Menu->Window->Show View->Other->Git Repositories.
GitRepositories

GitRepositories


Update the Config File in the Repository as mentioned below:
[branch "PullRequestError"]     remote = origin 	merge = refs/heads/PullRequestError

[branch “PullRequestError”]
remote = origin
merge = refs/heads/PullRequestError


What is the statement **refs/heads/PullRequestError** in the config file refer to ??

The ref in the URL must be formatted as heads/<branch name> for branches and tags/<tag name> for tags. If the ref doesn’t exist in the repository, but existing refs start with ref they will be returned as an array. If the ref doesn’t match an existing ref or any prefixes, a 404 is returned.

Running suite-of-suites Parallely in Testng


TestNG is a java framework useful to execute the Unit Tests in a java project. We can even TestNG to automate the Selenium Tests in the Project.In TestNG xml file, the execution of Tests is managed by setting the “parallel” attribute and “thread-count” attribute in the suite xml as follows:

  • <suite name=”My suite” parallel=”methods” thread-count=”5″>
  • <suite name=”My suite” parallel=”tests” thread-count=”5″>
  • <suite name=”My suite” parallel=”classes” thread-count=”5″>
  • <suite name=”My suite” parallel=”instances” thread-count=”5″>
  • Now the question arises that how can we execute multiple Testng xml files in the project. The solution is as follows:

    <suite name=”Running Suite Files” verbose=”1″ preserve-order=”true”>
            <listeners>
                    <listener class-name=”org.testng.reporters.VerboseReporter”/>
            </listeners>
            <suite-files>
                    <suite-file path=”testng1.xml”/>
                    <suite-file path=”testng2.xml”/>
            </suite-files>

    </suite>


    How do we execute these suite-of-suite files parallely?

    Conclusion::


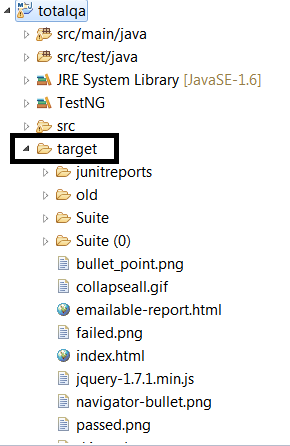
    Execution of the ParallelSuites.java program, stores the Results in the output folder.Make sure the Project is refreshed to view the results as mentioned below:

    is-there-a-possible-way-to-run-two-xml-files-in-testng-xml-parallel

    is-there-a-possible-way-to-run-two-xml-files-in-testng-xml-parallel


    Passing command line arguments for Selenium Maven Testng


    TestNG allows you to group your tests and also allows to pass Test Parameters using parameter tag in the TestNG xml file.
    You can then execute one or more specific groups such as Sanity,Regression or Functional Tests based on the requirement and passing the parameter values to the testng.xml using maven-surefire-plugin via pom.xml the following configuration is helpful.

    Passing the specific group name from the Command Line is achieved by updating the configuration of maven-sure-fire plugin as follows:

    Maven Command Line:

    Maven Command Line Arguments-Selenium,TESTNG

    Maven Command Line Arguments-Selenium,TESTNG

    Steps to achieve is mentioned as follows:

    Like our Facebook Page to stay in touch with us. Happy Testing!!!!
    https://www.facebook.com/totalqa

    1. Create a Testng @Test program as follows.

    2. Create an Grouping.xml file to invoke the Testng @Test Program.

    3. Update the pom.xml as follows.

    4. Download the apache maven software apache-maven-3.6.0-bin.tar.gz from this url https://maven.apache.org/download.cgi.

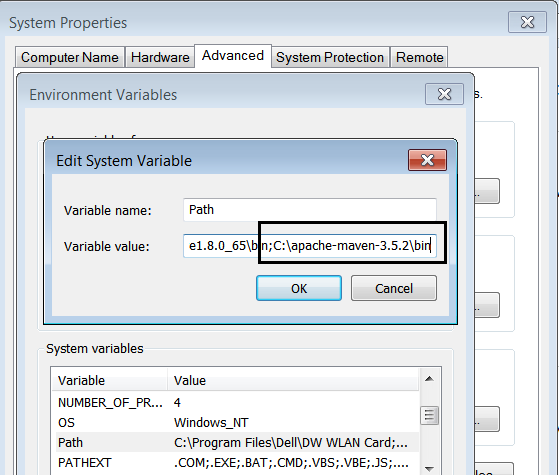
    5. Set the classpath as follows.

    Apache Maven Software Classpath

    Apache Maven Software Classpath

    6. Execute the following command from the command line.

    Maven Command Line Arguments-Selenium,TESTNG

    Maven Command Line Arguments-Selenium,TESTNG

    Conclusion:

    Passing the command line arguments is possible by using apache maven via pom.xml to the TestNG.xml

    Headless Browser in Selenium using PhantomJS-Pros and Cons


    PhantomJS is a headless web browser scriptable with JavaScript which is similar to HTMLUnitDriver. Click on this link to view the examples of the HTMLUnitDriver.

    PhantomJS runs on Windows, macOS, Linux, and FreeBSD. Currently the PhantomJS development is stopped due to less support from the group.

    Pros of Headless Browser:

    • Headless browser executes the scripts faster then the real browser.
    • Helps us in improves the performance execution of the scripts.
      Headless browser saves time.

    Cons of Headless Browser:

    • Headless browser does not mimic the real execution of the test-cases.
    • It not possible to view the steps visually during the execution of the test-cases.

    Like our Facebook Page to get frequent updates->

    https://www.facebook.com/totalqa


    Selenium WebDriver Code

    1. Add the following dependency in the pom.xml to add the PhantomJS Library to the build path:


    2. Instead of the setting the path to the Phantom JS executable. Use the WebDriverManager class ensure the following depedency is added in the maven project object model (pom.xml) file.


    3. Execute the below code in eclipse and verify the results.

    Conclusion

    Selenium Code executed successfully without launching the Browser.

    HeadLess Browser using the PhantomJS Driver

    HeadLess Browser using the PhantomJS Driver

    using WebDriverManager class in Selenium WebDriver

          No Comments on using WebDriverManager class in Selenium WebDriver


    Selenium WebDriver automation tool is mainly useful to run tests against multiple Browsers such as Chrome Browser,Firefox Browser,Internet Explorer Driver.Running the tests against multiple browsers is known as Cross Browser Testing.
    To launch the Browser in Selenium WebDriver we need to set the path of the executable available in the laptop. Following that we have to instantiate the driver instance based on the Driver instance. In order to avoid these steps we can use the WebDriverManager class.

    WebDriverManager

    WebDriverManager allows to automate the management of the binary drivers (e.g. chromedriver, geckodriver, etc.) required by Selenium WebDriver.
    Using WebDriverManager its not required to maintain the below lines of the code for launching the browser.

    System.setProperty(“webdriver.chrome.driver”, “executable path”);
    System.setProperty(“webdriver.gecko.driver”, “executable path”);
    System.setProperty(“webdriver.opera.driver”, “executable path”);
    System.setProperty(“phantomjs.binary.path”, “executable path”);
    System.setProperty(“webdriver.edge.driver”, “executable path”);
    System.setProperty(“webdriver.ie.driver”, “executable path”);

    WebDriverManager Maven Depdendency

    To use the WebDriverManager class ensure the following depedency is added in the maven project object model (pom.xml) file.


    Like our Facebook Page to get frequent updates->

    https://www.facebook.com/totalqa


    Selenium WebDriver Code

    Execute the below code in eclipse and verify the results.