[solved]java.lang.IllegalStateException – Driver not executable on MAC


In this tutorial we will discuss how to solve the java.lang.IllegalStateException on MAC during the execution of tests on Chrome Browser.
Before getting into point, we will discuss about File Permissions on Unix platform. Each and every file in Unix has following attributes:

  • Owner: Owner of the file
  • Group: User belongs to a particular Group
  • Other: Other users

To view permissions of any file on unix use the following command:
total-qa$ ls -l chromedriver
-rw-r--r-- 1 25399 25399 chromedriver

Changing Permissions

We can modify the permissions of a file by providing following Access:

  • Read
  • Write
  • Execute

To provide all the read,write and execute permissions for all the attributes Group,Owner and Others for a file in Unix use the following command in the terminal as mentioned below:

total-qa$ chmod 777 chromedriver
Owner :4 (read) + 2 (write) + 1 (execute) = 7 rwx
Group :4 (read) + 2 (write) + 1 (execute) = 7 rwx
Others :4 (read) + 2 (write) + 1 (execute) = 7 rwx

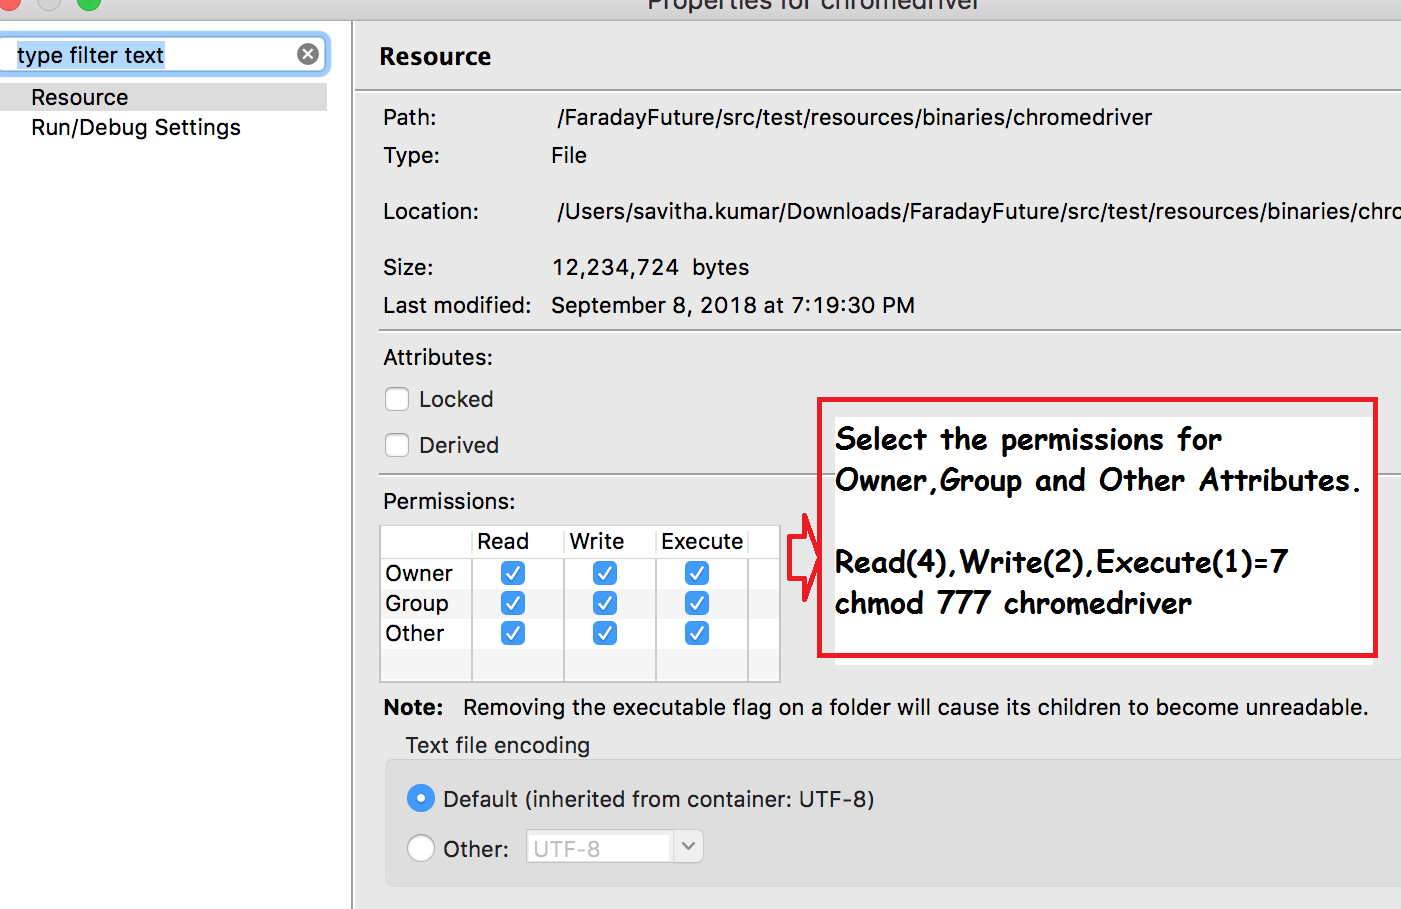
We can even update the permissions of the File in Eclipse directly as well.

1. Right Click on the project and select the Properties.

chromedriver properties on MAC

chromedriver properties on MAC


2. Select all the Read,Write and Execute permissions for Owner,Group and Others.
chmod:777 - Read,Write,Execute permissions for Owner,Group and Other Attributes

chmod:777 – Read,Write,Execute permissions for Owner,Group and Other Attributes

Conclusion:

Modifying the permissions of the file executes the chromedriver and launches the Chrome Browser successfully.

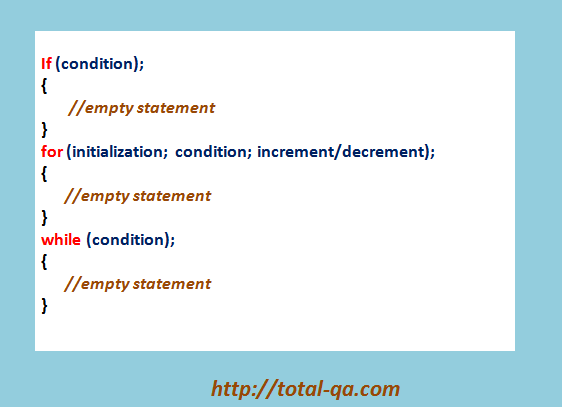
java-semicolon after for loop,while loop,if statement


In this tutorial we will discuss about the problem by adding the semicolon after for-loop,while-loop and if-statement. This concept is very important to know from Selenium WebDriver perspective as well. We mainly use for-loop for iterating the List of WebElements.
Also, one important key-note here is adding semicolon does not throw any compilation error in Eclipse.
So, it would be difficult to understand the reason why the code is not working as expected.
Else we can depend on the static code checking tools such as following which helps in identifying those issues.

Semicolon

java-semicolon after for loop,while loop,if statement

Adding Semicolon for if-Statement:

int i = 1;
if(i==2);//condition is false
{
System.out.println("if-statement");//Empty Statement will be executed
}

Output:

if-statement

Conclusion:

if(i==2); Adding semi-colon for if-statement the line is ended.
The code in the curly braces executes irrespective of the condition is true or false.


Adding Semicolon for for-loop:


for(int i=0;i>10;i++);//condition is false
{
System.out.println("in for-loop");//Empty Statement will be executed
}

Output:

in for-loop

Conclusion:

for(int i=0;i>10;i++); Adding semi-colon for-loop the line is ended.
The code in the curly braces executes irrespective of the condition is true or false.


Adding Semicolon for while-loop:

int j = 1;
while(j>10);
{
System.out.println("in while-loop");//Empty statement will be executed.
}

Output:

in while-loop

Conclusion:

while(j>10); Adding semi-colon for while-loop ends the line.
The code in the curly braces executes irrespective of the condition is true or false.

Therefore adding the semicolon executes the empty statements without any errors.

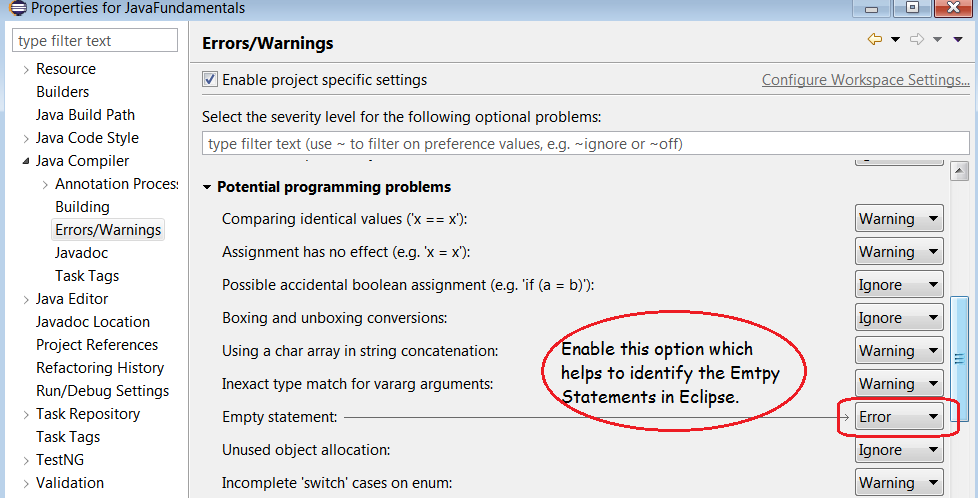
Highlighting the Empty Statements with Errors in Eclipse

Enable Empty Statement

Enable Empty Statement


Enabling Empty Statements shows the following Errors during compilation in Eclipse:
Empty Statement Errors

Empty Statement Errors


Automating SVG and Interactive Charts in Selenium-JavascriptExecutor


In this tutorial we will discuss about automating the Interactive Charts and SVG [Scalable Vector Graphics] in Selenium.

To automate these Interactive Charts, Selenium Locators such as Xpath and Css-Selector are not helpful. We should depend on an Interface called JavascriptExecutor to identify the SVG and read the values available in these charts.

Javascript Commands:

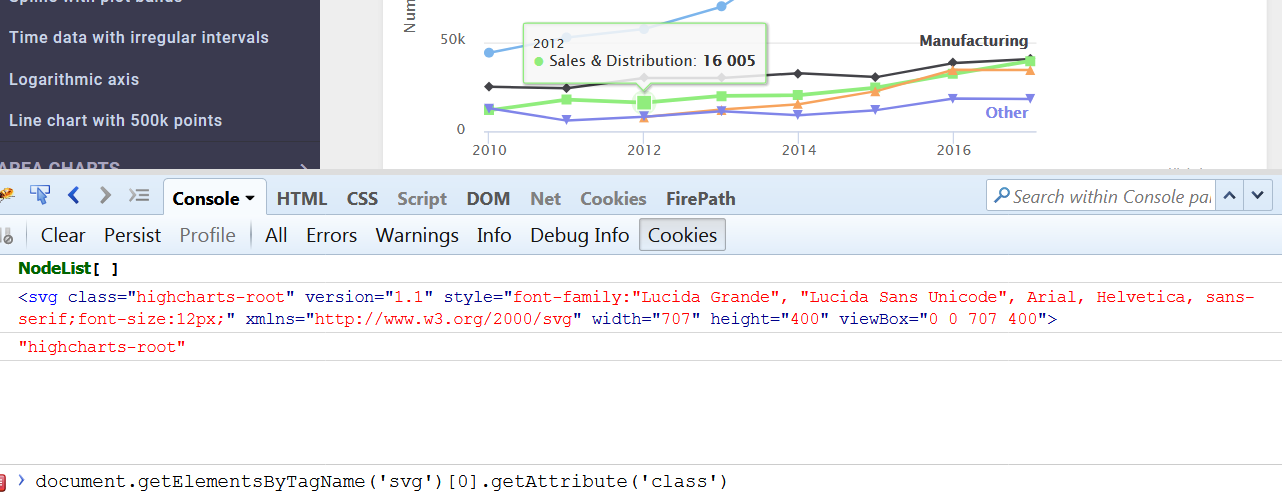
Reading Attributes of SVG graph[Scalable Vector Graphics]
document.getElementsByTagName('svg')[0].getAttribute('class')

Scalable Vector Graphics - SVG

Scalable Vector Graphics – SVG


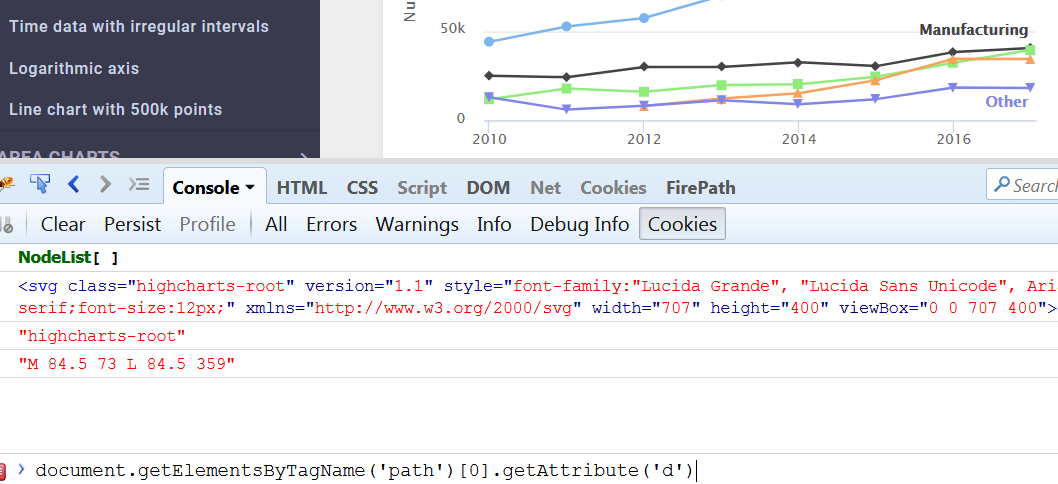
Reading Data from the Chart
document.getElementsByTagName('path')[0].getAttribute('d')
Interactive Chart-Line Chart

Interactive Chart-Line Chart

Executing the Javascript Commands in Selenium WebDriver

Output:

M 84.5 73 L 84.5 359
Basic line | Highcharts


References:

JavaScript HTML DOM Document
Interactive Charts

Conclusion:

Therefore, using Javascript Commands we can automate the SVG and Interactive Charts in Selenium.

DevOps Tutorial-3 Triggering CI Build with Github Push Notifications


In this tutorial we will learn about triggering the CI Build with Git Hub Push notifications or Pull notifications automatically by using Jenkins Web Hook URL.
The Jenkins Web Hook URL needs to be added in the GitHub Repository. These Web Hook helps to detect changes in the Git Hub and trigger the Jenkins JOB automatically. Please follow the steps to enable this in Git Hub and Jenkins.

Enable Communication between Jenkins and Git Hub

1. Access the Jenkins URL.
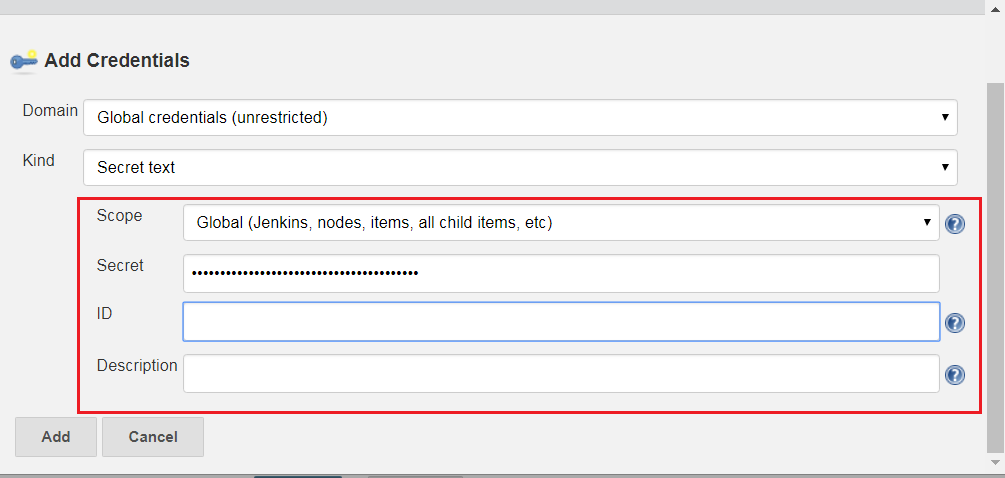
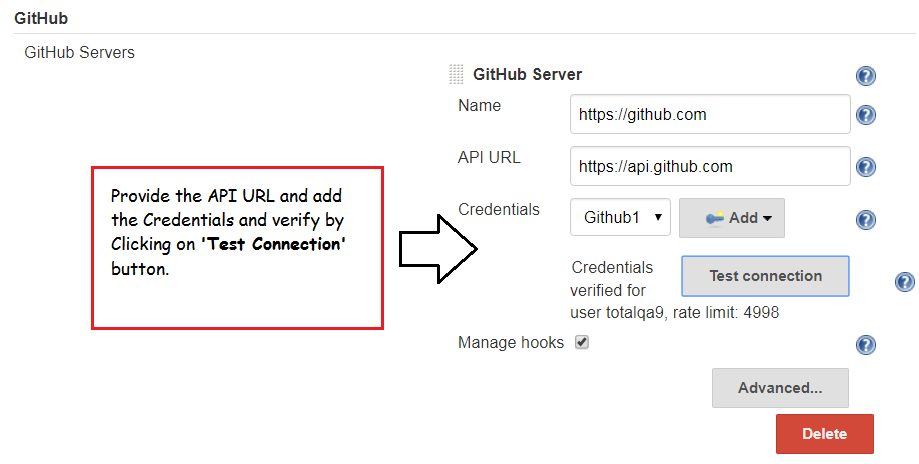
2. Navigate to Manage Jenkins->Configure System->Git Hub Section. Click on Add to provide the Credentials as mentioned below. For Generating the Secret Text Click on this link and generate the Token and update accordingly.
ID: Github1

New personal access token

New personal access token


Jenkins->Git Hub Server

Jenkins->Git Hub Server


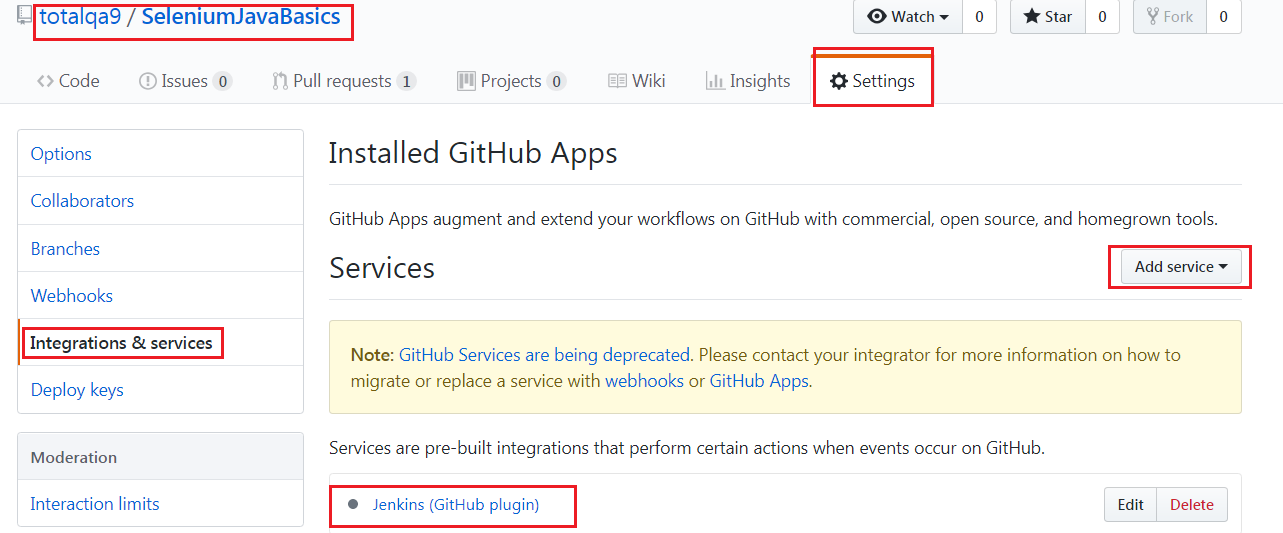
3. Navigate to the Git Hub Repository URL click on Integration Services and Add Service as Jenkins(GitHub plugin).
Git Hub Integration Plugin

Git Hub Integration Plugin


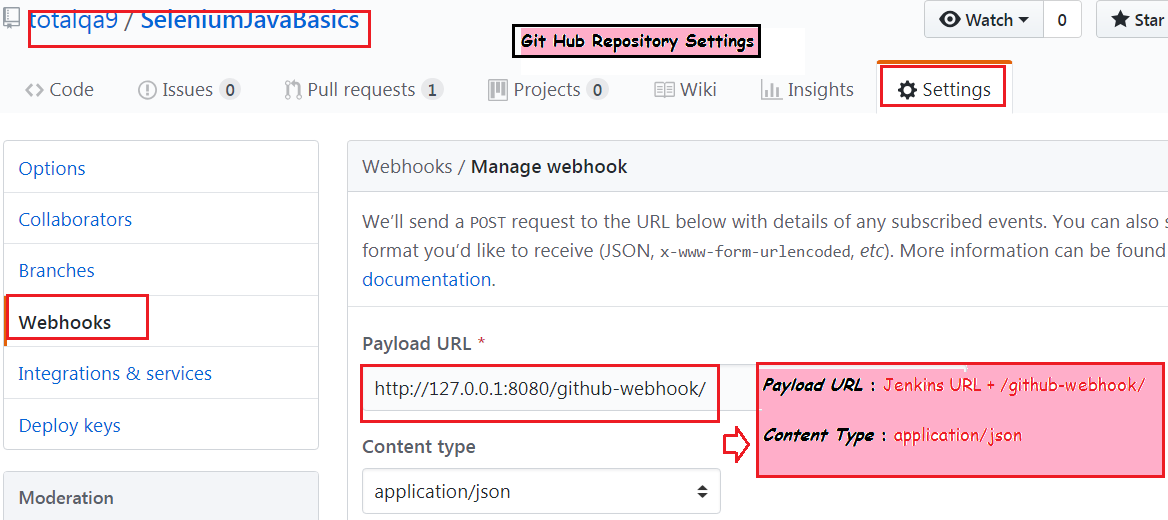
4. Configure the Web Hook in the Git Hub Repository Settings as shown below:
Payload URL : Jenkins URL + /github-webhook/
Git HubWebhook Configuration

Git HubWebhook Configuration

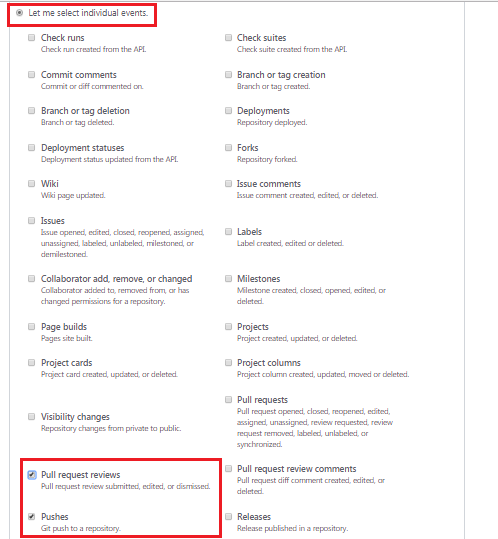
5. Provide the Secret Key generated in the Step 2 nothing but the Token. In addition to that select the Events to trigger this Web Hook.

  • Enable Pushes
  • Enable Pull request reviews

Git Hub Events Push and Pull

Git Hub Events Push and Pull

6. Select the Active Checkbox and Add the Web Hook.

7. Navigate to Git Hub Repository URL update the Review Comments for the Pull Request.

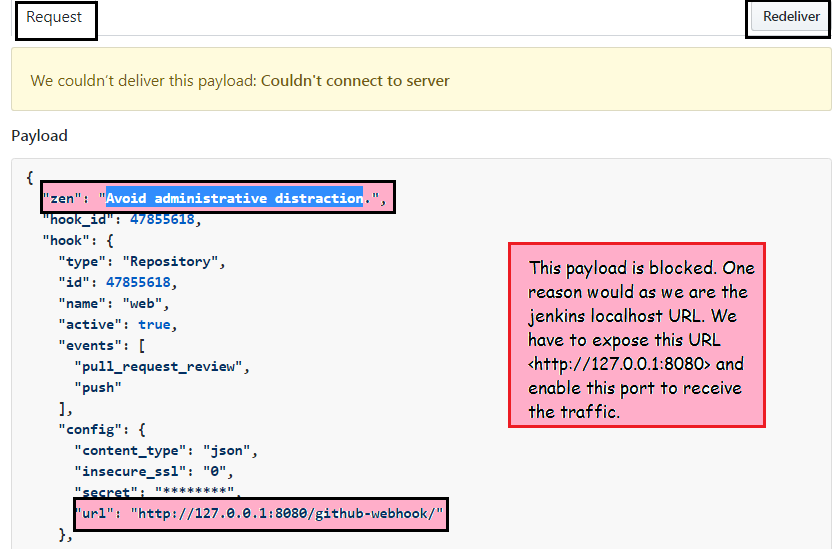
8. Access the Web Hook under the Repository Settings and check the payload information.

Web Hook Payload

Web Hook Payload

9. Click on Redeliver Button to send the payload again and verify the response.

Issues

Stack Over Flow: Web Hook Connectivity Issues to Jenkins

Conclusion:

Using Web Hooks in Git Hub we can configure events such as Push and Pull which triggers the Jenkins Job automatically.

References

DevOps tutorial Series

DevOps Tutorial-2 Resolve merge conflicts in Git and GitHub


In this tutorial we will learn about resolving the merge conflicts in Git and Github. Git can often resolve differences between merged branches. Usually, the changes are on different lines, or even in different files, which makes the merge simple for computers to understand.

However, sometimes there are competing changes that Git needs your help with to decide which changes to incorporate in the final merge. Often, merge conflicts happen when people make different changes to the same line of the same file, or when one person edits a file and another person deletes the same file. You must resolve the conflict before you can merge the branches.

Lets discuss this scenario in detail:

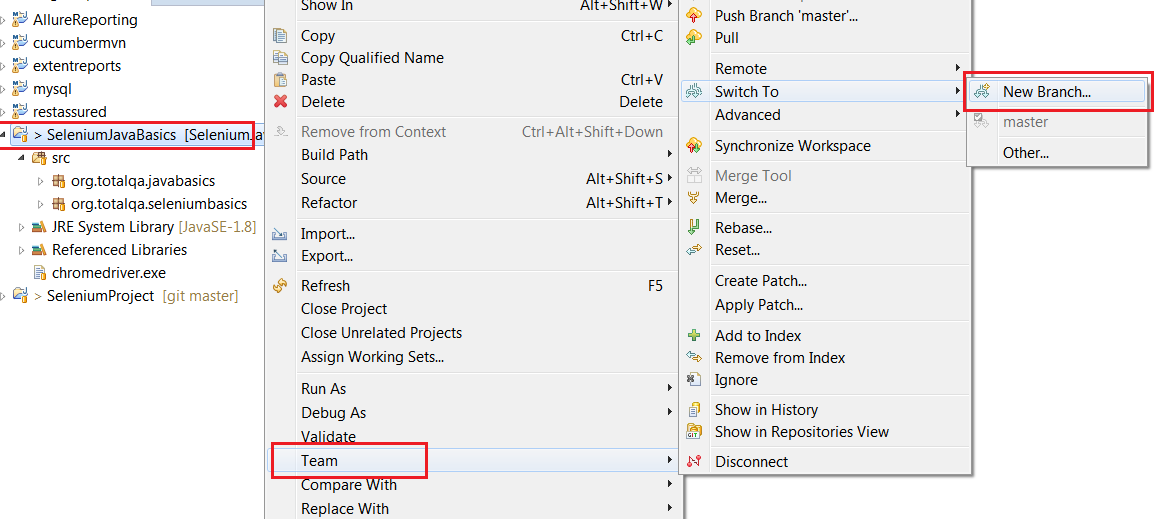
1. Generally developers or testers create a new branch and modify the HelloWorld.java in there own branch Fix_Bug01.

Creating a new branch for safely experimenting the changes

Creating a new branch for safely experimenting the changes


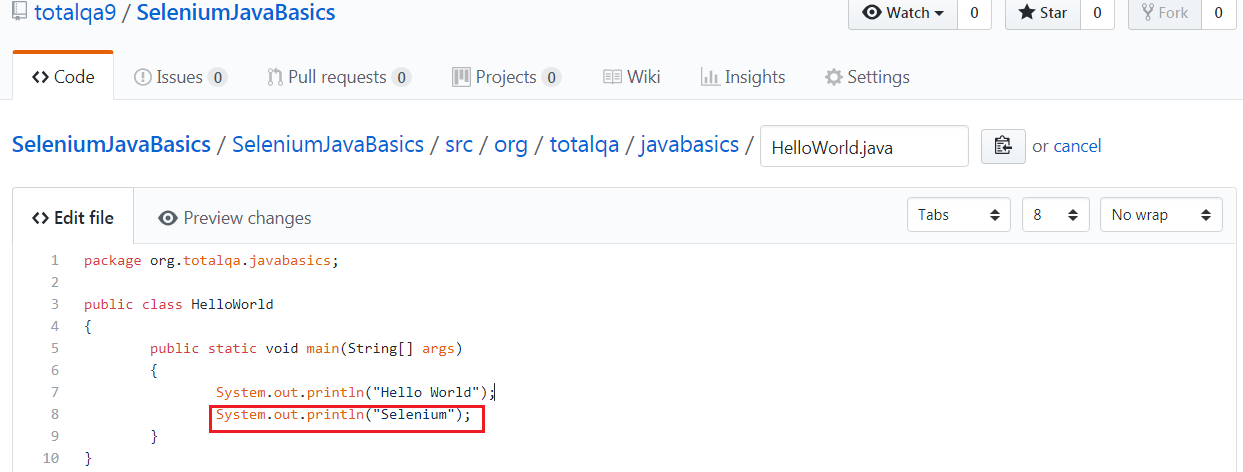
Adding a new line

Adding a new line


2. During the same time if another team member modify the same file and same lines in the master branch in the Github Repository.
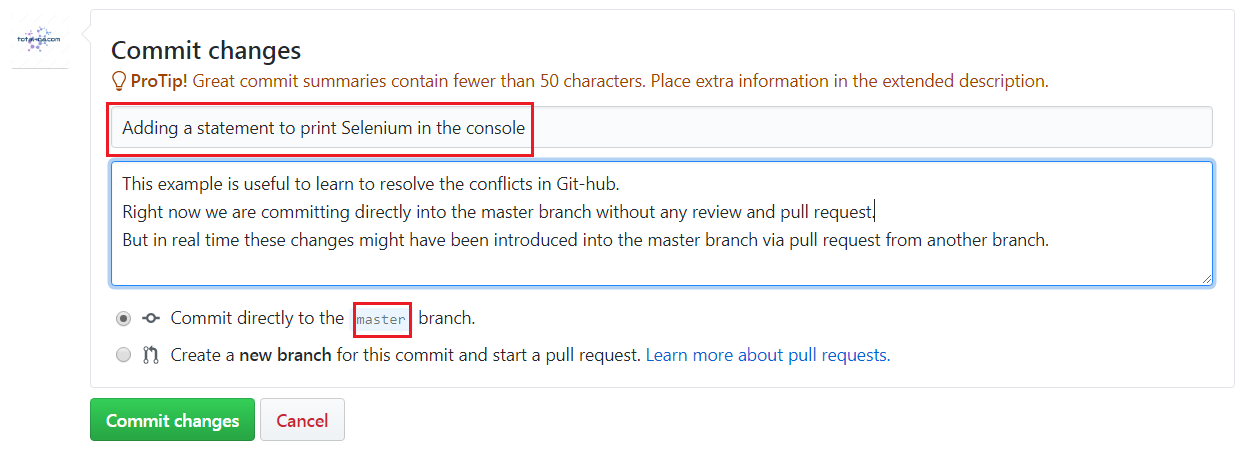
Updating the File in Github master branch

Updating the File in Github master branch


Committing the changes

Committing the changes


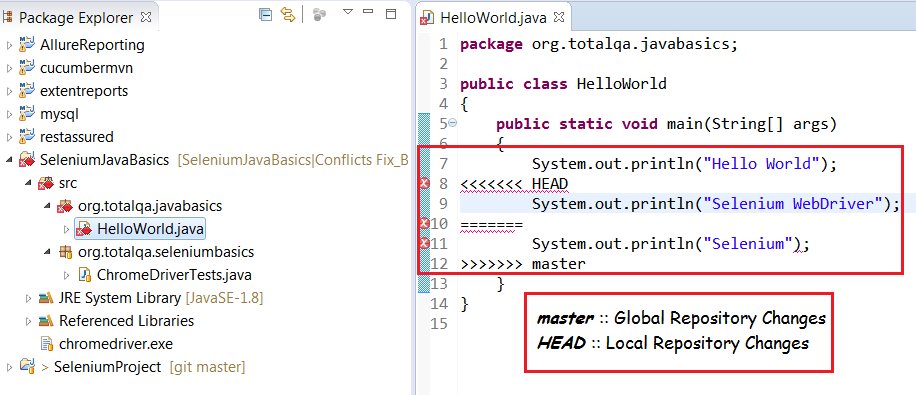
3. In Local Repository if the master branch is refreshed from Global Repository and try to merge these changes in the branch Fix_Bug01 which introduces the merge conflicts.
Refresh the Master

Refresh the Master


Conflicts due to changes in the same file and same line

Conflicts due to changes in the same file and same line


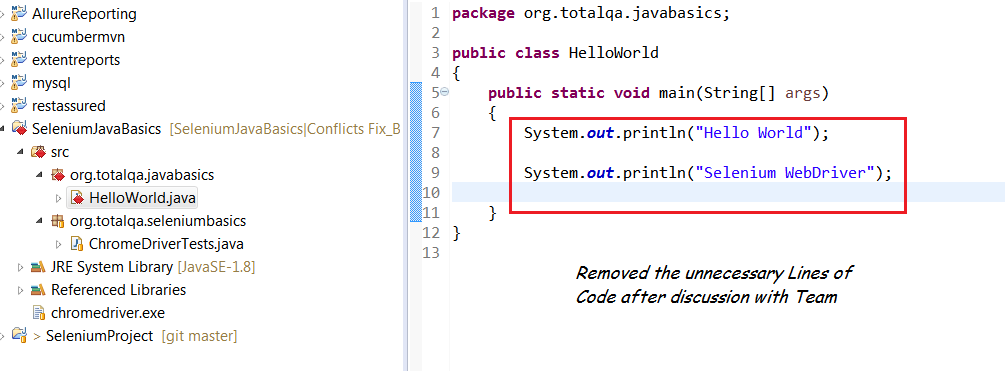
4. Fixing the merge Conflicts by ignoring the lines which are not required.
Merge Conflicts

Merge Conflicts

Deleted the unnecessary lines of code

Deleted the unnecessary lines of code


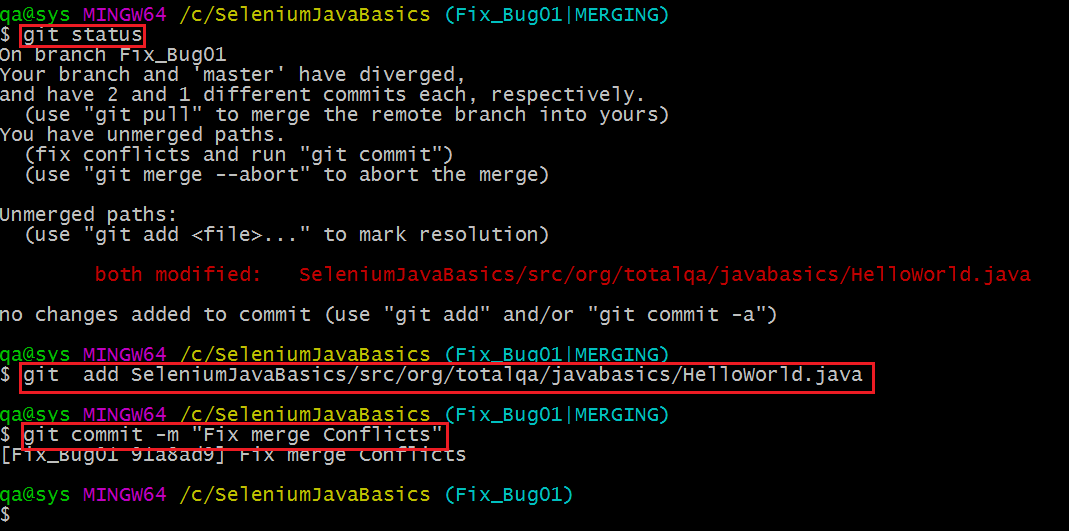
5. Execute the below commands in the Git bash to resolve the merge conflict.
git status

git add

git commit -m "Commit Message"

Fixing the merge conflicts

Fixing the merge conflicts

Conclusion:

In this example we have learnt how to resolve the merge conflicts in Github and Git.

Selenium WebDriver Tutorial WebElement Methods

      No Comments on Selenium WebDriver Tutorial WebElement Methods


In this example we will discuss about the WebElement Methods available in Selenium WebDriver. Refer to the Link for WebElement API Methods.


Generally we mainly use methods like sendKeys(),click(),getText(). But they are so many other methods available to verify the input data entered by the user in the textbox. Verify the Css Attributes like color and font-size of the Web Element.

Is WebElement is a Interface or Class??

Answer:: Interface
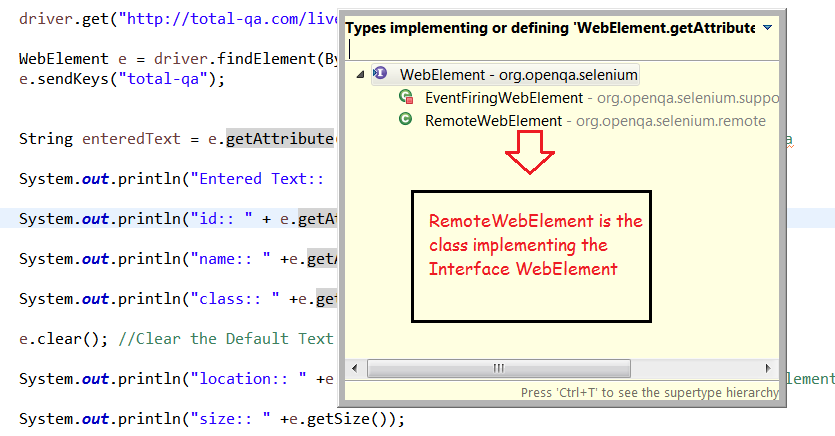
WebElement is an interface and all the abstract methods in the interface are implemented by the RemoteWebElement Class. Refer to the Link to get more information on Inheritance and Interfaces.

How do we know the Class which are implementing the Interface??

Hold the control button in the keyboard and place the mouse on the method and select Open Implementation as shown below to get the details of the classes which are implementing the interface.

Classes implementing the interface WebElement

Classes implementing the interface WebElement


RemoteWebElement Class implementing the WebElement Interface

RemoteWebElement Class implementing the WebElement Interface

getCssValue("background-color")
Returns the Color of the WebElement

getCssValue("font-size")
Returns the font-size

getLocation()
Returns the Location of the WebElement. A point, containing the location of the top left-hand corner of the element

getAttribute("value")
Returns the input data entered by the user in the Text box using sendkeys() method.

Example for fetching the background-color and font-size of the Elements in the Web Page:

Output:

Entered Text:: total-qa
id:: username
name:: username
class:: textboxcolor padding
location:: (268, 849)
size:: (231, 30)
color:: rgb(255, 255, 0)
fontsize:: 13.3333px
Tag Name:: input

Conclusion:

In this example we have learnt how to use the WebElement Methods in Selenium WebDriver.

XPath normalize-space example in Selenium WebDriver


In this example we will discuss about the usage of normalize-space in Xpath.

We already aware of the Functions like text(),contains(),starts-with(),last() and position() in Xpath. Refer to this link to know details about these functions. Xpath Functions.

Generally, normalize-space(String s) is a method in Xpath useful to remove any leading or trailing spaces in a String. This is also works like a trim() function in java.lang.String class. We will see different examples

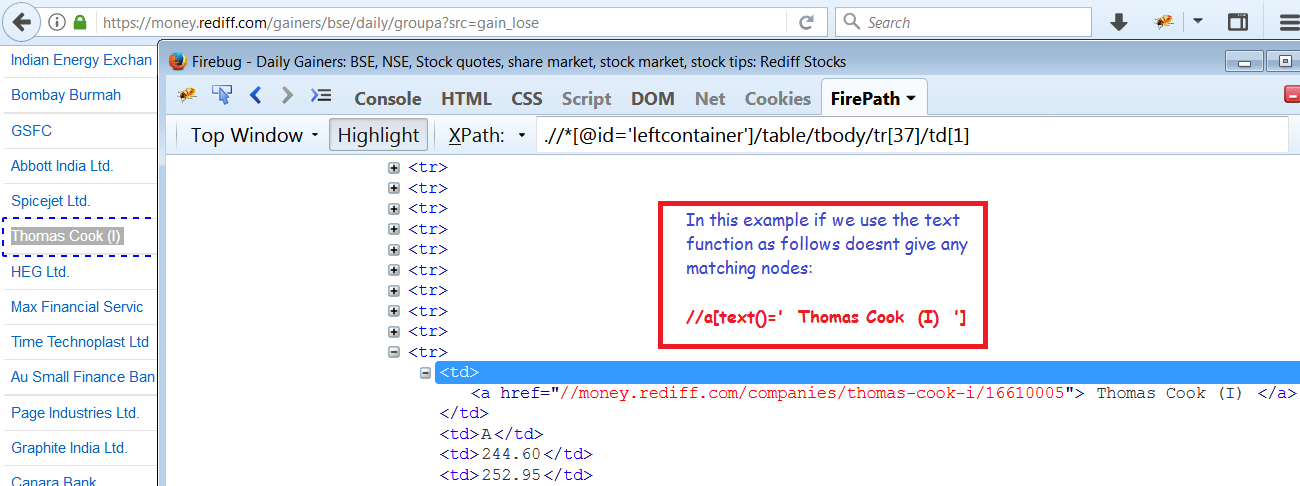
In the above example the table data has spaces for Thomas Cook. If we use Xpath Text Function it doesnt provide any value as an output. Please check the screenshot below:

Usage of Xpath text() Function

Usage of Xpath text() Function

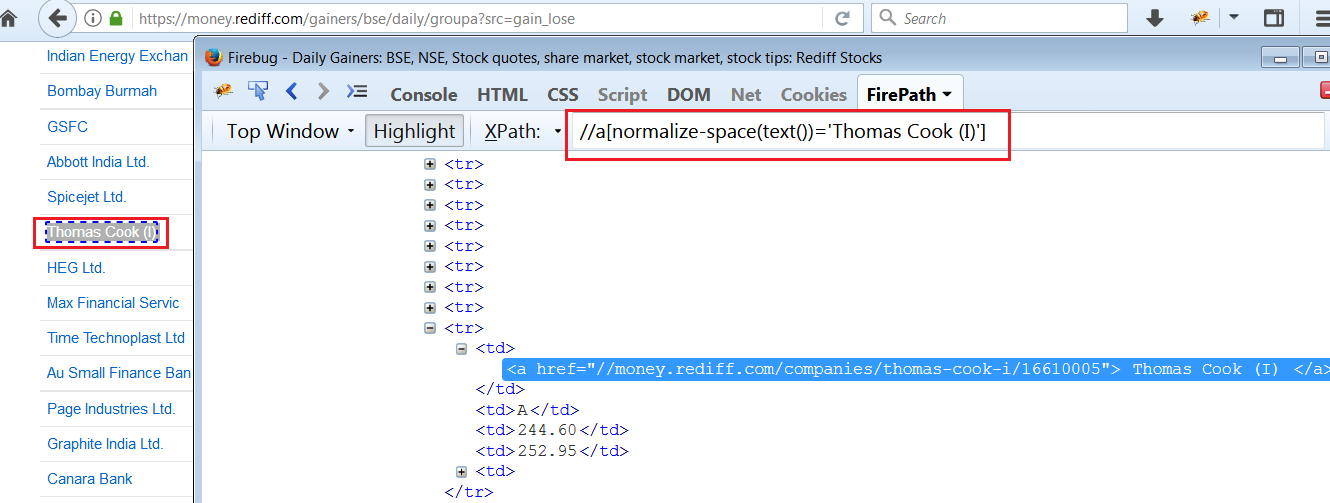
Usage of normalize-space(text()) method in Xpath.Please check the screenshot below:

xpath-normalize-space-example

xpath-normalize-space-example

Selenium WebDriver Example to fetch the price for a particular Stock:

Therefor the extra spaces in the table data is ignored and identified the element and fetches the stock price.

Output:

Stock Price::: 244.60

Conclusion:

In the example we have learnt how to use the normalize-space in Xpath.

[findElements Example]How to find Broken Links in a WebSite using Selenium WebDriver?

[findElements Example]How to find Broken Links in a WebSite using Selenium WebDriver?


In Web Applications it is important to identify the Broken Links. As manual Tester when we click on hyper link if we get HTTP_404 page not found. Then it is obvious that the page is broken. It would be good to find all the HTTP Error Codes as well https://en.wikipedia.org/wiki/List_of_HTTP_status_codes.
There are different ways of identify the broken links manually using the following Add-on:
LinkChecker Addon for Firefox which helps to identify the broken links in web page opened in Firefox.
In order to identify all the links in a webpage we can use findElements() method which returns the List <WebElement>


Differences between FindElements and FindElement in Selenium WebDriver
findElement(By)
1. WebElement e = driver.findElement(By.name(“username”));
findElement(By) returns an WebElement as a return value.
2. findElement(By) throws an exception if it is unable to find an Element.
WebElement e =driver.findElement(By.name(“abc”));
NoSuchElementException is an RunTimeException/Unchecked Exception
3. findElement(By) always selects the first one in the list of matching WebElements.


findElements(By)
1. findElements(By) returns an List of WebElements
Details About List:
Click on this link to know more about Collections: java.util.Collection


List is available under java.util package.
List is mainly useful to store multiple objects which are duplicates as well.
“abc”
“abc”
WebElements which hare having same properties are known as duplicates.
size() – number of the objects available in list
get(int index)- helps in retrieving the particular object
int a[]={1,2,3,4,5};
a[0]// 0 is the index value in Arrays and it 1 in Xpath.

2.findElements(By) returns an empty list if its unable to find an element
List list = driver.findElements(By.name(“abc”));
Empty List means list.size() is zero.
3. findElements(By) selects all the matching webElements and returns a list.


Logic to Identify the Broken Links in a WebPage:

Therefore we can find all the Broken Links in a WebPage using HTTPURLConnection and findElements method in Selenium WebDriver.
Hope this tutorial helps you in checking Broken links using selenium webdriver.


[Solved] java.lang.ClassCastException using Generics in Java

[Solved] java.lang.ClassCastException using Generics in Java


Generally when ever we write the Java Logic its better to know the issues during the compile time rather than at run time. If we do not use Generics we might face java.lang.ClassCastException when trying to add an Integer Object instead of String Object and try to retrieve the value and perform an operation on it will cause this exception. How do we overcome this using Generics we will learn from this tutorial.

Lets implement the Logic without using the Generics:

Executing this Program returns following output in the Console:


Exception in thread “main” java.lang.ClassCastException: java.lang.Integer cannot be cast to java.lang.String
at org.h2k.javaprograms.ClassCastExceptionExample.main(ClassCastExceptionExample.java:15)


Lets implement the Logic using the Generics:
In the above program change the Line No:8 as follows:

List<String> strList = new ArrayList<String>();


Conclusion:
Therefore implementing Generics avoids ClassCastException During run time. Any issues we can caught during Compile Time.

Rerunning failed tests using IRetryAnalyzer,ITestResult in TESTNG

Rerunning failed tests using IRetryAnalyzer,ITestResult in TESTNG


TESTNG is a java framework used by JAVA Developers to perform unit testing of their code.
We can even use TESTNG for Selenium to automate the manual testcases and verify the output by inserting
the Soft Assertions and Hard Assertions. TESTNG generates the reports once the testcase run completed.
It generates the test-output directory with results in index.html and emailable-report.html. It also generates the testng-failed.xml for the tests which are failed in the Suite. Now it is possible to re-run the failed tests.
Mostly the Selenium tests will fail due to multiple reasons, one of them is NoSuchElementException this occurs due to TimeOut Issues where the element takes time to display. In those cases it would be good to re-run and fix the issues.

Steps for Implementing the Retry Logic:

1. IRetryAnalyzer is an interface which has to be implemented the Class RerunTests.java.


2. Write the TestNG Testcase that has to be re-run. Use TESTNG attribute retryAnalyzer and provide the value for the attribute as RerunTests.java.

3. Finally the failed testcase executes as per the retryCount mentioned in the RerunTests.java.

Rerun Failed Tests using Retry Logic

Rerun Failed Tests using Retry Logic