Xpath Helper,ChroPath Plugins,Javascript Console for Chrome Browser

Xpath Helper,Chropath Plugins,Javascript Console for Chrome Browser


In Selenium they are totally 8 Locators. Out of all Locators, Xpath is very important which helps to identify the WebElements. Identifying the Xpath in Firefox Browser is easy using Firebug and Firepath plugins. But Firebug and Firepath plugins are not compatible with latest version of Firefox Quantum. How do we over come this is mentioned in detail in this Tutorial Link.
Now, how are going to identify the Xpath on Chrome Browser using the following
Xpath Helper
ChroPath
Javascript Console


Usage of Xpath Helper:
1. Open Chrome Browser and access the below Link to add the Xpath Helper plugin to the Chrome Browser.
Xpath Helper Link:
https://chrome.google.com/webstore/detail/xpath-helper/hgimnogjllphhhkhlmebbmlgjoejdpjl?hl=en
2. Once the plugin is added it is visible on the right hand side of the browser as shown below:

Xpath Helper Plugin

Xpath Helper Plugin


3. Open New browser and Hit Ctrl+Shift+X to open the Xpath Helper. Hold the Shift button and mouse hover on the Element to view the Xpath and Results.
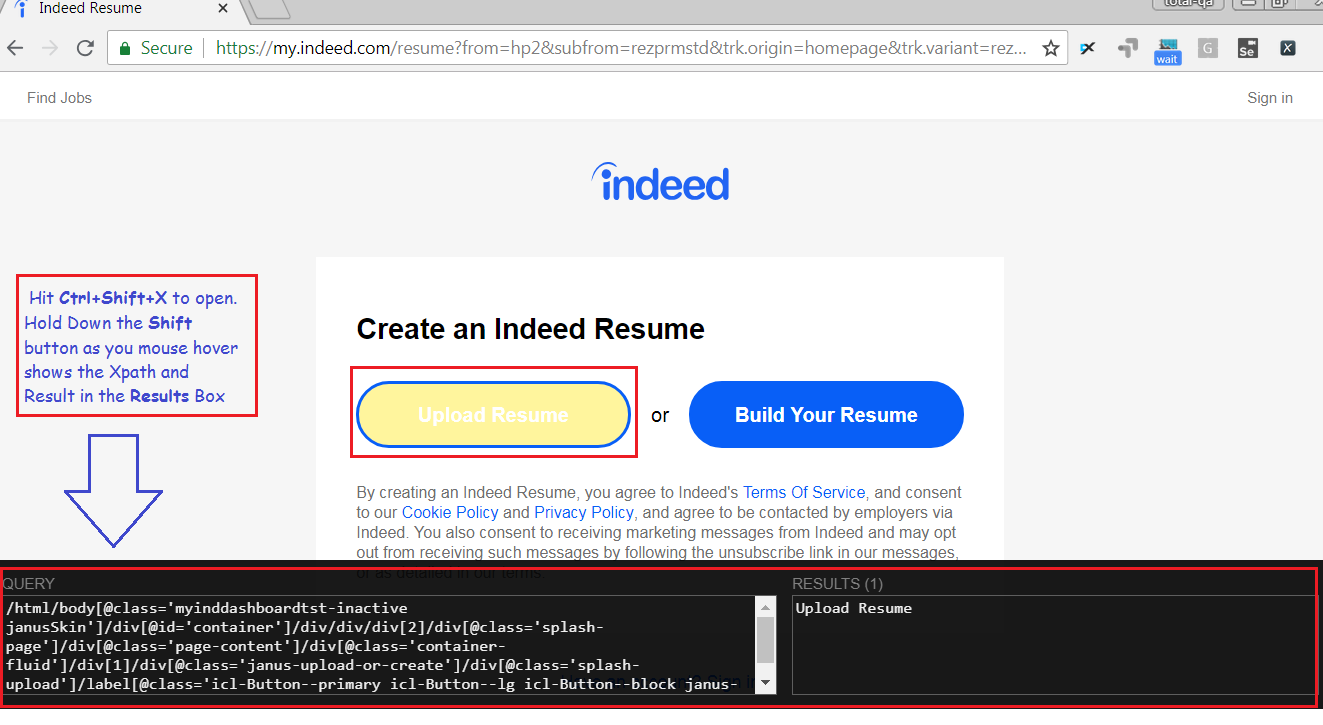
Hit Ctrl-Shift-X to open Xpath Helper.    Hold down Shift as you mouse over elements on the page to view the Xpath and the  Results .

Hit Ctrl-Shift-X to open Xpath Helper.Hold down Shift as you mouse over elements on the page to view the Xpath and the Results .


Usage of ChroPath:
This plugin is developed by Sanjay Kumar.
1. Open Chrome Browser and access the below Link to add the ChroPath plugin to the Chrome Browser.
ChroPath Link:
https://chrome.google.com/webstore/detail/chropath/ljngjbnaijcbncmcnjfhigebomdlkcjo
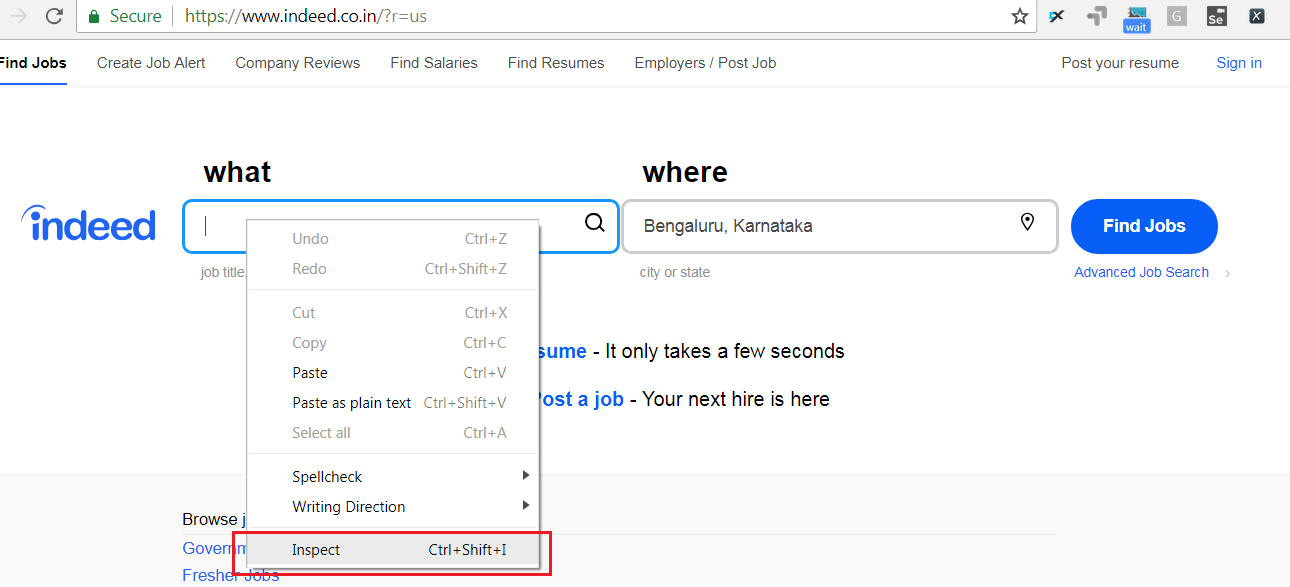
2. To open ChroPath right click on any Element and Select Inspect as shown below:

Inspecting an Element in Chrome Browser

Inspecting an Element in Chrome Browser


3. Open Chropath as shown below.
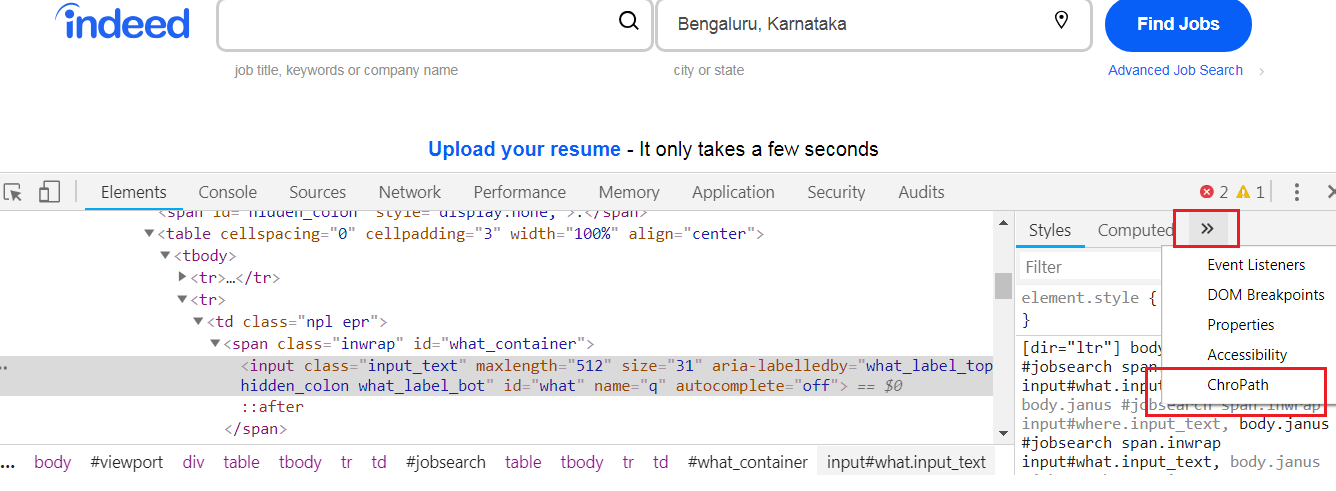
Select ChroPath Option

Select ChroPath Option


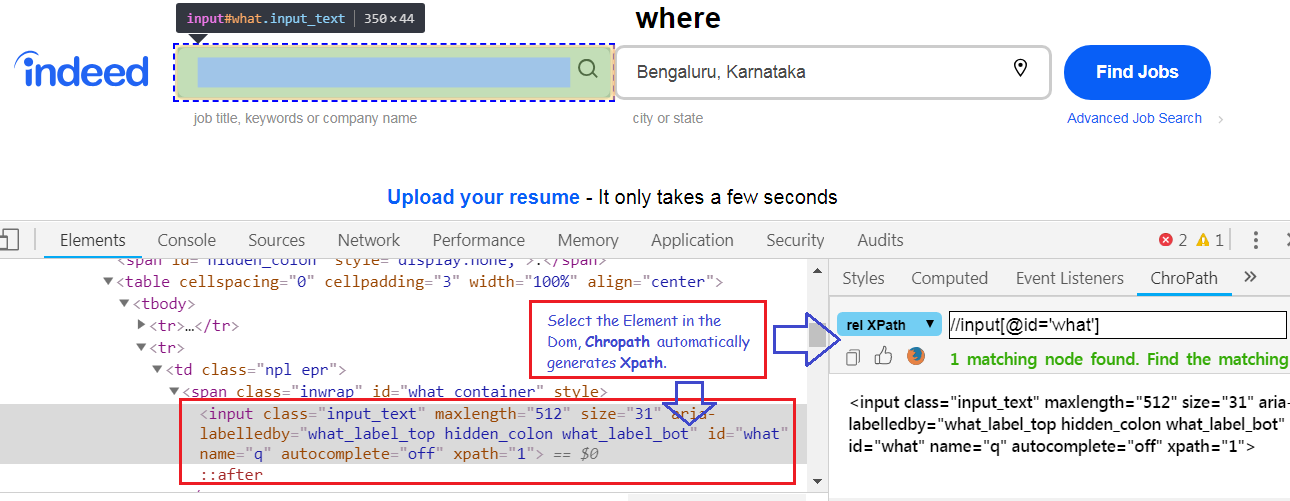
4. Select the Relative Xpath Option in ChroPath.

5. To generate XPath/CSS inspect element or click on any DOM node, it will generate the unique relative XPath/absolute XPath/CSS selector for the selected node.
Chropath Relative Xpath,Absolute Xpath,Css

Chropath Relative Xpath,Absolute Xpath,Css


Usage of Javascript Console:
1. Javascript Console which is part of Developer tools in Chrome Browser helps to identify the Xpath and also helps to execute all the Java Script Commands. For reference to the Javascript Commands click on this link https://www.w3schools.com/js/default.asp
2. Right click on any Element and Select Inspect as shown below:

Inspecting an Element in Chrome Browser

Inspecting an Element in Chrome Browser


3. Refer to the Commands for Reference. Type the below commands in the console to view the results.


console.log("message")
$x("//img")
$x("//input")
$x("//input[@id='what']")

Chrome Browser Developer Tools - Javascript Console

Chrome Browser Developer Tools – Javascript Console


Note: Chropath is also available fore Firefox as well. Please refer to the link below:
https://addons.mozilla.org/en-US/firefox/addon/chropath-for-firefox/

The Difference Between :nth-child and :nth-of-type CssSelector

The Difference Between :nth-child and :nth-of-type CssSelector


CssSelector is one of the most important Locator in Selenium WebDriver. Also Css is faster when compare to Xpath. In CssSelector to use index we use either nth-child(indexno) or nth-of-type(indexno).So, what is the difference between the two. Let us see an example in this tutorial.

Consider the following HTML Source as below:
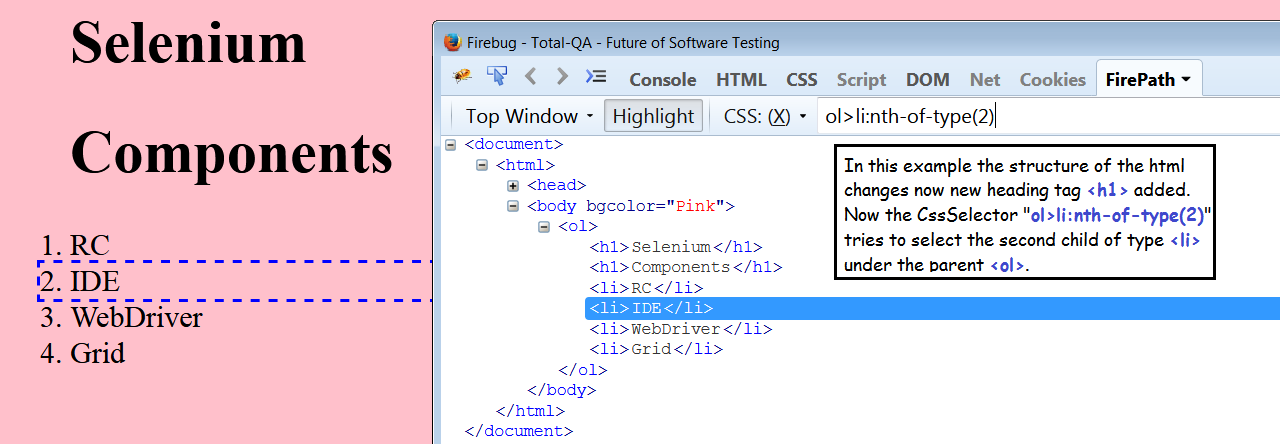
In this example they are 4 li tags under the parent ol.

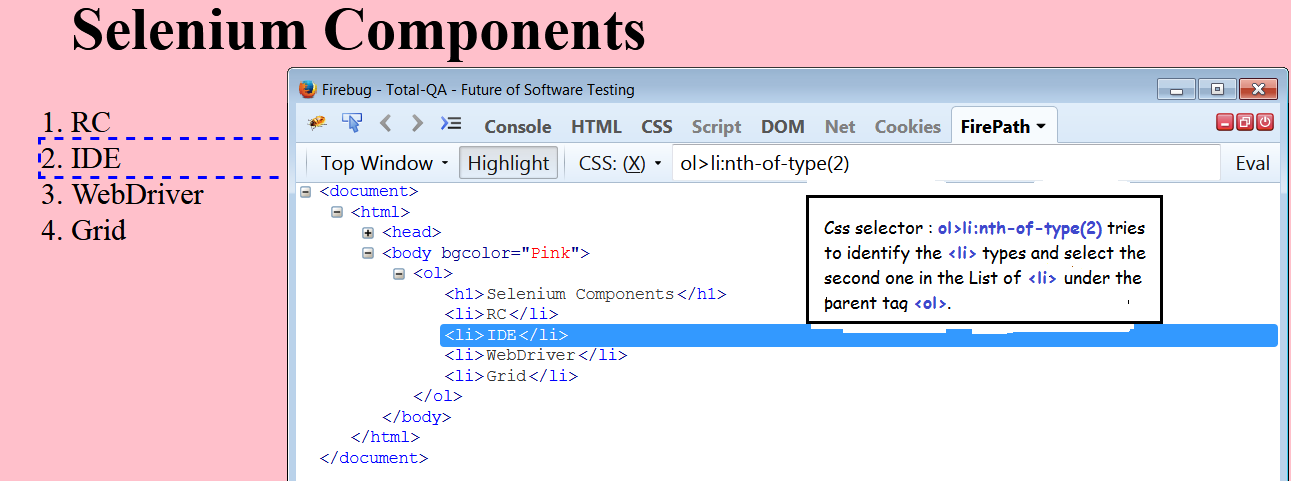
Identify the Value IDE using the nth-of-type(index) as follows

Usage of nth-of-type(indexno)

Usage of nth-of-type(indexno)


Identify the Value IDE using the nth-child(index) as follows
CssSelector tagName>nth-child(index)

CssSelector tagName>parent>child:nth-of-type(index)

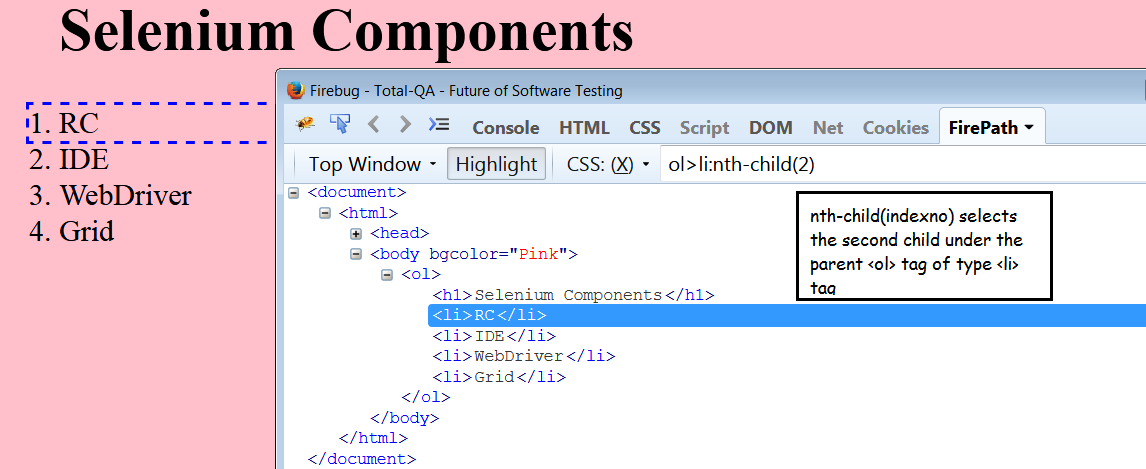
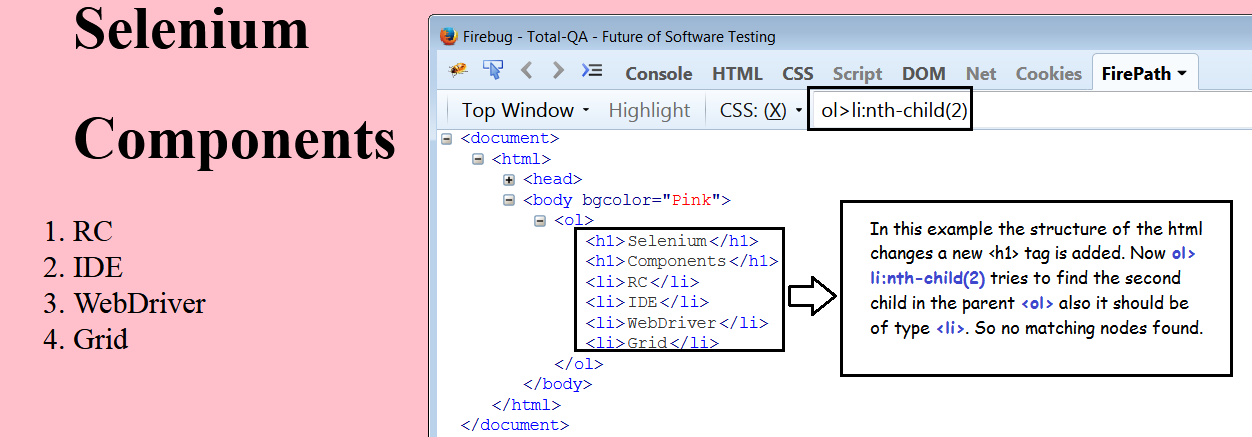
Let us see now if the html Structure is changed a new Heading Tag h1 is Added.


Identify the Value IDE using the nth-of-type(index) as follows

nth-of-type(indexno)

nth-of-type(indexno)


Identify the Value IDE using the nth-child(index) as follows
Usage of nth-child(index)

Usage of nth-child(index)


Conclusion:
In Csselector nth-of-type(index) is more useful then nth-child(index). Even though the html
structure changes nth-of-type(index) will work.

Css Tricks for Reference: https://css-tricks.com/
DevOps Tutorial-1 Pushing Code to Github

      No Comments on DevOps Tutorial-1 Pushing Code to Github

DevOps Tutorial-1 Pushing the Code to Github


In this tutorial we will discuss about the significance of Github in Real Time Projects and also we will see step-by-step process of Pushing the Code from Local Repository from Global Repository.
Github is an Centralized Distributed Versioning System useful to track the Files or Set of Files in a project.
Github is a socialized network like Facebook where developers and testers connect and share there code and help each other.

Step-By-Step process of Pushing code from Local to Global Repository
1. Sign-up to Github and create a Global Repository in Github.

Creating a Global Repository in Github

Creating a Global Repository in Github


2. Provide the Global Repository Name as SeleniumJavaBasics.
Public Repository URL -> https://github.com/totalqa9/SeleniumJavaBasics

Global Repository

Global Repository


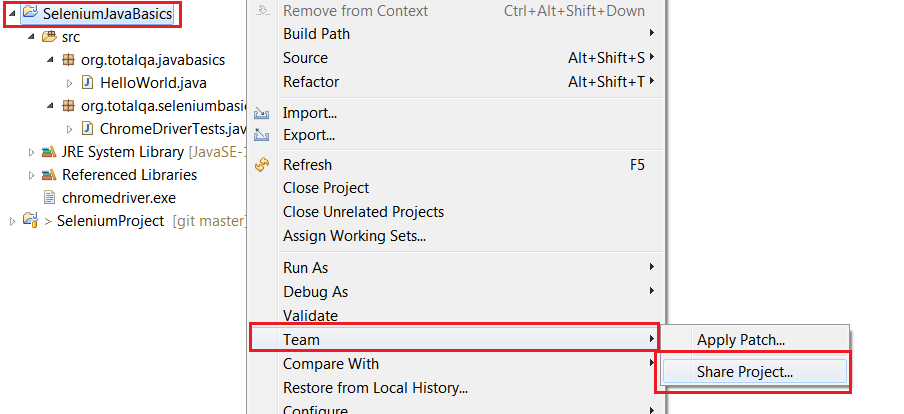
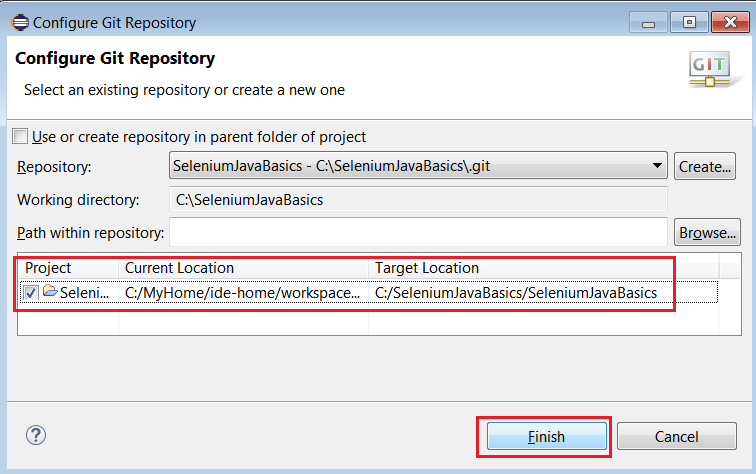
3. Share the Java Project Created in Eclipse to create a Local Repository.
Share Project

Share Project


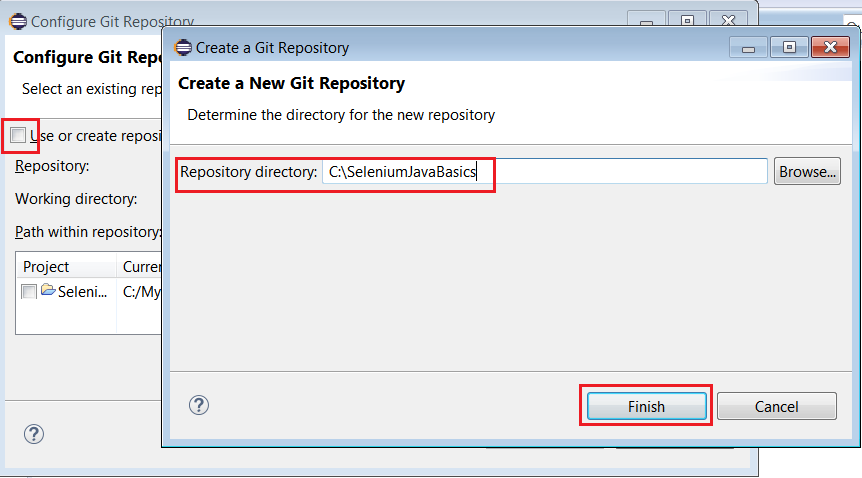
4. Select the Working Directory to create a Local Repository.
Select Local Directory to Store Github Repository

Select Local Directory to Store Github Repository


5. The Local Repository got selected.
Local Repository

Local Repository


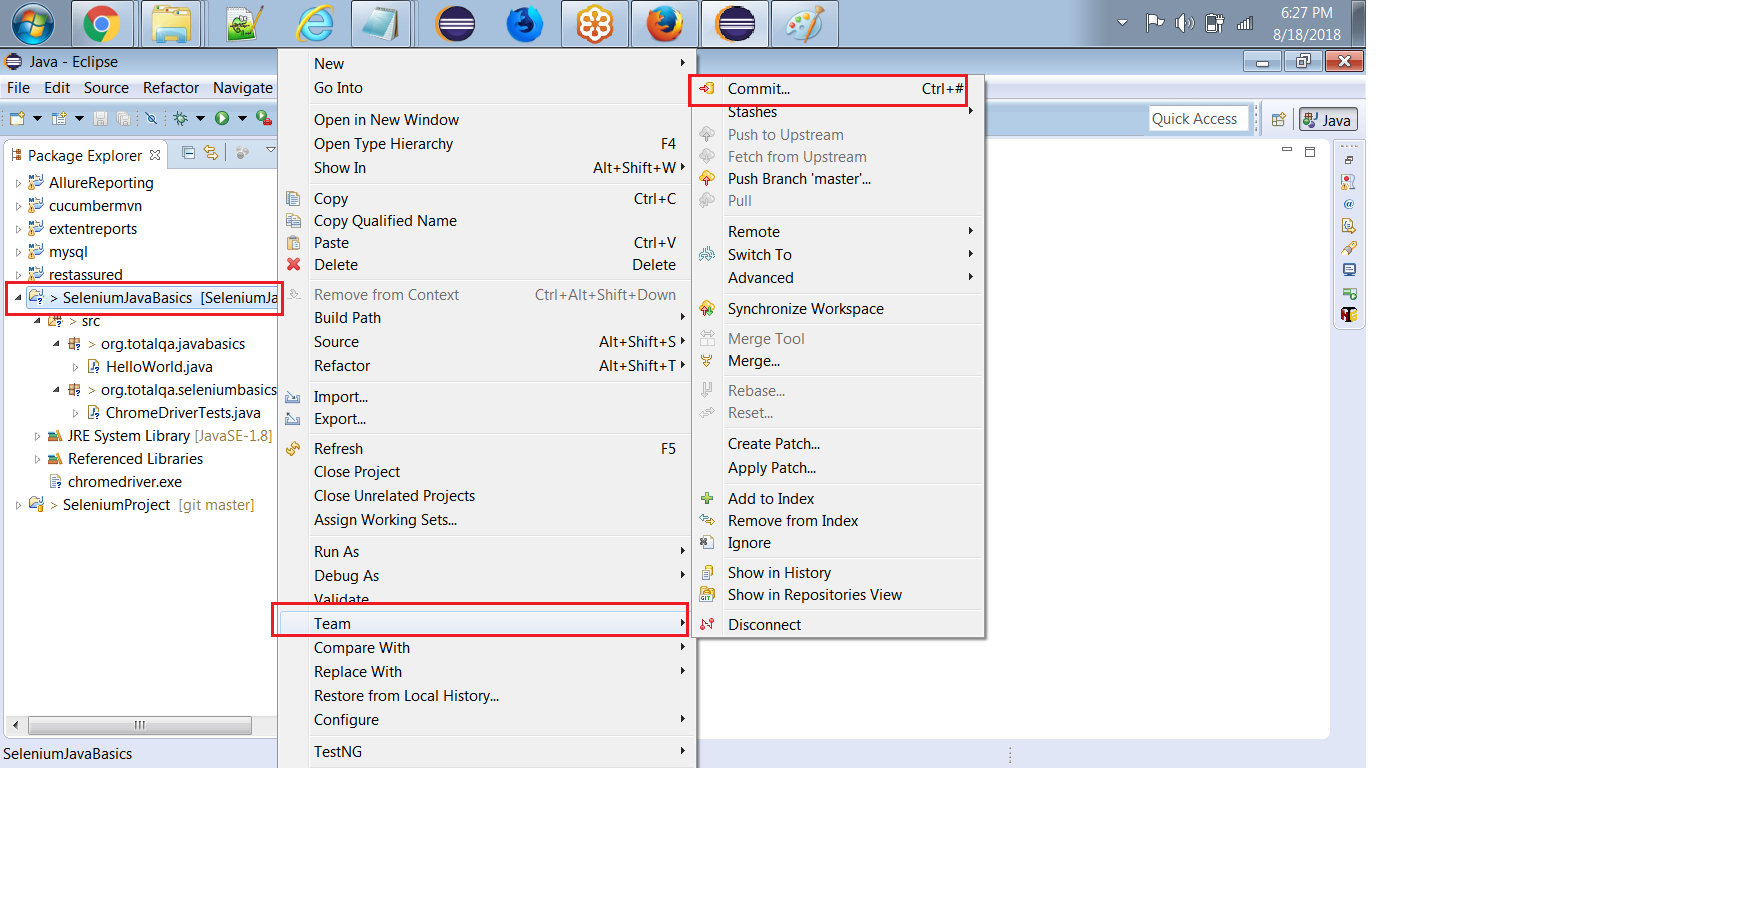
6. Commit and Push the Local Repository to Global Repository.
Commit and Push the Java Project

Commit and Push the Java Project


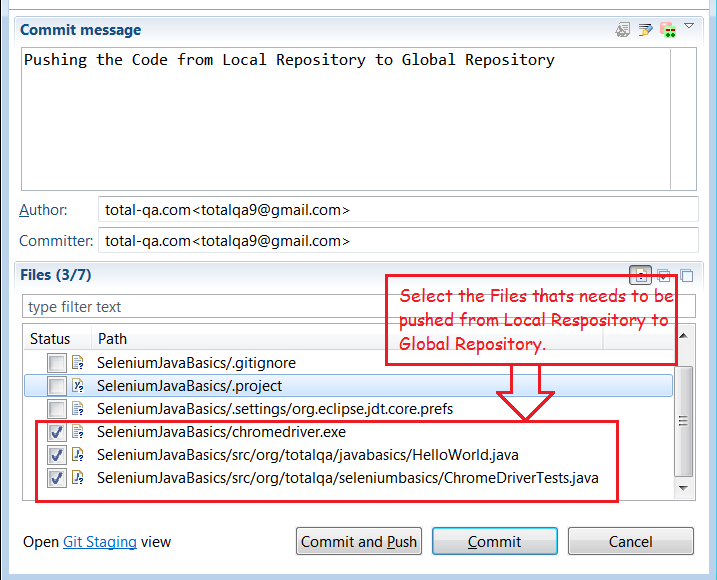
7. Select the Files in the Java Project to Push. Generally all the source files and xml files in the project will be committed. Ignore any reports generated during run-time.
Provide the Commit Message and Select the Files to Push

Provide the Commit Message and Select the Files to Push


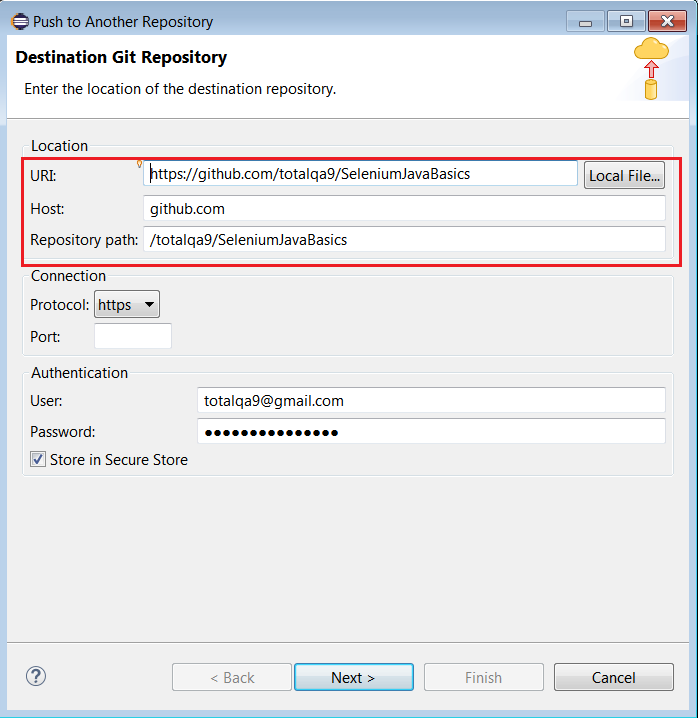
8. Provide the Destination Git Repository Details.
Destination Git Repository Details

Destination Git Repository Details


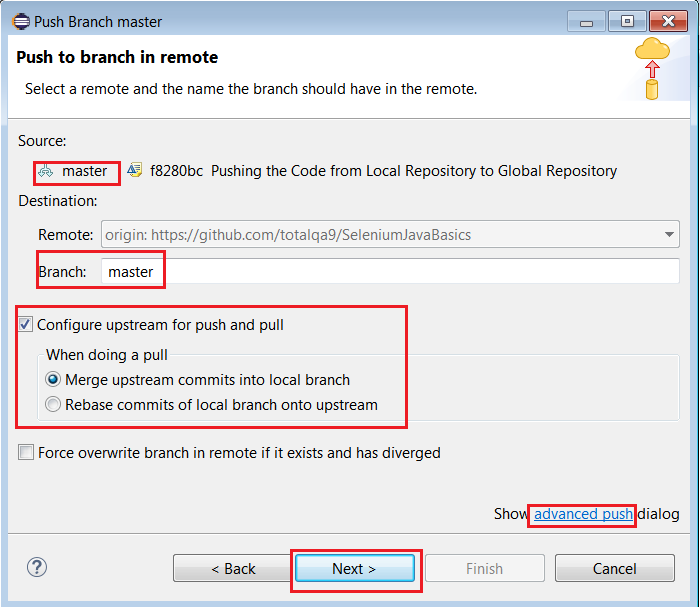
9. Pushing the Branch to Remote.Click on the advanced push link.
Advanced Push

Advanced Push


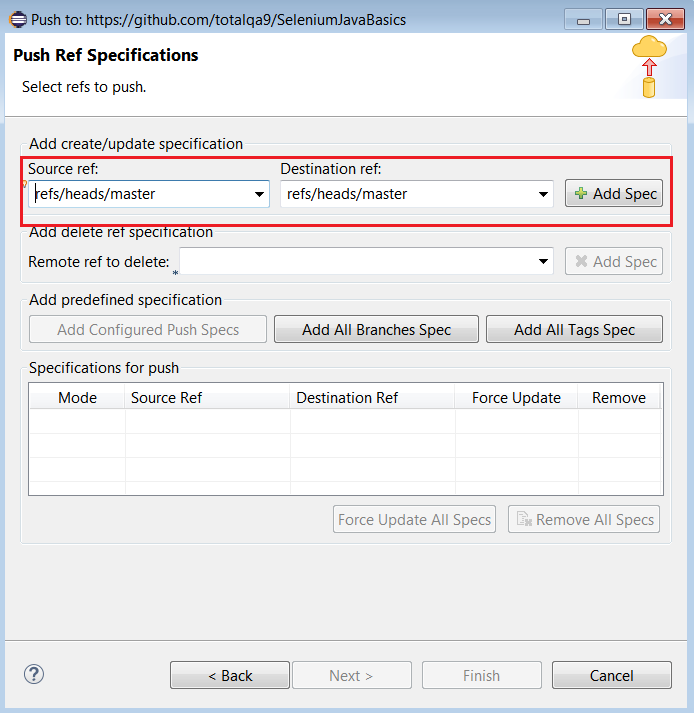
10. Provide the Source Ref and Destination Ref specification.
Push Ref Specification

Push Ref Specification


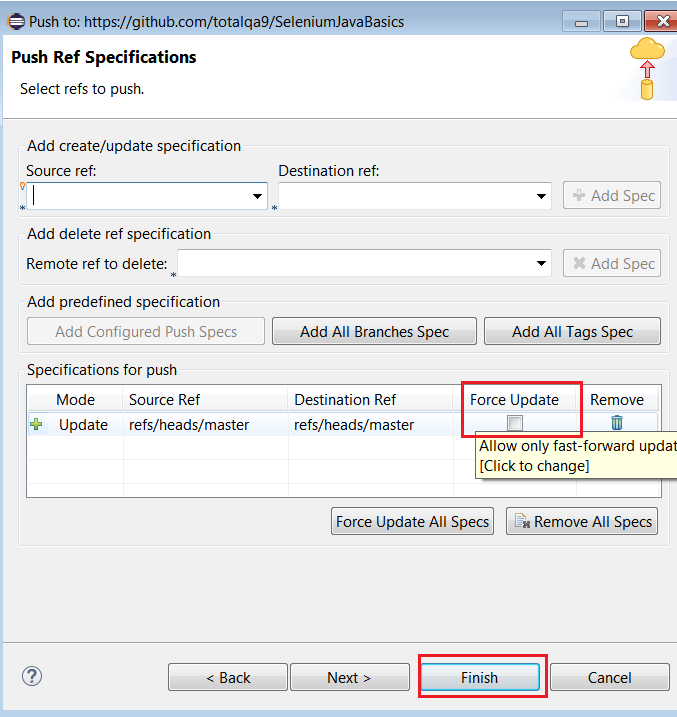
11. Select the Force Update Checkbox and Click on Finish button.
Force Update

Force Update


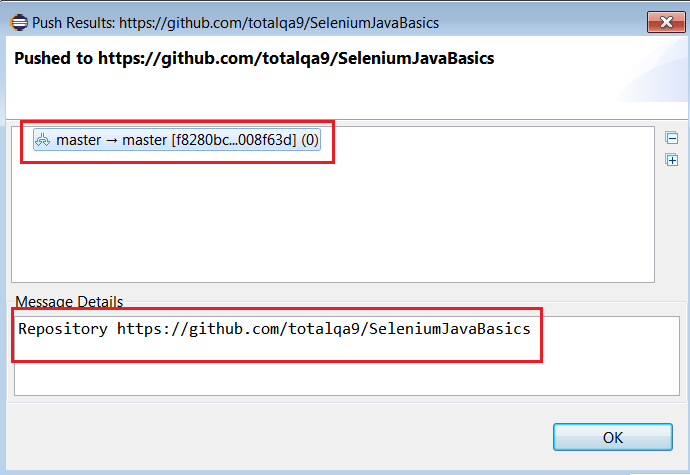
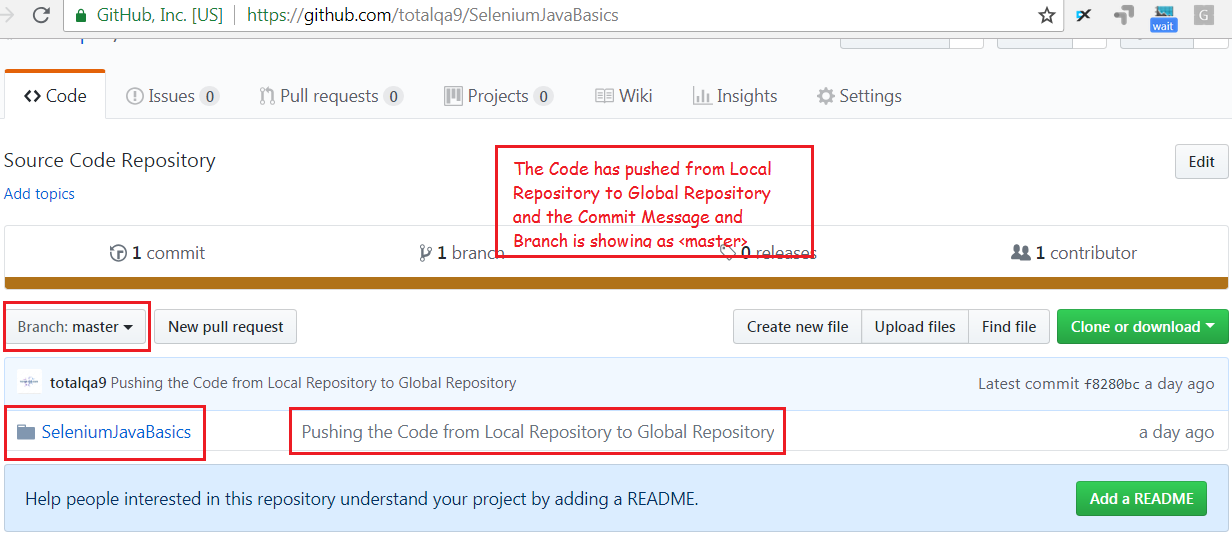
12. Finally the Source Code from the Local Repository pushed to Global Repository. Please find the Push Results below:
Push Results

Push Results


13. As a result the Code pushed to the Global Github Repository.
Global Repository

Global Repository

How can I install a second version of Firefox without affecting the first?

How can I install a second version of Firefox without affecting the first?


In the case of Selenium Locators to learn about Xpath and CssSelector its good to practice the Xpath and Css Selector on Firefox Addons like Firebug and Firepath . These Add-ons are compatible on Older Version of Firefox 55.0/56.0 and they are not compatible with Firefox Latest version Quantum.
To Download the older version of Mozilla Firefox we can access the link https://ftp.mozilla.org/pub/firefox/releases/.
To run the Selenium WebDriver Scripts we use the Selenium Jars , geckodriver.exe and Mozilla Firefox Latest Version which is Quantum.
So, can we have both Older version of Firefox and Latest Version of Firefox Quantum in the laptop.Is it possible???
Yes

Installing the First Version Mozilla Version – Latest
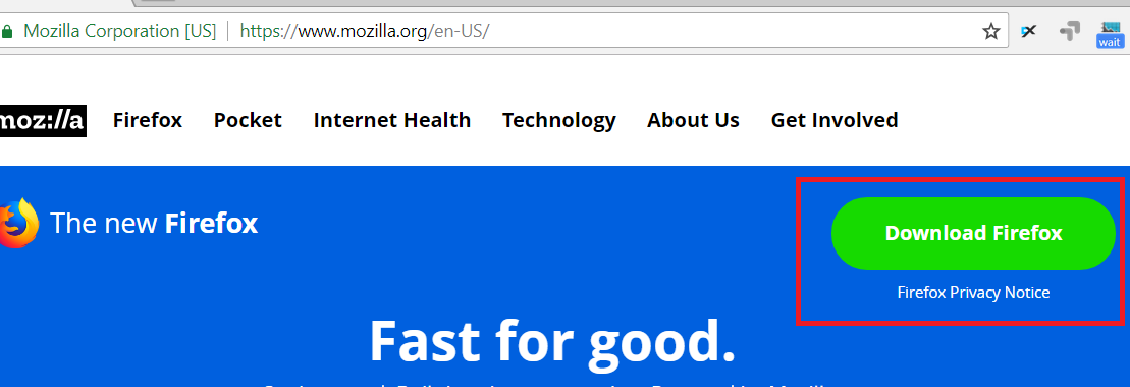
1. Access the mozilla firefox link . Click on Download button to download the executable file.

https://www.mozilla.org/en-US/firefox/new/

https://www.mozilla.org/en-US/firefox/new/


2. Open the executable file and complete all the Steps to download the Firefox in the C:\Program Files directory.
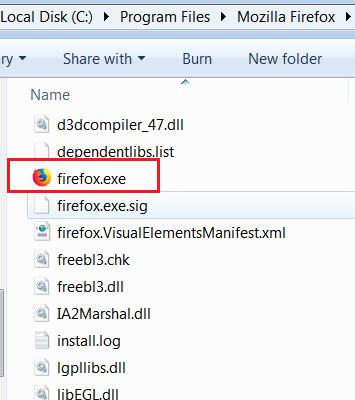
3. Double Click on the executable file to launch Firefox.
firefox.exe

firefox.exe


Installing the Second Version Mozilla Version – Older Version 55.0/56.0
1. Download the older version of Mozilla Firefox 55.0 from this link.
https://ftp.mozilla.org/pub/firefox/releases/55.0/win64/en-US/
2. Double Click on Firefox Setup 55.0.exe to Launch the Installer.
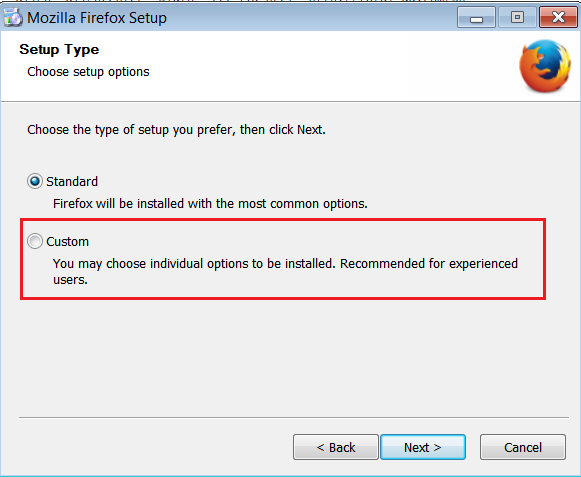
3. Select the Setup Type as Custom instead of Standard.

Setup Type - Custom

Setup Type – Custom


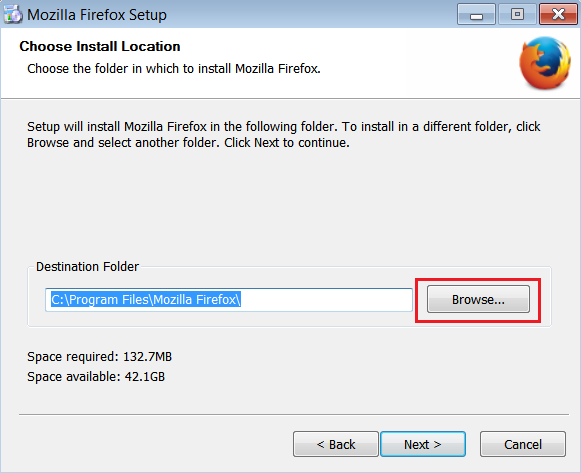
4. Click on Browse button to select the Path to install the older version of Firefox.
Mozilla Firefox Browse button

Mozilla Firefox Browse button


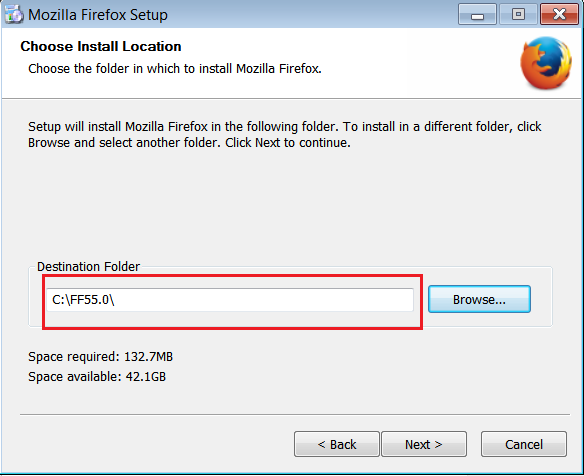
5. Create a Directory under C:\ and select the Path.
Mozilla Firefox Installation Directory

Mozilla Firefox Installation Directory


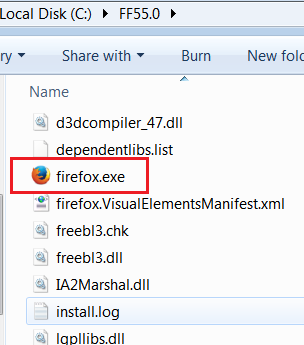
6. Once it is installed double click on firefox.exe to launch the firefox browser.
Firefox 55.0

Firefox 55.0


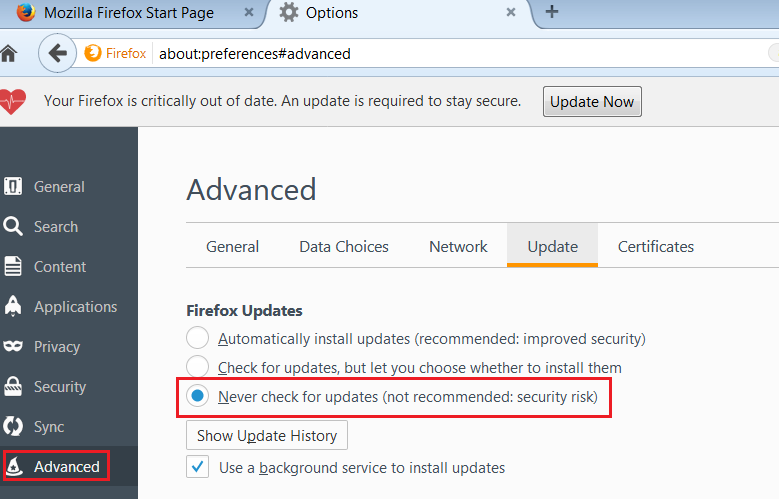
7. Navigate to Tools -> Options -> Preferences -> Advanced -> Update. Select the Option ‘Never Check for Updates’. Refer to the below screenshot.
Never Check For updates

Never Check For updates


8. Follow the link to Install Mozilla Firefox Add-ons[Firebug and Firepath].
Continue reading

How to Attach Java Docs Source & Selenium Docs Source To Eclipse

How to Attach Java Docs Source & Selenium Docs Source To Eclipse


In this tutorial we will learn how to attach the Java Source Code with attachments for the Java Projects
in Eclipse. This helps to understand the Coding Standards and Naming Conventions in Java. Also we can easily use this implement any logic in Selenium or Java Projects.

Attaching the Java Docs Source Code In Eclipse
1. Download the Java as per the steps mentioned in this tutorial.
JAVA Installation
2. Write a Sample Program in Java.

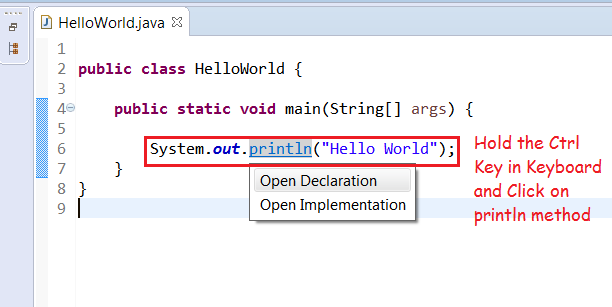
3. Hold the Ctrl Button in keyboard and Click on ‘println’ method.

Attaching Java Documentation & Source Code

Attaching Java Documentation & Source Code


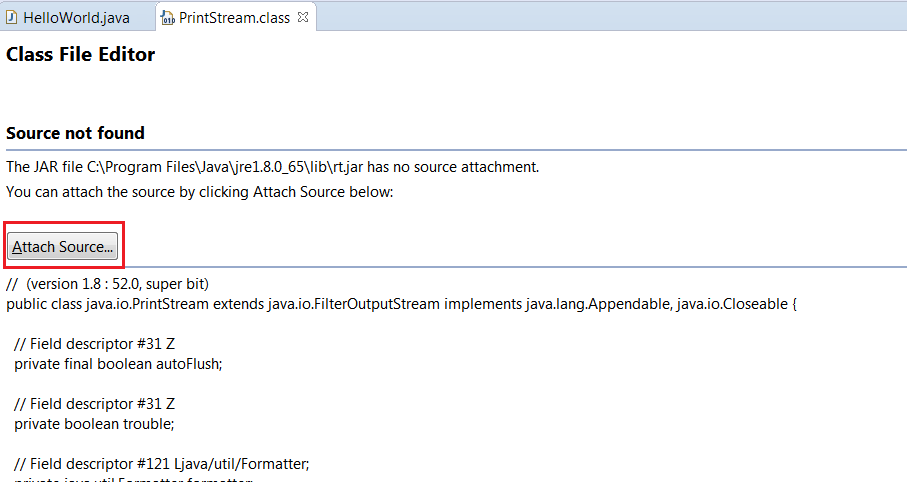
4. Click on Attach Source Button.
Attaching Source

Attaching Source


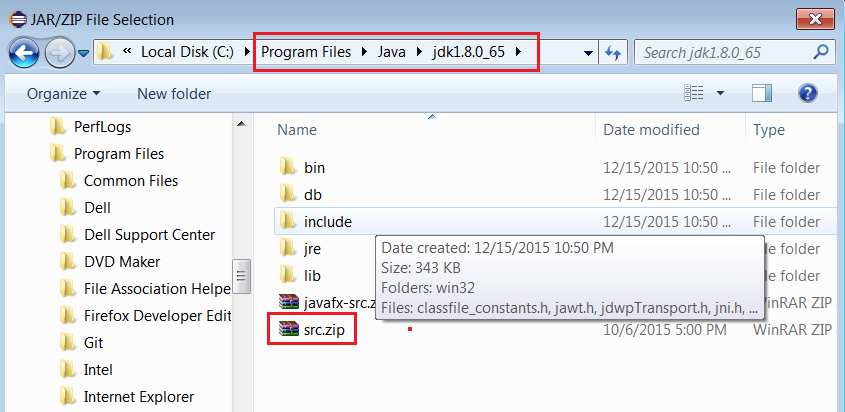
5. Click on External File Button to navigate to the location of the Java JDK [Java Development Kit] Source code.
Add the src.zip and click on OK button.

Adding src.zip to the project.

Adding src.zip to the project.


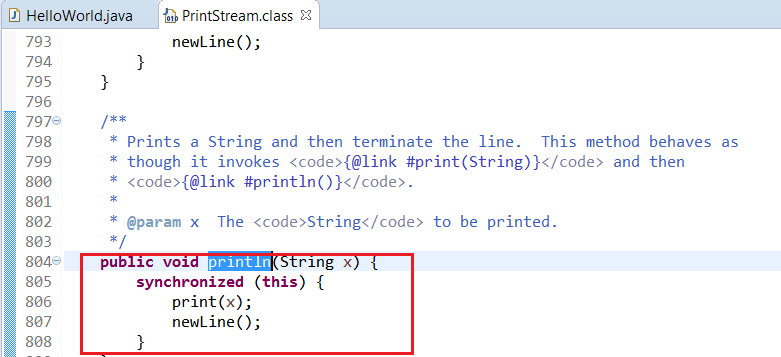
6. Hold the Ctrl Button and Click on ‘println’ method.
Java Source Code

Java Source Code

Attaching the Selenium Docs Source Code In Eclipse
1. Write a Sample Program in Selenium WebDriver.

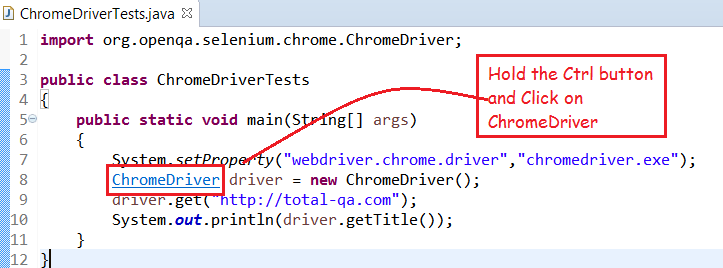
2. Hold the Ctrl Button in keyboard and Click on ChromeDriver Java Class.


Selenium Chrome Driver

Selenium Chrome Driver


3. Click on Attach Source Button and click on External File Button.
Attaching ChromeDriver.java Source Code

Attaching ChromeDriver.java Source Code


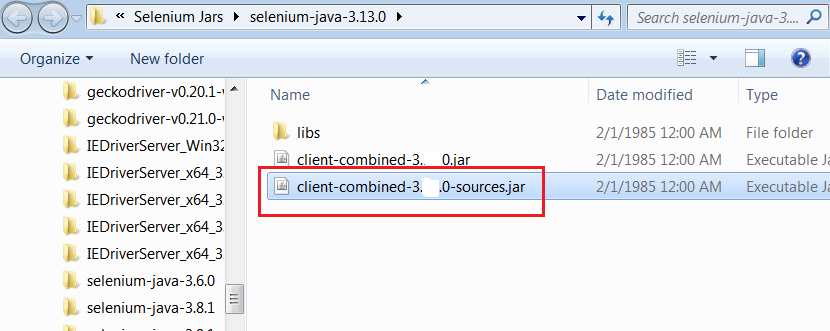
4. Navigate to the Location where the Selenium Libraries are downloaded.
Attaching Client Combined Sources Jar file

Attaching Client Combined Sources Jar file


Refer to the Step-By-Step Configuration of Selenium Jars in Eclipse. Configuration of Selenium Jars in Eclipse
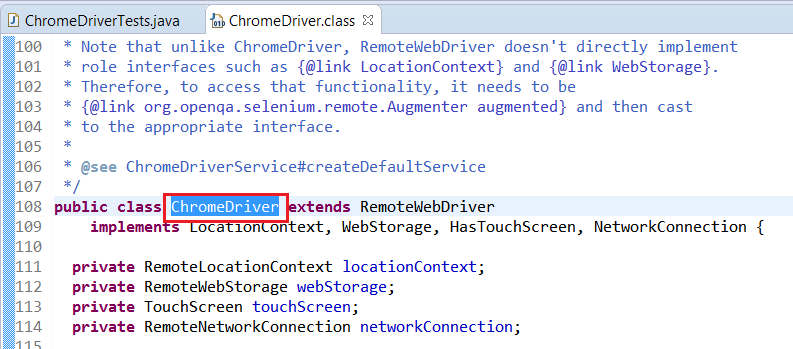
5. Hold the Ctrl Button and Click on ‘ChromeDriver’ Java Class.
org.openqa.selenium.chrome.ChromeDriver.java

org.openqa.selenium.chrome.ChromeDriver.java


Run Selenium WebDriver Tests on Chrome Browser against MAC,LINUX,WINDOWS


Selenium automates browsers like Firefox,Chrome and Internet Explorer.
Selenium WebDriver Scripts run against multiple Platforms MAC,Windows and Linux.
In this tutorial, we will discuss about Running Selenium WebDriver Scripts on Chrome Browser.

Steps to be Followed to Execute Tests on Chrome Browser
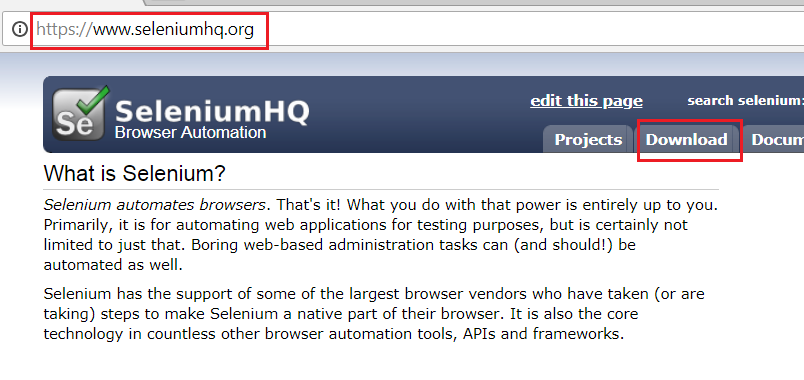
1. Access the URL http://seleniumhq.org and navigate to the Downloads tab.

seleniumhq.org

seleniumhq.org


2. Click on the Download Link the Latest version of Selenium Jars.
Selenium Webdriver Latest Version

Selenium Webdriver Latest Version


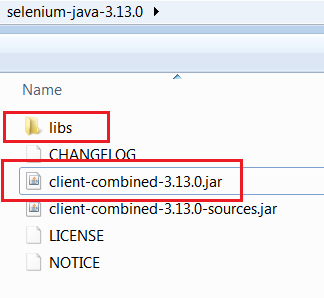
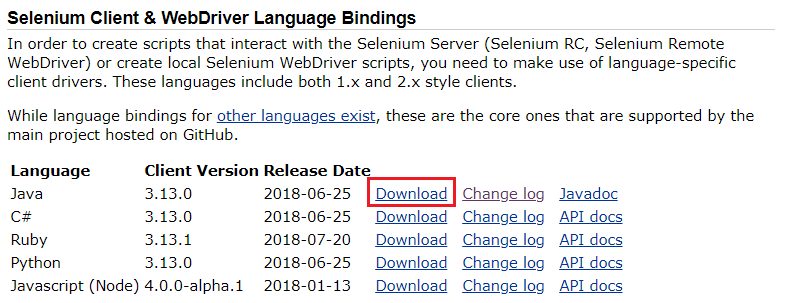
3. Unzip the selenium-java-3.xx.0.zip file and view the contents of the Jar files.
Selenium WebDriver & Library Jar Files

Selenium WebDriver & Library Jar Files


4. Open Eclipse->Right Click on Java Project->Build Path->Configure Build Path.
ConfigureBuildPath

ConfigureBuildPath


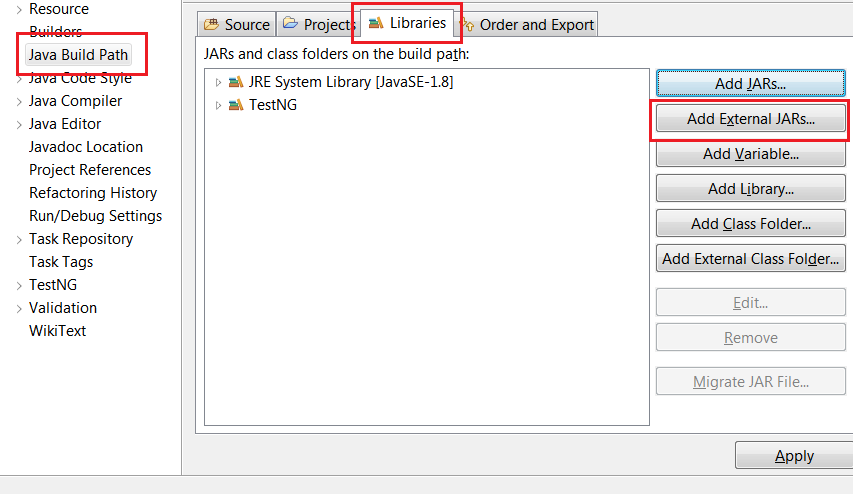
5. Click on ‘External Jars’ button and navigate to the directory where the Selenium Webdriver jars are unzipped in previous Step 3.
AddExternalJars

AddExternalJars

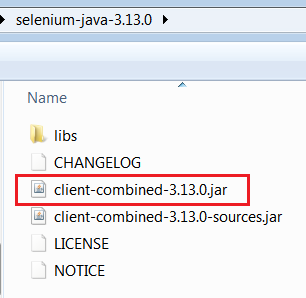
6. Add the External Jar – client-combined-3.xx.0.jar.

client-combined-3.13.0.jar

client-combined-3.13.0.jar

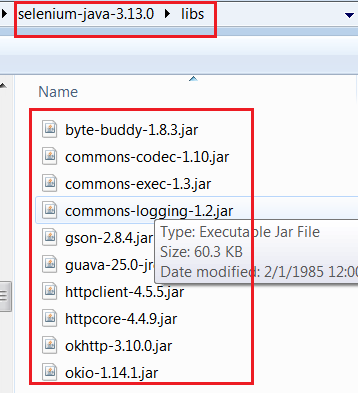
7. Add the External Jars available under lib folder unzipped in Step 3.

Selenium WebDriver Lib Jars

Selenium WebDriver Lib Jars


Update Chrome Browser
1. On your computer, open Chrome browser.
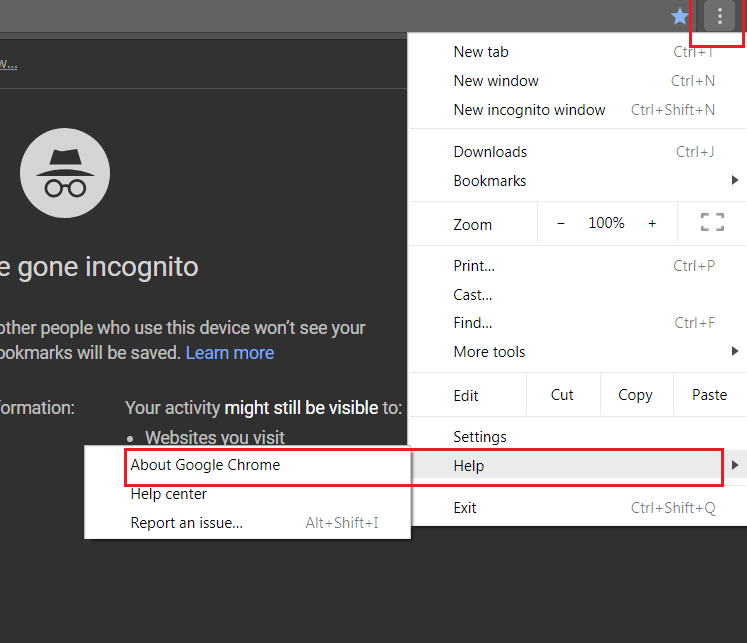
2. At the top right, click More as shown in the below screenshot.

Chrome Browser - Update Chrome

Chrome Browser – Update Chrome


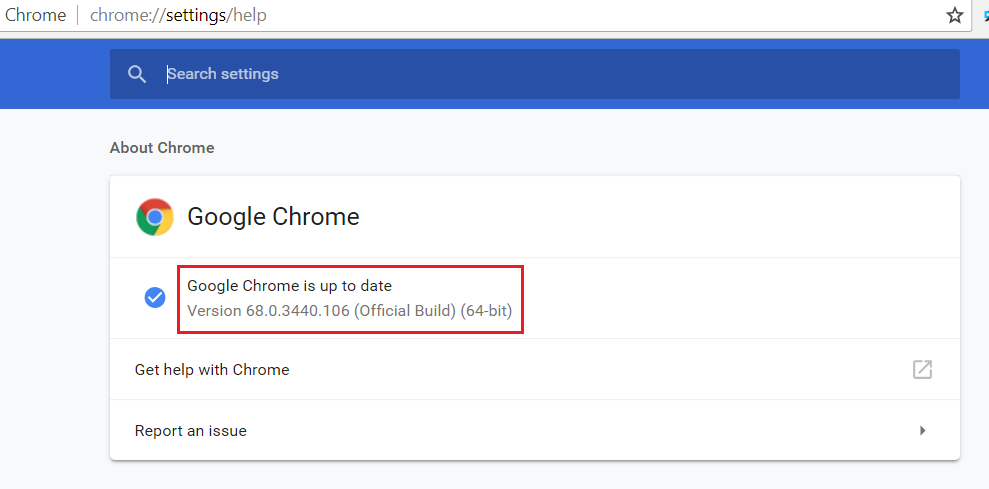
3. Click Update Google Chrome. If you don’t see this button, you’re on the latest version.
Chrome Latest - Version

Chrome Latest – Version


4. Click Relaunch and verify the Chrome Browser updated to the Latest version.


Download the chromedriver.exe and copy to Java Project.
1. Download the Latest Version of Chrome Driver Executable File from this link.
http://chromedriver.chromium.org/downloads
2. Download the Zip file according the Operating System-Windows,MAC,Linux.
Note: For Windows, 64 bit version is not available.

Chrome Latest Version-MAC,WINDOWS,LINUX

Chrome Latest Version-MAC,WINDOWS,LINUX


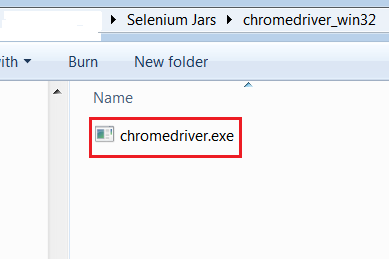
3. Unzip the File and look for chromedriver.exe.
Unzip the  file and look for chromedriver.exe

Unzip the file and look for chromedriver.exe


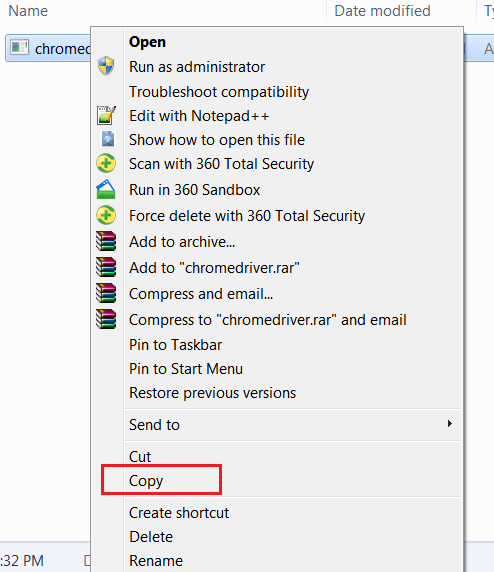
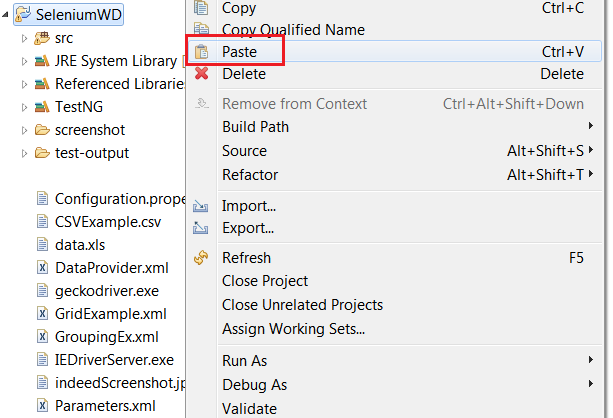
4. Right Click and copy the chromedriver.exe downloaded.
Copy chromedriver.exe

Copy chromedriver.exe


5. Open Eclipse and Right Click on the project in the package explorer and copy the Executable file in
the Java Project.
Selenium WebDriver PRoject

Selenium WebDriver PRoject


Example Program

Console Output

ConsoleOutput

ConsoleOutput


To disable the Information Logs in the console
Firefox:
Add the below statement before instantiating the Firefox Driver instance.
System.setProperty(FirefoxDriver.SystemProperty.BROWSER_LOGFILE,“null");
Chrome Browser
Add the below statements before instantiating driver instance.

ChromeOptions chromeOptions = new ChromeOptions();
chromeOptions.addArguments("--log-level=3");
chromeOptions.addArguments("--silent");
WebDriver driver = new ChromeDriver(chromeOptions);

Integrating GitHub with Jenkins for Continuous Integration and Continuous Delivery


GitHub is a Web-based Git repository hosting service. It offers all of the distributed revision control and source code management (SCM) functionality of Git as well as adding its own features.
Jenkins is an open-source continuous integration software tool written in the Java programming language for testing and reporting on isolated changes in a larger code base in real time. The software enables developers to find and solve defects in a code base rapidly and to automate testing of their builds.
Objective:
In this tutorial we will discuss how to integrate Github with Jenkins and triggering the code.

Steps to follow:
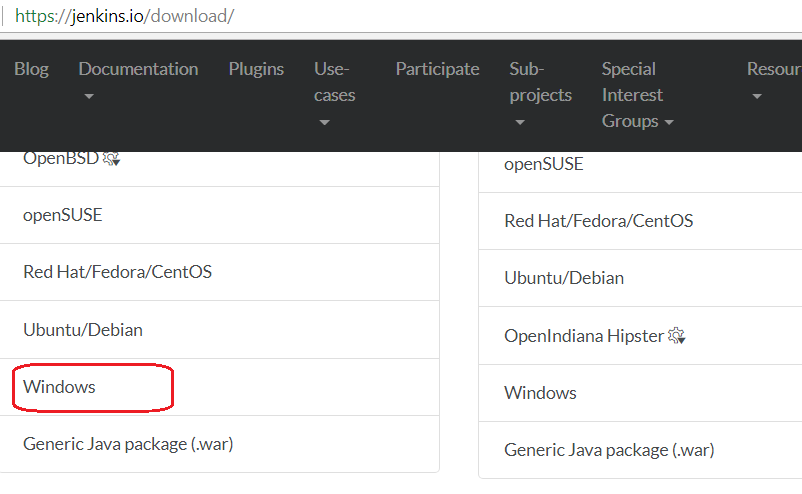
1. Download Jenkins from this link as a service in windows.

Download Jenkins

Download Jenkins


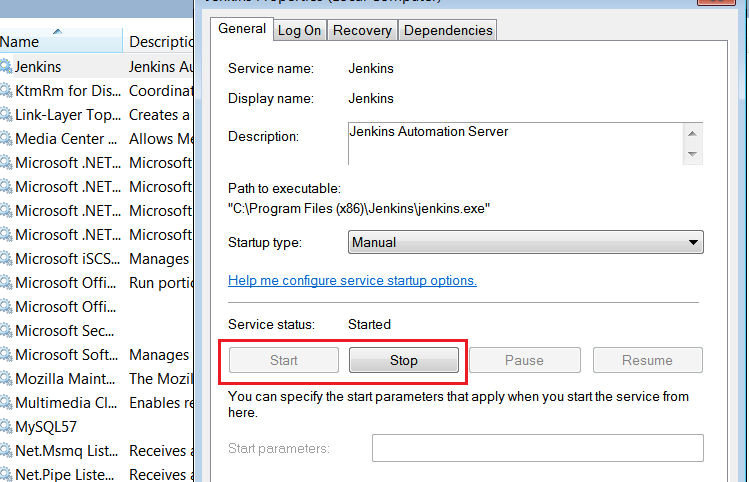
2. Open Windows Service Manager using to start and stop the Jenkins as a service.
services.msc-start and stop the Jenkins service

services.msc-start and stop the Jenkins service


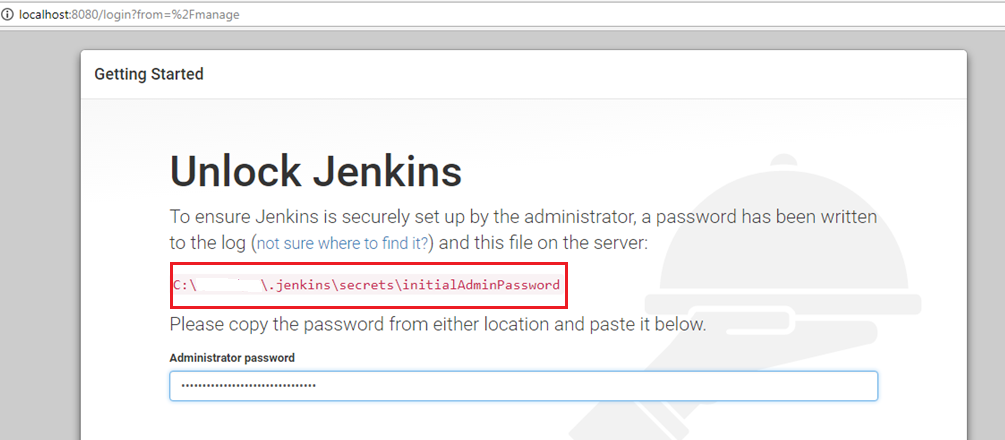
3. Access the Jenkins URL running on the port number 8080->http://localhost:8080 for the first time. Unlock jenkins by providing Initial Admin
Password.
Unlock Jenkins by using InitialAdminPassword

Unlock Jenkins by using InitialAdminPassword


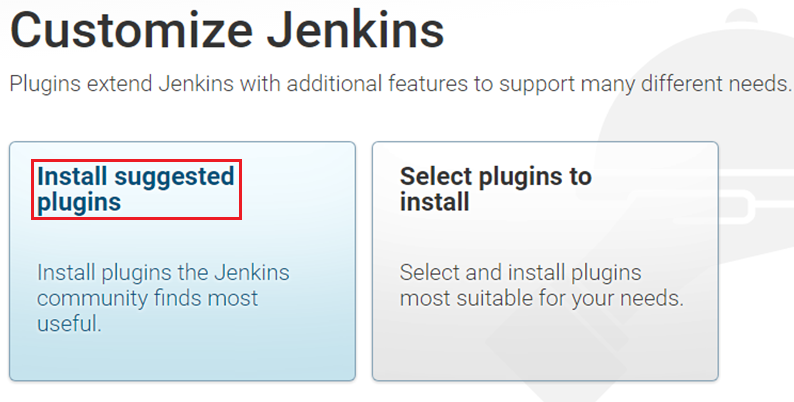
4. Customize the Jenkins by installing the Suggested Plugins.
Customize Jenkins by Selecting the Suggested Plugin

Customize Jenkins by Selecting the Suggested Plugin


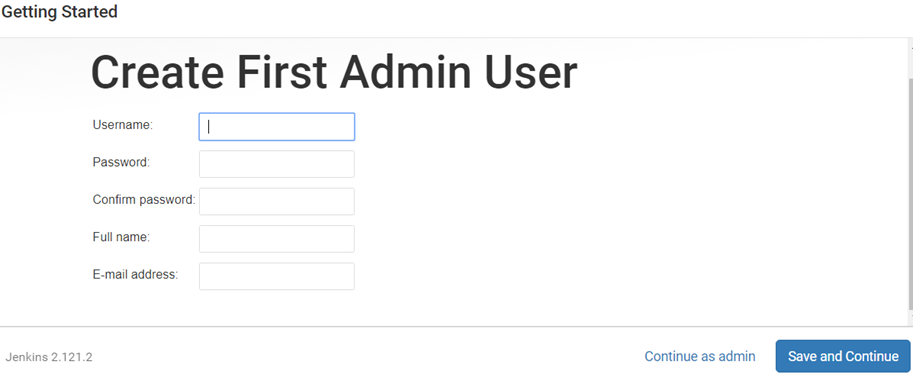
5. Create First Admin User. Provide username & password as admin/admin and Click on ‘Save and Continue’ button.
Jenkins First Admin User-admin/admin

Jenkins First Admin User-admin/admin


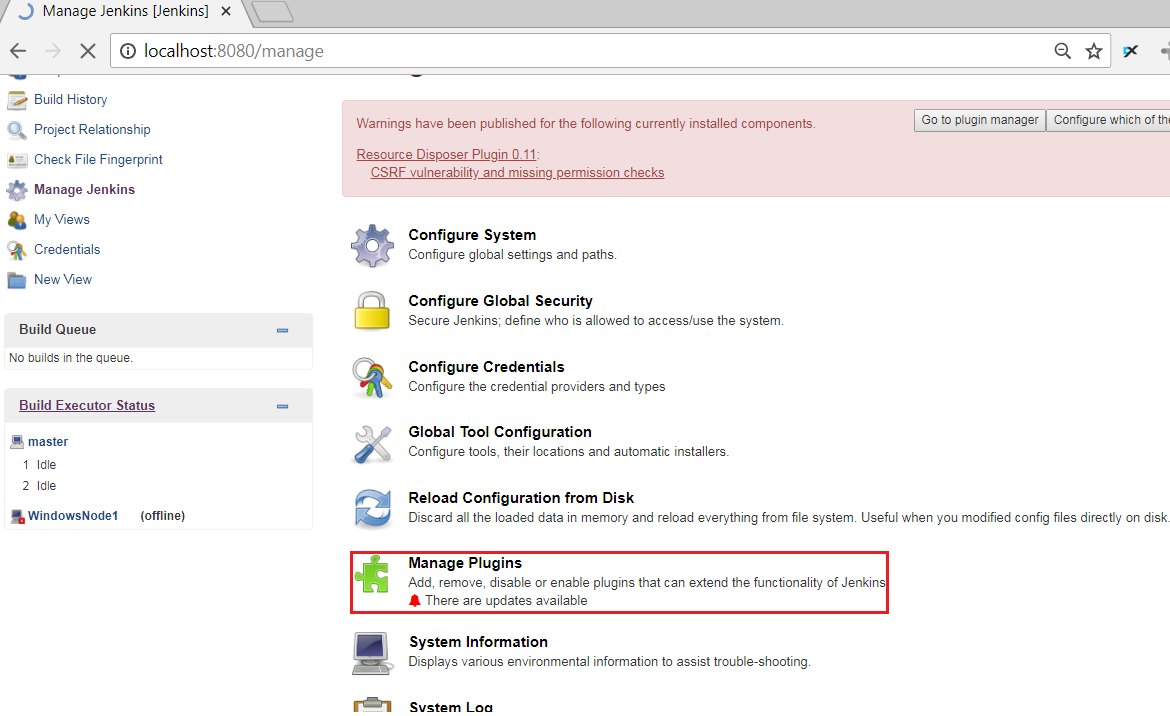
6. Once the Jenkins Configuration is done. Click on ‘Manage Jenkins->Manage Plugins’ link to install the required plugins.
Manage Jenkins->Manage Plugins->Upload .hpi to download any plugin in Jenkins.

Manage Jenkins->Manage Plugins->Upload .hpi to download any plugin in Jenkins.


7. Download the Plugins manually from this link https://updates.jenkins-ci.org/download/plugins/.
Upload an .hpi

Upload an .hpi


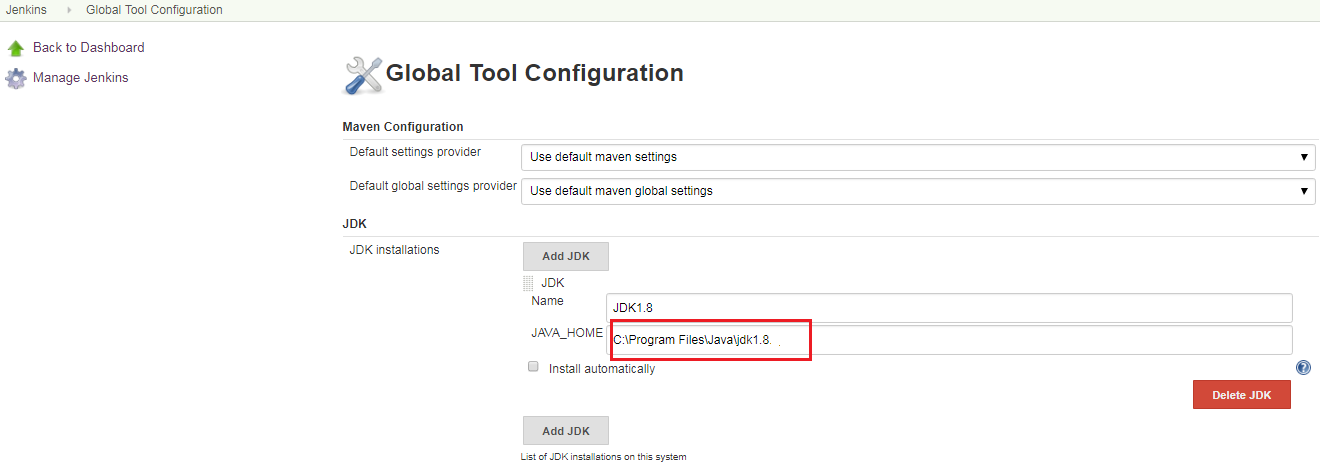
8. Update Global Tool Configuration by updating the Location of the software install by navigating to ‘Manage Jenkins->Global Tool Configuration’. Provide the location of JDK installed in the server/localhost.
Global Tool Configuration

Global Tool Configuration


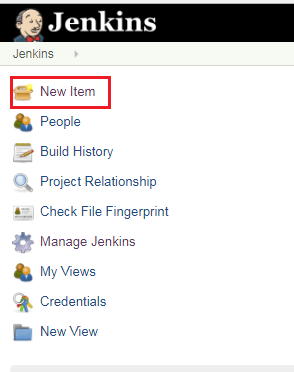
9. Create Jenkins Job by clicking on New Item.
Jenkins New Item

Jenkins New Item


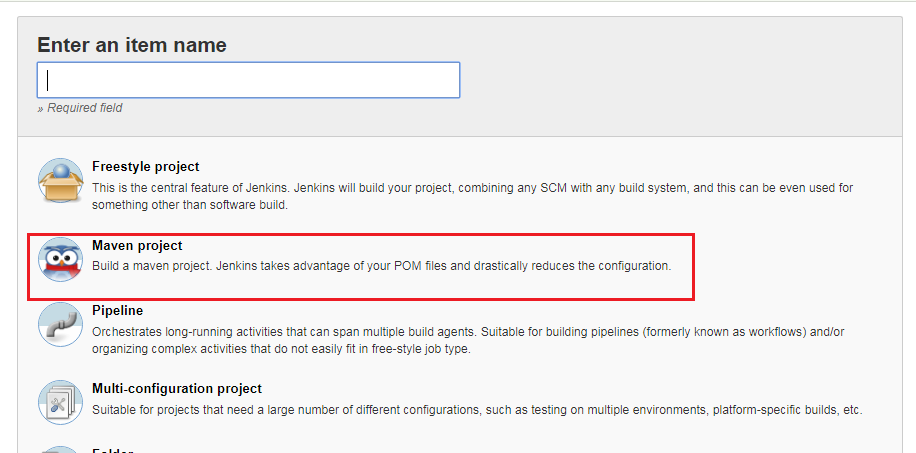
10. Select the Maven Project option and Provide the Item Name as .
New Item->Maven Project

New Item->Maven Project


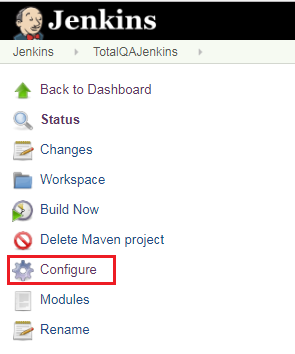
11. Click on Configure.
Configure Jenkins

Configure Jenkins


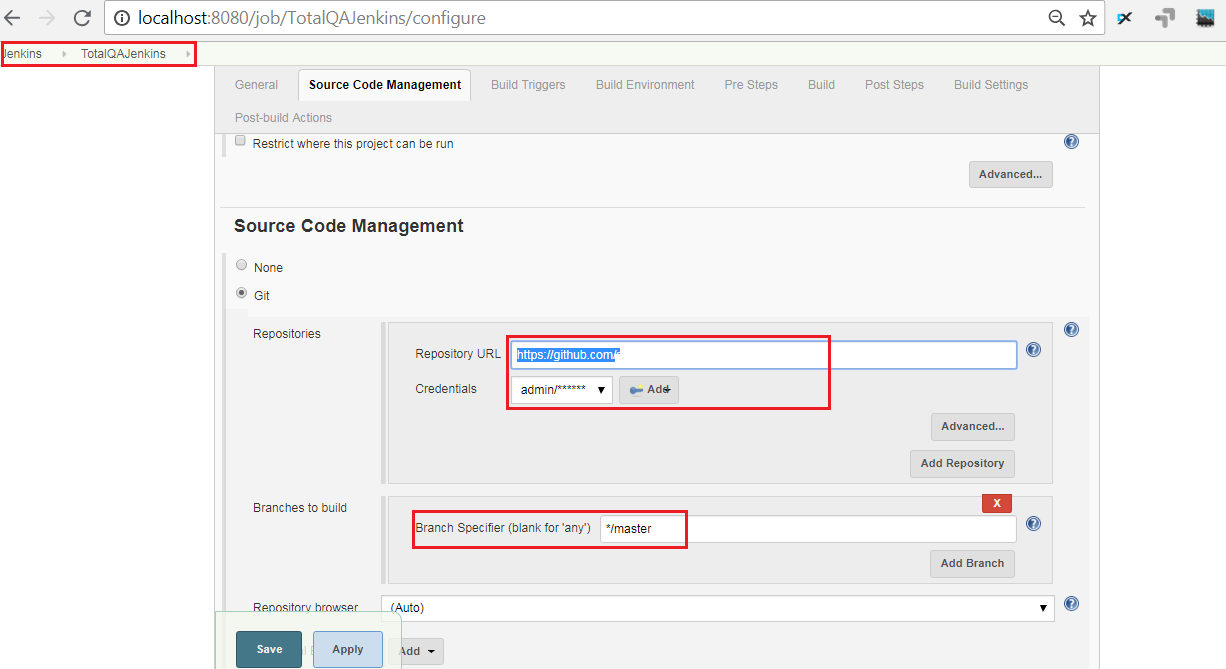
12. Provide the Github Repository URL and select the Branch.
Jenkins-Github Repo->Master branch

Jenkins-Github Repo->Master branch


13.Provide the Location of pom.xml and mention Maven Goals.
Jenkins - Maven pom.xml

Jenkins – Maven pom.xml


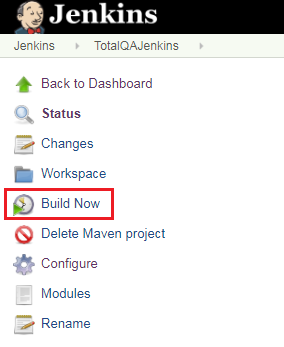
14. Click on Build Now.
Jenkins->Build Now

Jenkins->Build Now


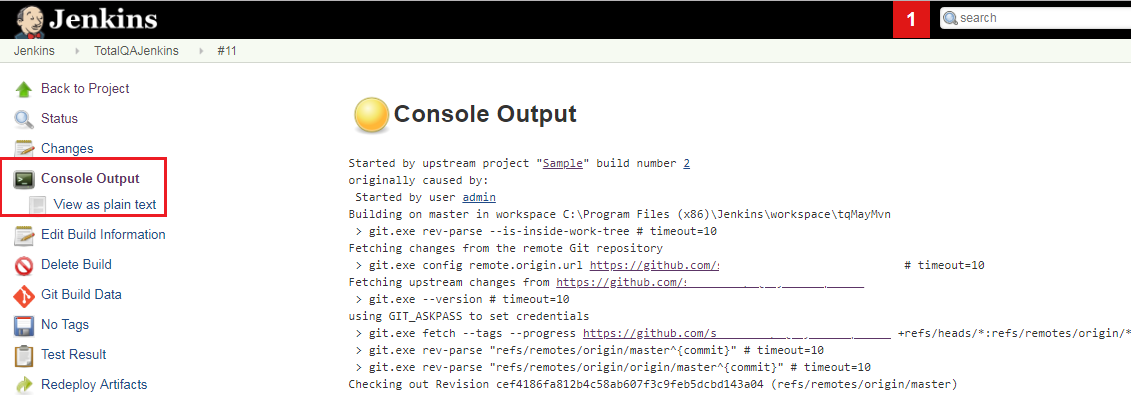
15. View the Results in Jenkins->Job Name->Job ID->Console Output.
Jenkins - Job #ID- Console Output- to view Results

Jenkins – Job #ID- Console Output- to view Results


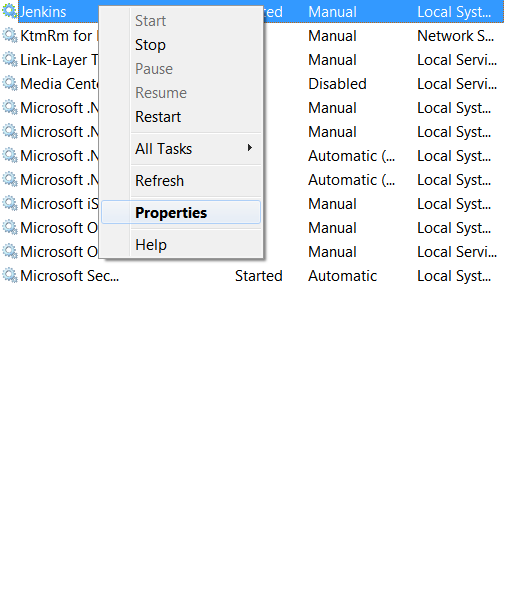
16. To view the Browser running in the back ground. Open the command . Select the Jenkins process.
Perform Right Click and do the steps.
Jenkins->Properties

Jenkins->Properties


Jenkins ->Service>Properties

Jenkins ->Service>Properties


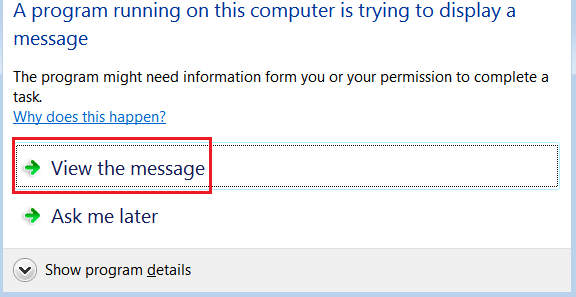
17. During the Execution the following dialog shows select the option ‘View the Message’ then
automatically we can view the execution on Browser.
Interactive Services Detection Dialog

Interactive Services Detection Dialog


18. Viewing the Results in Jenkins JOB.
Jenkins Job->Test Results

Jenkins Job->Test Results


[Solved]Error in Launching Eclipse on a MAC-Failed to find a Main Class

Refer to the below Links for Practise
Collections in Java
Complete List of Selenium Basics
50 Real Time Interview Questions
Real Time Scenario’s
Java Platform Standard Edition 8 Documentation
Java Quiz
Java OOPS Quiz
Selenium Advanced Quiz
Selenium Quiz


1. Once installation of Eclipse Latest Version – Photon on MAC from this Download link
http://www.eclipse.org/downloads/download.php?file=/technology/epp/downloads/release/photon/R/eclipse-java-photon-R-macosx-cocoa-x86_64.dmg
2. Navigate to the Downloads Folder.
3. Click on the the Disk Image File eclipse-java-photon-R-macosx-cocoa-x86_64.dmg file to launch the Eclipse.
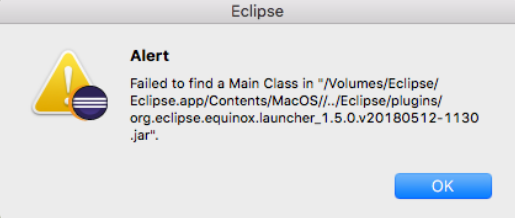
The following error shows:

Unable to Launch Eclipse - MAC

Unable to Launch Eclipse – MAC


Solution:
1. Open Terminal type the command “java -version“.
2. Make sure the latest version of Java > 1.8 is installed on a MAC Laptop.
3. Else Install the Java JDK 1.8 from this link on MAC helps to fix the issue.
http://download.oracle.com/otn-pub/java/jdk/8u181-b13/96a7b8442fe848ef90c96a2fad6ed6d1/jdk-8u181-macosx-x64.dmg

Tips on MAC:
Short cuts on MAC refer to the link -> https://support.apple.com/en-in/HT201236

Select the Date from DatePicker in Selenium WebDriver-Example for While loop


In this example we will discuss how to automate the
Date Picker in Selenium WebDriver.
This example also gives details about
the usage of while loop.As we know for and while loop looks
similar in objective. But while loop, helps to execute the
block only when the condition is true.

Difference between for loop and while loop
The for loop is used when you know how many times to execute the block of statements.
In the case of while loop when you are unsure how many iterations are required to
complete the given expression.

DatePicker
The datepicker is tied to a standard form input field. Focus on the input (click, or use the tab key) to open an interactive calendar in a small overlay. Select the date it will display in the input text box.

Real Time DatePicker Example
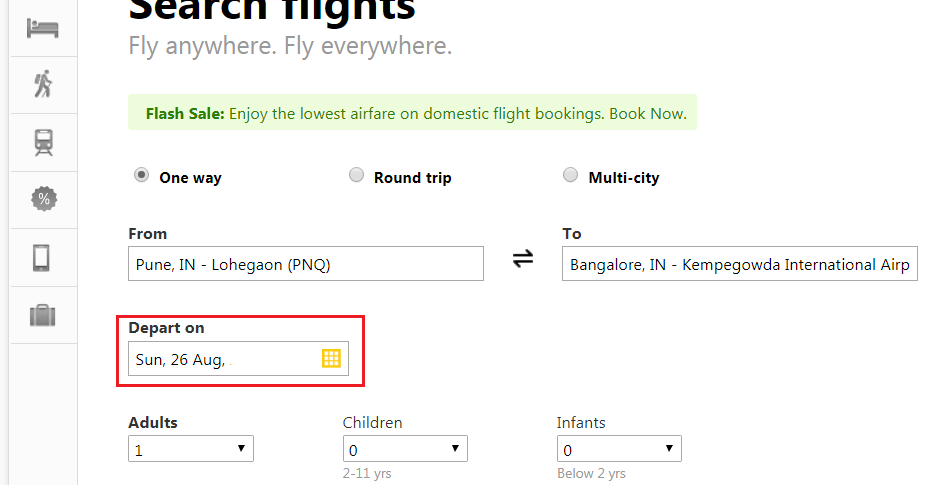
1. Access the Clear trip website using the following url:
https://www.cleartrip.com/
2. Identify the Input Text box.
3. Provide the Future Date to select the Departs on.

DatePicker.java

DatePicker.java


Selenium WebDriver Program

Test your Knowledge in Java,Selenium,HTML,QTP,CSS by attending Quiz!!!!
Quiz Link

Auto Suggestion & Auto Complete Text Box – visibilityOfAllElementsLocatedBy Example


In this Example we will focus on Handling Auto Suggestion or
Auto Complete Textbox in Web Based Applications like Yahoo in Selenium WebDriver. This Example helps
to understand the usage of Synchronization – Explicit Wait in Real time Scenario’s.
Also usage of the method
ExpectedConditions.visibilityOfAllElementsLocatedBy
in Selenium WebDriver.
Definition of Auto Complete
Autocomplete or Auto Suggestion allows the browser to predict the value. When a user starts to type in a field, the browser should display options to fill in the field, based on earlier typed values. The auto complete works
with the following input types: text, search, url,email and datepickers.

Scenario


1. Open the browser
2. Enter the url https://in.yahoo.com/?p=us
3. Type Selenium in the Search text box
4. It displays the options for Selenium
5. Select the text ‘Selenium Interview Questions’ from the display options.

yahoo.com

yahoo.com


Example

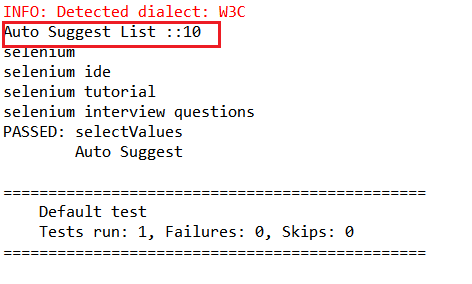
Console Output


Eclipse Console Output

Eclipse Console Output


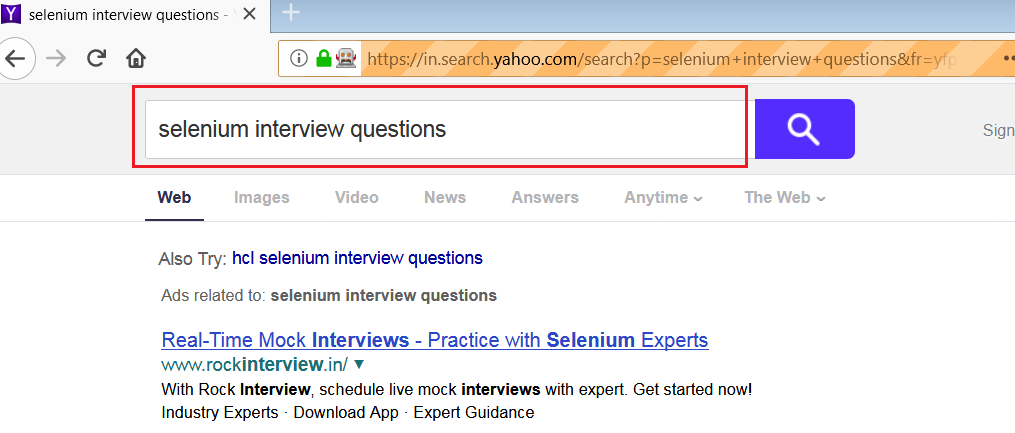
Search Results
Yahoo Search Results

Yahoo Search Results